• Steel Soldiers now has a few new forums, read more about it at: New Munitions Forums!

  • Microsoft MSN, Live, Hotmail, Outlook email users may not be receiving emails. We are working to resolve this issue. Please add support@steelsoldiers.com to your trusted contacts.

"Rescued" M816 Wrecker

Another Ahab

Well-known member
18,003
4,563
113
Location
Alexandria, VA
Hmmm.... ok,, theoretically, as I don't want to drop a tank right now for shnicks and giggles... Think Im leaving the driver side where it is, and either finding a different tank,,,, or,,,, if welding is involved,,, extend the pass tank (cut in half and weld in a section of sheetmetal) or modify crane hydro tank... but now that I think about it... extending the existing pass tank might be the better option as I would only have to weld in 1 maybe 2 bungs at that point instead of having to move the filler to a (side, now top) and plug the cut out....

Not trying to beat a dead horse but just a thought.
It's ALWAYS easier to think it through, and flip the ideas back one-at-a-time in your head, then to build it wrong and have to undo the build.

The design stage is the best stage to make all your mistakes. They're a lot less painful that way for sure.
 

red

Active member
1,988
25
38
Location
Eagle Mountain/Utah
Today a friend of mine came by and we worked on the air brake setup. Spent most of the day working on the front axle. Stripped down both ends of the axle to remove the seals which turned out to be a pain in the ass removing the seal on the driver side. Ended up taking the 5ft prybar and feeding it in through the axle from the passenger side, then used the sledge hammer.

IMG_20170401_122828381.jpg IMG_20170401_125958471.jpg IMG_20170401_130730984.jpg IMG_20170401_130755982.jpg


Installed the new front seal/retainer on the passenger side. Planning to finish the front axle tomorrow.

Spent some time using the torch to remove the rivets from one of the rear axle hubs.

IMG_20170401_122822300.jpg


Then took the sledge hammer and removed the plate

IMG_20170401_141639033.jpg


Although it takes some work, it's not as bad as I was expecting for the rivet removal.

We also installed all the studs into the front hubs/drums.


Been doing some cost research for the plumbing. Because of how much of the DOT approved steel braided hose I have, it will actually be cheaper to use that for plumbing the truck. Extreme overkill of hose strength haha.
 

red

Active member
1,988
25
38
Location
Eagle Mountain/Utah
Front passenger hub is now completely assembled. Removed the brake adjusters and worked them until they were able to function correctly then reassembled with a good amount of anti-seize. Axle shaft and both bearings greased, as well as all the nearby grease zerks.

IMG_20170403_145121136.jpg IMG_20170403_150138943_HDR.jpg IMG_20170403_162217476.jpg IMG_20170403_163111160.jpg IMG_20170403_163647507.jpg IMG_20170403_164212609_HDR.jpg IMG_20170403_180256802_HDR.jpg


Have to enlarge the hole in the frame for the airline flange stud tomorrow. Once that is done then the tire/wheel will be mounted and this hub will be complete. Planning to take care of the driver side front tomorrow which will finish up the front axle.
 
Last edited:

red

Active member
1,988
25
38
Location
Eagle Mountain/Utah
Not as productive today as I had planned but some progress at least. Couldn't find my step bit for the drill so had to go buy a new one.

Started off by opening up the hole through the frame for the airline flange fitting.

IMG_20170404_152328447.jpg


Next I ran a 16 1/2" airline from it down to the fitting on the air can. Removed the secondary fitting and plugged it off since I'm not duplicating the m939 setup, simplifying it to what is necessary. That finished up the passenger front.

IMG_20170404_154354656_HDR.jpg IMG_20170404_160627494_HDR.jpg


Over on the driver side installed the new seal/retaining ring in the axle, then enlarged the hole for the airline fitting and made it's hose.

IMG_20170404_162530767.jpg


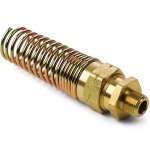
Using reusable hose ends. They cost a bit more but they are installed using 2 wrenches onto the hose.

IMG_20170404_163329277.jpg IMG_20170404_163619320.jpg
 

red

Active member
1,988
25
38
Location
Eagle Mountain/Utah
How does that first section of the two-part fitting work:

- Does it have female threads that bite into the end of the hose?
yes, it threads onto the outer part of the hose counter-clockwise. Then the second section is flared and threads into the hose/first section, pinching the hose between the fitting.
 

red

Active member
1,988
25
38
Location
Eagle Mountain/Utah
finally able to get the m816 off its outriggers today! Been sitting on them since late November when the disassembly for the airbrake conversion started. Finished up the front axle so finally felt comfortable letting the weight off of the outriggers.

IMG_20170405_184447835.jpg IMG_20170405_184549311.jpg IMG_20170405_192104726_HDR.jpg IMG_20170405_192117885_HDR.jpg


Greased everything on the driver side hub area, took little to none at the grease zerks. Used a total of 2 1/2 tubes between the axle shaft and the hub bearings. I run Primrose 327 grease, costs a bit more but works great and doesn't wipe off easily, if at all haha.

Big relief finally getting this thing off of the outriggers safely. Been sitting on them since November.
 
Last edited by a moderator:

zebedee

conceptualizer at large
Steel Soldiers Supporter
1,631
736
113
Location
Central NY
<snip>Big relief finally getting this thing off of the outriggers safely. Been sitting on them since November.
What did you do to stop the truck rolling forwards/backwards or sideways off of the outriggers since they are not rigid? Did you just cross your fingers and hope the fixed baseplate would be good enough?
 

red

Active member
1,988
25
38
Location
Eagle Mountain/Utah
Blocks of wood under each axle, and the rear tire blocked as well. So it was safe and stable, I just didn't like it sitting disabled like that for so long.
 

Valence

Well-known member
Steel Soldiers Supporter
2,112
555
113
Location
Davis County, UT
Blocks of wood under each axle, and the rear tire blocked as well. So it was safe and stable, I just didn't like it sitting disabled like that for so long.
I thought it was theft deterrent. :p

Unfortunately, that won't help you from the metal scrap thieves when they find the place.
 

red

Active member
1,988
25
38
Location
Eagle Mountain/Utah
Where it's at is alot like my old neighborhood back in Midland Texas. Had an issue in that neighborhood with some kids breaking into houses. 3rd house they broke into, both of them were killed. No theft issues after that. Plus there is security on site as well.

Not like anyone who's unfamiliar with this model wrecker could drive it anyways and the only way to haul it is with a semi-wrecker.
 

MyothersanM1

19K M1 Armor Crewman
Steel Soldiers Supporter
1,958
427
68
Location
Culver City, CA
Did you run the rubber/polymer hoses or the steel braided to the wheel ends?
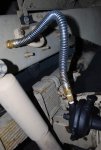
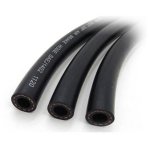
3/8" SAE J1402A Air Brake Hose and its associated fittings. Simple to repair in the field. The fitting just off of the chambers is a swivel to avoid any binding or kinking of the hose during steering.
J1402 air brake hose.jpgJ1402 reuseable fittings 1.jpg
 

red

Active member
1,988
25
38
Location
Eagle Mountain/Utah
3/8" SAE J1402A Air Brake Hose and its associated fittings. Simple to repair in the field. The fitting just off of the chambers is a swivel to avoid any binding or kinking of the hose during steering.
View attachment 674385View attachment 674384
Gotcha, the standard over the road air brake hose. It's a good choice (300psi, readily available, easy to work with), fiber braided for strength and the external metal coil you added helps with protection.

I'm running the 201 air brake/fluid hose, overkill. Steel braided with a fabric outer layer, 2000psi. Designed for rugged offroad use with air and fluid systems. Requires a tubing cutter to work with it. I have alot of 13/32" sitting here and I think enough 3/16" for the signal line for the rear service brakes.
 

MyothersanM1

19K M1 Armor Crewman
Steel Soldiers Supporter
1,958
427
68
Location
Culver City, CA
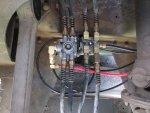
Some rear brake plumbing shots using the same hose. That's an R-12 relay valve for the service side and an SR-7 spring brake modulating valve all mounted to the cross member centered above the trunnion.

IMG_0347.jpgIMG_0332.jpgDSC_0022.jpg
 

red

Active member
1,988
25
38
Location
Eagle Mountain/Utah
Picture of the brake hose that I'm using
IMG_20170411_140845332_HDR.jpg


And the grease that I've been using on the truck.

IMG_20170411_141156645_HDR.jpg


Cut the hoses to length and figured out the routing for the plumbing going from the QR1 valve out to the frame studs for the front brakes yesterday. Removed the original T fitting that went from the air tank and plumbed to the original air pack and front emergency glad hand. Replaced it with a different T fitting, reconnected the plumbing to the front emergency glad hand, and installed a push lock fitting on the other side of the T. Was planning to do more on the airbrake conversion but that's how things go sometimes.

Did use the crane to move the dump truck remains forward. Had to get to the remains of the old LDT multifuel engine from the m35a2 in order to remove it's old injection pump pieces. Used the crane to lift up the front end while my friend got to test out his new winch.

IMG_20170415_134441467_HDR.jpg IMG_20170415_135523803.jpg IMG_20170415_135706466_HDR.jpg IMG_20170415_140817225_HDR.jpg IMG_20170415_170254946_HDR.jpg


I've decided to not build up the m103a2 as a tool/generator trailer. Instead going to build that into the m51a2 trailer project that starts later this year.
 

red

Active member
1,988
25
38
Location
Eagle Mountain/Utah
Spent today out at the wrecker. Those 9/16" rivets, well most of them on this 1 hub came out ok. Few seconds with the grinder to smooth them out then some air hammer work and 7 of them came out. Number 8 took some heat and sledge hammer work before it decided to come out. The last 2 however, took over 3 hours to drive them out. Ran out of acetalyne, snapped a drill bit, broke the end of a punch off, finally got the **** things out.

IMG_20170422_105712650.jpg IMG_20170422_113233827.jpg IMG_20170422_142946871_HDR.jpg


With them finally out went ahead and mounted the new airbrake backing plate. Passenger side middle axle.

IMG_20170422_152508036_HDR.jpg


Measured the wheelstuds, I have 3 total that are long enough for the rear hubs with the new air brake drums. Parts store is closed today so I'll have to swing by next week and pick up a total of 37. Thankfully the longer studs that were installed on the front hubs when converting to the 395's are long enough, just having to replace all the stock length rear studs.


Couldn't progress on the hubs anymore for now so went ahead and finished regreasing all the fittings on the truck. Having an air powered grease gun makes it much easier and a cleaner job.

Planning to mount the brake pedal tomorrow.
 

MyothersanM1

19K M1 Armor Crewman
Steel Soldiers Supporter
1,958
427
68
Location
Culver City, CA
Spent today out at the wrecker. Those 9/16" rivets, well most of them on this 1 hub came out ok. Few seconds with the grinder to smooth them out then some air hammer work and 7 of them came out. Number 8 took some heat and sledge hammer work before it decided to come out. The last 2 however, took over 3 hours to drive them out. Ran out of acetalyne, snapped a drill bit, broke the end of a punch off, finally got the **** things out.


Having an air powered grease gun makes it much easier and a cleaner job.
The rivets are a good time, huh?! What only 30 more to go?:smile: Sorry, didn't mean to make light of the situation. But, been there, done that! Did you grind the heads off or burn them off? With the shape of the OEM backing plates, it was difficult to get an angle grinder in there to get a good bite on them.


Those pneumatic grease are wonderful. They make short work of a tedious task. I love mine!
 

red

Active member
1,988
25
38
Location
Eagle Mountain/Utah
Yea the pneumatic grease guns are great. Using the flexible grease hose it's just one hand to hold the hose and the other hand just squeezes the trigger for a little while. When I first serviced the truck went through 5 tubes of grease just hitting all the grease zerks, no way am I doing that with a hand pumper hahaha.


Used the torch to cut the rivet heads off first. A 'scarfing' tip would be perfect on the torch for that work. Even with the standard straight tip like mine has it's fast and easy to do that part then knock the original brake backing plates off. Yep 30 more to go.

For anyone with the older 5 tons and you're planning to upgrade to the m939 series wedge brakes, it's a lot less labor to just swap the rear axles than to knock these rivets out.
 
Top
AdBlock Detected

We get it, advertisements are annoying!

Sure, ad-blocking software does a great job at blocking ads, but it also blocks useful features of our website like our supporting vendors. Their ads help keep Steel Soldiers going. Please consider disabling your ad blockers for the site. Thanks!

I've Disabled AdBlock
No Thanks