• Steel Soldiers now has a few new forums, read more about it at: New Munitions Forums!

  • Microsoft MSN, Live, Hotmail, Outlook email users may not be receiving emails. We are working to resolve this issue. Please add support@steelsoldiers.com to your trusted contacts.

What did you do to your deuce this week?

goodwithwood35

Active member
Steel Soldiers Supporter
327
51
28
Location
Bakersfield, CA
When I let off the accelerator, my tach bounces. If I’m maintaining speed or accelerating, mine stays put at the correct RPM.

My speedo used to bounce no matter what I did. I even pulled the cable off the back of the speedometer, filled it with brake cleaner, while driving to get all the crud out, then PB blaster and more lube. No luck, I assume it got so crud filled it kinked internally. I ended up replacing it with one of Big Mikes replacement ones. Fixed the problem.

I took the old one all apart and found the cable was decent, but the sheath had some burrs where it was coming unwound. It more than likely was as old as the 51 year old truck, and most people, even service shops forget to lube these things. And the little zerk on the speed adaptor at the transfer case.


Sent from my iPhone using Tapatalk
 

tobyS

Well-known member
4,832
833
113
Location
IN
I began putting the M35A3 together. It's a project I have put off, but have to sell something and my M931A2 hasn't sold, so the A3 gets my attention. Since I have troop seats and a cover, I started there and then went to tires. My cover is getting more damage off than it would on, so it gets assembled on the truck.

I found all the top and troop seat components except bows. Anyone have a set of metal bows?

I have 4 deascent 14.5r20's that have new o-rings and stem seals that are going on the back. They are going on without flipping the hubs for now, to get mobile. That will happen later. I put some old 10.00/20 on the front until I locate some really nice 365's or make the jump back to rear duals and the 365's on the front.

i noticed the rag top is getting several holes, so will head to the store for a temporary cover until I locate a hardtop or make one.

Next is the tranny. I have a complete rebuilt Allison ready to go in. Then seats....anyone have an extra drivers seat base ( to go on passengers side). I have new seats, just need one base.

She's going to be a nice truck, but has taken a lot of investment.
 

Wolfgang the Gray

Active member
Steel Soldiers Supporter
323
69
28
Location
New River, AZ
Did you notice at 4:38 the guy is applying grease to the studs. Even back then they new the advantage of lubricating the wheel studs. Of course today I would use "anti-seize" instead of grease.
I did notice that. I need to get some anti-seize.

I also noticed how easy it was to get the lug nuts off. Those French must be strong to remove nuts torqued to 300+ pounds with such ease.
 

cattlerepairman

Well-known member
Steel Soldiers Supporter
3,256
3,354
113
Location
NORTH (Canada)
A few other cool little tidbits...like to store the hydraulic jack either standing up or with the rubber air valve facing upwards. The fact that they have thimbels and lug nuts on the front (as used on the rear duals) is un-cool. The shovel method works and is a back saver. The French commentary is not shy to say that if you follow these simple instructions you will be able to swap tires without problems. If you get hurt or damage the equipment it is your own **** fault because you didn't pay attention to the required steps! Umm..politically incorrect, nowadays.
 

rustystud

Well-known member
9,280
2,987
113
Location
Woodinville, Washington
A few other cool little tidbits...like to store the hydraulic jack either standing up or with the rubber air valve facing upwards. The fact that they have thimbels and lug nuts on the front (as used on the rear duals) is un-cool. The shovel method works and is a back saver. The French commentary is not shy to say that if you follow these simple instructions you will be able to swap tires without problems. If you get hurt or damage the equipment it is your own **** fault because you didn't pay attention to the required steps! Umm..politically incorrect, nowadays.
I also like the "rocks" for support ! I know this is suppose to be a "field expedient" measure, but rocks ! Really ?!?!?!
Just carry some wood blocks if nothing else. Of course a jack-stand would be the preferred safest way.
Also you "never" torque the lug nuts with the truck wheel in the air. You just tighten them and lower the wheel back to the ground before really "reefing" on the lug nuts.
 

brianp454

Member
572
11
18
Location
Portland, OR
I ran up I-5 into WA and up to 67 MPH (per GPS) till I grabbed a fresh deli sandwich (yummy!) and two bags to groceries at Winco. Running the tank very low with a fuel can handy to burn off the last of the veg oil before it gets too cold.
 

Aussie Bloke

Well-known member
725
373
63
Location
Lost, out bush in OZ
G'day everyone,......

Did you notice at 4:38 the guy is applying grease to the studs. Even back then they new the advantage of lubricating the wheel studs. Of course today I would use "anti-seize" instead of grease.

My Father always taught me to put a couple of drops of engine oil on the leading edge of the threads if thay were dry.[
As you turn the nut it spreads the oil as needed and stops them from seizing.

Also I was taught to lower the wheel onto the ground until there is just enough weight on it to apply enough friction to stop the wheel turning when you tighten the wheel nuts.
This will allow the wheel to move if needed as the nuts tighten, then you put the full weight on the wheels.

Anyway, that's what I was taught.


Aussie.
 

rustystud

Well-known member
9,280
2,987
113
Location
Woodinville, Washington
G'day everyone,......


My Father always taught me to put a couple of drops of engine oil on the leading edge of the threads if thay were dry.[
As you turn the nut it spreads the oil as needed and stops them from seizing.

Also I was taught to lower the wheel onto the ground until there is just enough weight on it to apply enough friction to stop the wheel turning when you tighten the wheel nuts.
This will allow the wheel to move if needed as the nuts tighten, then you put the full weight on the wheels.

Anyway, that's what I was taught.


Aussie.
If you tighten up the lug nuts properly the wheel will "seat" itself and then you can lower it to the ground to really torque the lug nuts.
 

frank8003

In Memorial
In Memorial
6,426
4,985
113
Location
Ft. Lauderdale, Florida
So ............
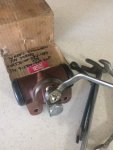
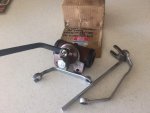
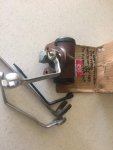
When bleeding the Deuce brakes, having read the TM and being alone, what did everybody come up with as a tool to get in there to the bleeder screw. And did anybody ever find little caps for the bleeder screw ends to keep out the road filth?
Says just use a combination wrench but I found the Army must have different tools.
I bent up a lot of wrenches just trying to figure it out. Probably I missed something like use tool # J-302 or something. Anyhow I bent up lots of wrenches, That was the only thing holding me up with the one man brake bleeder setup. I have not seen this reference to "special tools" anyplace, but then I may have missed it. What has all the SS used?
I will laugh with you, it is OK, me not having a firm grasp of the obvious.

IMG_5016.jpgIMG_5018.jpgIMG_5017.jpg
 

frank8003

In Memorial
In Memorial
6,426
4,985
113
Location
Ft. Lauderdale, Florida
G'day everyone,......
My Father always taught me to put a couple of drops of engine oil on the leading edge of the threads if thay were dry.[As you turn the nut it spreads the oil as needed and stops them from seizing.
Also I was taught to lower the wheel onto the ground until there is just enough weight on it to apply enough friction to stop the wheel turning when you tighten the wheel nuts.
This will allow the wheel to move if needed as the nuts tighten, then you put the full weight on the wheels.
Anyway, that's what I was taught. Aussie.
TM says to use a bit of 30W motor oil, and the cap nuts, which I call thimbols are to be tossed after each use.
Hey it is only a TM
 

tobyS

Well-known member
4,832
833
113
Location
IN
I agree they need something to keep the crud out. I have a new set for my truck too. Might find a poly tube the right size to slip on tight and then stick a spot of silicone in the other end and let it dry.

Since I haven't looked, does the wrench have to be bent that way? I like the closed box the best.
 
Last edited:

rustystud

Well-known member
9,280
2,987
113
Location
Woodinville, Washington
So ............
When bleeding the Deuce brakes, having read the TM and being alone, what did everybody come up with as a tool to get in there to the bleeder screw. And did anybody ever find little caps for the bleeder screw ends to keep out the road filth?
Says just use a combination wrench but I found the Army must have different tools.
I bent up a lot of wrenches just trying to figure it out. Probably I missed something like use tool # J-302 or something. Anyhow I bent up lots of wrenches, That was the only thing holding me up with the one man brake bleeder setup. I have not seen this reference to "special tools" anyplace, but then I may have missed it. What has all the SS used?
I will laugh with you, it is OK, me not having a firm grasp of the obvious.

View attachment 706665View attachment 706667View attachment 706666
I've never had a problem getting to the bleeder screws. Just use my regular line wrench.
 

brianp454

Member
572
11
18
Location
Portland, OR
Fuel Filters

Note I have intentionally been running my fuel filters longer than I think they should be, especially considering the alternative fuels I run constantly. I wanted to test to failure and replace them at first sign of trouble. It looks like I found that point.

Yesterday I went for a spin to meet a couple buddies for lunch and was running low on fuel and carrying a couple fuel cans (one 5 gallon of diesel and one 2 gallon of gas just in case) to continue thinning out the veg oil I’d been running over the Summer. I got about ½ way to my destination and in a bad spot (no shoulder to pull off) when she started to sputter a bit (note she normally purrs like a kitten) and have one of those massive bouncy unloaded rear events at the same time. RATS! I came to a safe place to pull off with a shoulder and a break in traffic and began to add the 5 gallons of diesel from this new fancy “safe” canister. RATS! I spilled all over, got it up my sleeve, spilled on my pants, all over the ground, etc. RATS! Those #$%^ “safety” “environmental” or WTF OVER POS cans are the worst! Thanks for ruining my pants whoever forced that stupidity on us… Anyway, with some more fuel in I got to where I was going but she still sputtered a bit.

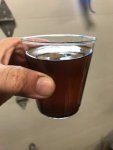
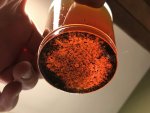
On the way home she ran perfect with no issues. So then when I got home I thought I would drain the primary (NAPA 3405 | WIX33405 JATonka kit) before shutting it off. I backed off the drain and it was sticky with nothing coming out, so I kept on backing it out. This is one of those situations in a guy’s mind where he knows something is amiss, yet keeps going. Error in judgment alert! I kept backing it out waiting for a dribble and just kept going even though nothing was coming out. All the sudden the plug flow out and began spraying into this little cup that I planned to use to capture the crud and play show and tell with yall. Note this pic is from after all of this played out, yet shows why nothing came out at first.

Soooo, with a 5/16 inch or so diameter column of fuel|veg oil blend spraying down and the plug nowhere in sight, I went running for the fuel cutoff and power switch. With that off I ran back looking for the plug with a column of fuel still spraying on the ground… And then it starts to pour down rain… I find the plug and begin to thread it in with a nice flow of fuel dribbling down my arm and into my clean shirt and jacket… I managed to get the plug back in and cross-threaded it in the process. The plastic plug seems to have swollen due to exposure to my fuel blends.

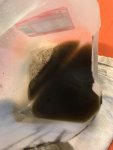
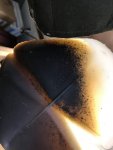
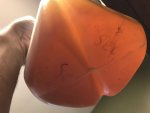
I decided it was time to replace the primary fuel filter. I carry a spare set in the tool box just in case. Upon seeing the debris in the primary (see pics without SEC, see below), I decided it was time to replace the secondary filters also. Thanks to having the JATonka secondary kit also, it just took a few minutes. Looking back through my records I found:
5/5/13, 39,864 miles, 1,609 hours – replaced primary and secondary fuel filters
11/2/17, 46,279 miles, 1,828 hours – replaced primary and secondary fuel filters

171102 M35A2 Primary Fuel Filter Crud 1.jpg171102 M35A2 Primary Fuel Filter Crud 2.jpg171102 M35A2 Primary Fuel Filter Crud 3.jpg171102 M35A2 Primary Fuel Filter Crud 4.jpg171102 M35A2 Secondary Fuel Filter Crud.jpg
The small cup is what I captured as the primary plug popped off and the milk jug is the dump from the primary filter. The pic of the milk jug bottom with SEC written on it is what came out of my secondary filters. It’s pretty clean, so it seems the primary has been doing a great job of catching the crud. The crud did not move when I waved a magnet by them and when feeling them the hunks seem like rubber. Any ideas on what this crud is?

I need to make it more of a habit of draining the primary periodically and probably should replace the filters more often. I took her for a spin again this morning, took on 17 gallons of #2 to continue thinning the veg oil, and she is purring like a kitten again.
 
Last edited:

Tracer

Well-known member
Steel Soldiers Supporter
6,555
13,939
113
Location
Hawthorne, NV.
Note I have intentionally been running my fuel filters longer than I think they should be, especially considering the alternative fuels I run constantly. I wanted to test to failure and replace them at first sign of trouble. It looks like I found that point.

Yesterday I went for a spin to meet a couple buddies for lunch and was running low on fuel and carrying a couple fuel cans (one 5 gallon of diesel and one 2 gallon of gas just in case) to continue thinning out the veg oil I’d been running over the Summer. I got about ½ way to my destination and in a bad spot (no shoulder to pull off) when she started to sputter a bit (note she normally purrs like a kitten) and have one of those massive bouncy unloaded rear events at the same time. RATS! I came to a safe place to pull off with a shoulder and a break in traffic and began to add the 5 gallons of diesel from this new fancy “safe” canister. RATS! I spilled all over, got it up my sleeve, spilled on my pants, all over the ground, etc. RATS! Those #$%^ “safety” “environmental” or WTF OVER POS cans are the worst! Thanks for ruining my pants whoever forced that stupidity on us… Anyway, with some more fuel in I got to where I was going but she still sputtered a bit.

On the way home she ran perfect with no issues. So then when I got home I thought I would drain the primary (NAPA 3405 | WIX33405 JATonka kit) before shutting it off. I backed off the drain and it was sticky with nothing coming out, so I kept on backing it out. This is one of those situations in a guy’s mind where he knows something is amiss, yet keeps going. Error in judgment alert! I kept backing it out waiting for a dribble and just kept going even though nothing was coming out. All the sudden the plug flow out and began spraying into this little cup that I planned to use to capture the crud and play show and tell with yall. Note this pic is from after all of this played out, yet shows why nothing came out at first.

Soooo, with a 5/16 inch or so diameter column of fuel|veg oil blend spraying down and the plug nowhere in sight, I went running for the fuel cutoff and power switch. With that off I ran back looking for the plug with a column of fuel still spraying on the ground… And then it starts to pour down rain… I find the plug and begin to thread it in with a nice flow of fuel dribbling down my arm and into my clean shirt and jacket… I managed to get the plug back in and cross-threaded it in the process. The plastic plug seems to have swollen due to exposure to my fuel blends.

I decided it was time to replace the primary fuel filter. I carry a spare set in the tool box just in case. Upon seeing the debris in the primary (see pics without SEC, see below), I decided it was time to replace the secondary filters also. Thanks to having the JATonka secondary kit also, it just took a few minutes. Looking back through my records I found:
5/5/13, 39,864 miles, 1,609 hours – replaced primary and secondary fuel filters
11/2/17, 46,279 miles, 1,828 hours – replaced primary and secondary fuel filters

View attachment 706821View attachment 706822View attachment 706823View attachment 706824View attachment 706827
The small cup is what I captured as the primary plug popped off and the milk jug is the dump from the primary filter. The pic of the milk jug bottom with SEC written on it is what came out of my secondary filters. It’s pretty clean, so it seems the primary has been doing a great job of catching the crud. The crud did not move when I waved a magnet by them and when feeling them the hunks seem like rubber. Any ideas on what this crud is?

I need to make it more of a habit of draining the primary periodically and probably should replace the filters more often. I took her for a spin again this morning, took on 17 gallons of #2 to continue thinning the veg oil, and she is purring like a kitten again.
Brian, I've seen gas cap o'rings crack, crumble, and end up in the fuel tank. Once they get in, they dissolve, and become crud. 2cents
 

Engineer 1SG

New member
29
0
1
Location
Eastern Shore of Virginia
Replaced my seat shock today.

The factory seat in my deuce was bottoming out on severe ruts and potholes and was generally unforgiving. I’m sure it had nothing to do with me being 6’ 2” and 275 pounds :roll:, so I figured that the shock must have worn out. I researched through this site and found that the Polaris shock was a close match, so I purchased one and installed it.

The first picture is of the Polaris shock, part number 04-237. I almost panicked when I first received the shock, thinking they sent the wrong one, as this should not be a coil over shock, but it was just a generic picture on the box.

The second picture shows a comparison in size between the original Gabriel shock at the top, and the new Polaris shock at the bottom. The Polaris shock extends slightly further than the original shock.

The third picture compares the shocks in the compressed position. As you can see, the Polaris shock, when compressed, is about ½” longer than the original shock. However, as you can see in the second picture, it appears that the seat never compressed the original shock completely, as demonstrated by the dirt and lack of wear at the top of the shock shaft. Checking after installation confirmed that the seat does not compress the Polaris shock completely, allowing full range of motion without binding due to its length.

As mentioned on other posts on this site, the Polaris shock has a smaller diameter bushing, which turned out to be 10mm (.3937”), while the original shock has bushings of 7/16” (.4375”). Using a sharp 7/16” drill bit and plenty of lubrication, I was able to bore the Polaris shock’s bushings out to 7/16” on a drill press very easily; I did not need to hold them, as the bushings held firm in the shock.

The only issue I found was that the Polaris shock has a slightly larger diameter body than the original Gabriel shock. This causes the body of the Polaris shock to hit the rear frame brace of the seat when the seat is empty and fully upright. You can see this in the fourth picture. Hopefully this won’t be a problem, as the body of the shock will only hit the frame when the seat is empty. I’ll keep an eye on the shock over time to see what effect hitting the frame of the seat will have on the shock. I’m not sure how tight the tolerances were when these seat frames were welded up; others may or may not have the same problem if you use the Polaris shock.

1.jpg2.jpg3.jpg4.jpg
 

brianp454

Member
572
11
18
Location
Portland, OR
Hello Engineer 1SG,

I'm about 100 pounds less than you, but also sometimes have my seat top and bottom out. I bet the shock is shot, no pun intended. I understand the Monroe 66104 is an exact fit for the original and is about $65. Why did you go through all the trouble for the Polaris shock? How did it end up working?

The factory seat in my deuce was bottoming out on severe ruts and potholes and was generally unforgiving. I’m sure it had nothing to do with me being 6’ 2” and 275 pounds :roll:, so I figured that the shock must have worn out. I researched through this site and found that the Polaris shock was a close match, so I purchased one and installed it.

The first picture is of the Polaris shock, part number 04-237. I almost panicked when I first received the shock, thinking they sent the wrong one, as this should not be a coil over shock, but it was just a generic picture on the box.

The second picture shows a comparison in size between the original Gabriel shock at the top, and the new Polaris shock at the bottom. The Polaris shock extends slightly further than the original shock.

The third picture compares the shocks in the compressed position. As you can see, the Polaris shock, when compressed, is about ½” longer than the original shock. However, as you can see in the second picture, it appears that the seat never compressed the original shock completely, as demonstrated by the dirt and lack of wear at the top of the shock shaft. Checking after installation confirmed that the seat does not compress the Polaris shock completely, allowing full range of motion without binding due to its length.

As mentioned on other posts on this site, the Polaris shock has a smaller diameter bushing, which turned out to be 10mm (.3937”), while the original shock has bushings of 7/16” (.4375”). Using a sharp 7/16” drill bit and plenty of lubrication, I was able to bore the Polaris shock’s bushings out to 7/16” on a drill press very easily; I did not need to hold them, as the bushings held firm in the shock.

The only issue I found was that the Polaris shock has a slightly larger diameter body than the original Gabriel shock. This causes the body of the Polaris shock to hit the rear frame brace of the seat when the seat is empty and fully upright. You can see this in the fourth picture. Hopefully this won’t be a problem, as the body of the shock will only hit the frame when the seat is empty. I’ll keep an eye on the shock over time to see what effect hitting the frame of the seat will have on the shock. I’m not sure how tight the tolerances were when these seat frames were welded up; others may or may not have the same problem if you use the Polaris shock.

View attachment 707406View attachment 707407View attachment 707408View attachment 707409
 

Engineer 1SG

New member
29
0
1
Location
Eastern Shore of Virginia
Hello Engineer 1SG,

I'm about 100 pounds less than you, but also sometimes have my seat top and bottom out. I bet the shock is shot, no pun intended. I understand the Monroe 66104 is an exact fit for the original and is about $65. Why did you go through all the trouble for the Polaris shock? How did it end up working?
It really wasn't much trouble to replace the shock; it was relatively easy to drill out the bushings. I hadn't seen the Monroe shock in my searches for a compatible shock on this site; most people were using the Polaris type shock successfully, so that's what I went with. I paid $25.99 for the Polaris shock (plus shipping). I took the complete seat out of the deuce, which made replacing the shock simpler in my shop, and I haven't put the seat back in the deuce to test it out yet. I bounced up and down on the seat in the shop to test the compression and extension of the shock. I'll report back how it feels in the truck once I get the seat put back in this weekend.
 
Top
AdBlock Detected

We get it, advertisements are annoying!

Sure, ad-blocking software does a great job at blocking ads, but it also blocks useful features of our website like our supporting vendors. Their ads help keep Steel Soldiers going. Please consider disabling your ad blockers for the site. Thanks!

I've Disabled AdBlock
No Thanks