• Steel Soldiers now has a few new forums, read more about it at: New Munitions Forums!

  • Microsoft MSN, Live, Hotmail, Outlook email users may not be receiving emails. We are working to resolve this issue. Please add support@steelsoldiers.com to your trusted contacts.

MEP-804A Diode Ring Destroyed

peapvp

Well-known member
Steel Soldiers Supporter
1,115
1,229
113
Location
Basehor, KS
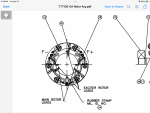
Agreed, but let's not overlook that the manufacturer said that they discontinued the press-fit, as in the 60-Hz, first picture, and began using the stud-mounted similar to the one in the second picture. They went on to say that the replacement ring also accepts the press-fit diodes.
I suspect that mine may have been hand crafted, which would explain the presence of red paint on the back and absence of green paint, the manufacturer's color.
Evvy,

The question boils down to of which Diodes they installed
 

Guyfang

Moderator
Staff member
Moderator
16,766
24,076
113
Location
Burgkunstadt, Germany
Ok, here is the story as told to me.

Marathon original diode ring was sub standard. Add to that, press in diodes. Harder to replace when just diodes are bad. AND, that drove up the cost of repair. Why by a whole ring, when its just a diode bad? The military had lots of failures. So many, that the military drew up there own diode bridge assy. and had it made by an outside source. So many of the 804A and B models got the diode ring changed out. And many, when they went in for RESET, or other repair, had main gens pulled out and sent to a repair shop. Hence, different colors in the main gen.
 

Guyfang

Moderator
Staff member
Moderator
16,766
24,076
113
Location
Burgkunstadt, Germany
So, this should be a warning to all 804 A/B owners:

There seems to be an x amount of 50Hz/60Hz 804's floating around out there which have the 400 Hz Diode Ring Installed.

The Diodes are different:
The Diodes on the 50Hz / 60Hz Diode Rings have a Lower Current Rating and a lower maximum Voltage then 400 Hz Unit's

Theoretically, this should not be a problem but the impedance the Voltage Regulator "see's" is quite different in both setups.
That's why they have two different Voltage Regulators for the different frequencies. I am not so sure that I agree with this explanation. We have two different voltage regulator systems because the military let two different companies make different systems. And other sets, like 805's and 806, which also have different voltage reg systems, have had no, or rare, diode ring failures.
Open to read comments
 

peapvp

Well-known member
Steel Soldiers Supporter
1,115
1,229
113
Location
Basehor, KS
Ok, here is the story as told to me.

Marathon original diode ring was sub standard. Add to that, press in diodes. Harder to replace when just diodes are bad. AND, that drove up the cost of repair. Why by a whole ring, when its just a diode bad? The military had lots of failures. So many, that the military drew up there own diode bridge assy. and had it made by an outside source. So many of the 804A and B models got the diode ring changed out. And many, when they went in for RESET, or other repair, had main gens pulled out and sent to a repair shop. Hence, different colors in the main gen.
Oh what a Story,
If you built your own Diode Ring use the 1N1160 and 1N1160R, they are definitely the better Diodes.
Don't forget lock washers on everything is threaded on this assembly, otherwise it will become a projectile at 1,800 rpm
 
Last edited:

peapvp

Well-known member
Steel Soldiers Supporter
1,115
1,229
113
Location
Basehor, KS
Open to read comments
Just read your explanation, and posted a Diode recommendation.
However, if I understood Evvy correctly, then on her Diode Ring with the 1N1190 / 1N1190R there were no lock washers.

That's why I would recommend that if you own a 804 A/B to very thoroughly check your Diode Ring and replace before they brake.
 

peapvp

Well-known member
Steel Soldiers Supporter
1,115
1,229
113
Location
Basehor, KS
Open to read comments
Guy,

I was under the impression that the 400Hz Versions always used a different AVR then the 50Hz/60Hz
On the 002A/ 003A / 004A / 005A A11 there are quite a few parts (Resistors, Diodes, Capacitors) on the Voltage Regulator Board which you have to change between 50Hz/60Hz and 400Hz
The same is basically correct for the the 800's Series to my knowledge.

However, the 1N1160 1N1160R can do both where the 1N3663 1N3663R are the older Devices and do not respond as well to required performance of the 400 Hz systems besides that the Voltage at 400 Hz is 120VAC
 

Evvy Fesler

Well-known member
366
772
93
Location
Roxboro, North Carolina USA
So, this should be a warning to all 804 A/B owners:

There seems to be an x amount of 50Hz/60Hz 804's floating around out there which have the 400 Hz Diode Ring Installed.

The Diodes are different:
The Diodes on the 50Hz / 60Hz Diode Rings have a Lower Current Rating and a lower maximum Voltage then 400 Hz Unit's

Theoretically, this should not be a problem but the impedance the Voltage Regulator "see's" is quite different in both setups.
That's why they have two different Voltage Regulators for the different frequencies.
Suggested edit: There seems to be an x amount of 50Hz/60Hz 804's floating around out there which *may* have the 400 Hz Diode Ring Installed.
 

Evvy Fesler

Well-known member
366
772
93
Location
Roxboro, North Carolina USA
Just read your explanation, and posted a Diode recommendation.
However, if I understood Evvy correctly, then on her Diode Ring with the 1N1190 / 1N1190R there were no lock washers.

That's why I would recommend that if you own a 804 A/B to very thoroughly check your Diode Ring and replace before they brake.
This was a very expensive learning exercise. I think I'll use both lock washers AND thread lock compound. 😜
 

peapvp

Well-known member
Steel Soldiers Supporter
1,115
1,229
113
Location
Basehor, KS
Ok, here is the story as told to me.

Marathon original diode ring was sub standard. Add to that, press in diodes. Harder to replace when just diodes are bad. AND, that drove up the cost of repair. Why by a whole ring, when its just a diode bad? The military had lots of failures. So many, that the military drew up there own diode bridge assy. and had it made by an outside source. So many of the 804A and B models got the diode ring changed out. And many, when they went in for RESET, or other repair, had main gens pulled out and sent to a repair shop. Hence, different colors in the main gen.
Guy,
New Jersey Semiconductor advertised the 1N3663 1N3663R as:

iN3659thru 1N3663 (SILICON)
(DO-21)
Low-cost silicon rectifiers in hermetically sealed,
press-fit case, designed for operation under severe
environmental conditions. Cathode connected to case,
but available with reverse polarity by adding suffix
"R" to type number.
 

Attachments

peapvp

Well-known member
Steel Soldiers Supporter
1,115
1,229
113
Location
Basehor, KS
Evvy,

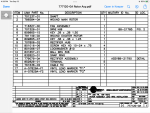
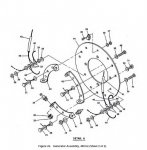
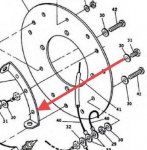
Reflecting on this missing lock washer issue and the explosion drawing of the 400 Hz Assembly, I would like to point out the following:
The Disk #44 is a composite of
1 Disks Part # B-718817-01
3 Disk Part # B-718930-01

those are held together with lock washer #30 and Machine Screw # 31 to Brackets # 43

the diodes itself are screwed to bracket # 43 with lock washer # 30 and Nut # 33

sofar so good, now do you know or can you tell us if the lock washer #30 was used on Diodes? Or did your assembly have no lock washers # 30 and or # 38 at all?

The lock washer # 30 with machine screw # 31 which secure the bracket # 43 to theFiberglass rings are the tricky ones when assembling this Diode Ring.

If you torque machine screw # 31 to high then lock washer #30 will grind its teeth to far into the first disk.

This lock washer then will act as a grinder on the first fiberglass ring.

Conclusion:
The machine screws # 31 have to be torqued to a specific value so lock washer # 30 doesn’t damage the first fiberglass ring but still locks everything together under vibration.

Without any lock washer, the results are pretty clear.

Maybe you can sweet talk Marathon to tell you to what torque these machine screws should be torqued to when using the lock washer # 30?

65B2B6B4-40B7-4A60-9B49-EE3406BBACDF.jpeg
D2808197-F407-438C-B4DD-9C3E39FBAC62.png
4ECFA6C2-083A-4685-8B0C-0DE516D9A571.png

Peter
 
Last edited:

Evvy Fesler

Well-known member
366
772
93
Location
Roxboro, North Carolina USA
Evvy,

Reflecting on this missing lock washer issue and the explosion drawing of the 400 Hz Assembly, I would like to point out the following:
The Disk #44 is a composite of
1 Disks Part # B-718817-01
3 Disk Part # B-718930-01

those are held together with lock washer #30 and Machine Screw # 31 to Brackets # 43

the diodes itself are screwed to bracket # 43 with lock washer # 30 and Nut # 33

sofar so good, now do you know or can you tell us if the lock washer #30 was used on Diodes? Or did your assembly have no lock washers # 30 and or # 38 at all?

The lock washer # 30 with machine screw # 31 which secure the bracket # 43 to theFiberglass rings are the tricky ones when assembling this Diode Ring.

If you torque machine screw # 31 to high then lock washer #30 will grind its teeth to far into the first disk.

This lock washer then will act as a grinder on the first fiberglass ring.

Conclusion:
The machine screws # 31 have to be torqued to a specific value so lock washer # 30 doesn’t damage the first fiberglass ring but still locks everything together under vibration.

Without any lock washer, the results are pretty clear.

Maybe you can sweet talk Marathon to tell you to what torque these machine screws should be torqued to when using the lock washer # 30?

View attachment 879133
View attachment 879134
View attachment 879135

Peter
Hi Peter,

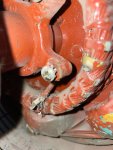
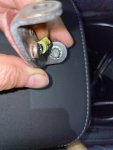
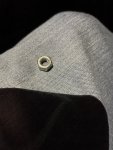
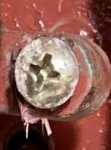
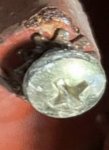
Curiosity got the better of me. I rummaged around the barn and found a low magnification dissection scope that I had bought my children years ago for home inspired science projects. Upon examination of the fiberglass surface I was able to see the typical pattern of an external tooth lock washer. I also found that two bolts and lock washers were present in the bracket and I had just missed them. If you look closely at the picture you may notice that the head of the bolt is smaller than the circumference of the lock washer. That’s not good. This type of lock washer employs the strut effect to put up superior torque resistance. But… the teeth (struts) have to be in contact with both the substrate and the bolt head. Clearly it isn’t. An internal tooth lock washer would have been a better choice for this bolt.
 

Attachments

Evvy Fesler

Well-known member
366
772
93
Location
Roxboro, North Carolina USA
Hi Peter,

Curiosity got the better of me. I rummaged around the barn and found a low magnification dissection scope that I had bought my children years ago for home inspired science projects. Upon examination of the fiberglass surface I was able to see the typical pattern of an external tooth lock washer. I also found that two bolts and lock washers were present in the bracket and I had just missed them. If you look closely at the picture you may notice that the head of the bolt is smaller than the circumference of the lock washer. That’s not good. This type of lock washer employs the strut effect to put up superior torque resistance. But… the teeth (struts) have to be in contact with both the substrate and the bolt head. Clearly it isn’t. An internal tooth lock washer would have been a better choice for this bolt.
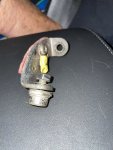
The next observation is that two diodes were out of their mounts. This is likely the key find because the bracket in which they mount is very beefy and the bolt on the diode is long and of sturdy diameter. It has a rather large nut over an internal tooth lock washer. Ideally, one would specify an external tooth lock washer for this application. That’s because the relief groove and edge of the nut reduces contact with the teeth for the nut and the bore for the bolt is a larger diameter than the internal teeth can engage. Because the diodes were out of their bracket holes it is probable that they came loose and started whipping about. They may have come loose because their lock washers weren’t fully engaged.

Unknowns

- From Peter’s post it appears that an engineer specified the correct type of lock washer. Does the specification apply to all manufacturers? All
Manufacturers of diode rings and the brackets? All manufacturers of the diodes?

- Did the mechanic use the specified hardware?

-To Peter’s point was all hardware torqued to specifications?
 

Attachments

Evvy Fesler

Well-known member
366
772
93
Location
Roxboro, North Carolina USA
The next observation is that two diodes were out of their mounts. This is likely the key find because the bracket in which they mount is very beefy and the bolt on the diode is long and of sturdy diameter. It has a rather large nut over an internal tooth lock washer. Ideally, one would specify an external tooth lock washer for this application. That’s because the relief groove and edge of the nut reduces contact with the teeth for the nut and the bore for the bolt is a larger diameter than the internal teeth can engage. Because the diodes were out of their bracket holes it is probable that they came loose and started whipping about. They may have come loose because their lock washers weren’t fully engaged.

Unknowns

- From Peter’s post it appears that an engineer specified the correct type of lock washer. Does the specification apply to all manufacturers? All
Manufacturers of diode rings and the brackets? All manufacturers of the diodes?

- Did the mechanic use the specified hardware?

-To Peter’s point was all hardware torqued to specifications?
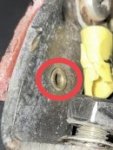
Another consideration is the design of the fiberglass wafer. They are strong in tension, but not all that rigid in flexure. The mounting to the bracket is inboard while a significant weight is carried outboard and on one side. This makes me wonder if the wafer oscillates and if some harmonic frequency eventually destroys it. There is evidence that the mounting holes are deformed or torn, but we don’t know if this was causal or a byproduct of the diodes flopping about or an empty bracket causing imbalance.
 

Evvy Fesler

Well-known member
366
772
93
Location
Roxboro, North Carolina USA
Another consideration is the design of the fiberglass wafer. They are strong in tension, but not all that rigid in flexure. The mounting to the bracket is inboard while a significant weight is carried outboard and on one side. This makes me wonder if the wafer oscillates and if some harmonic frequency eventually destroys it. There is evidence that the mounting holes are deformed or torn, but we don’t know if this was causal or a byproduct of the diodes flopping about or an empty bracket causing imbalance.
What so I think happened? I don’t know, but I think from Guy’s friend’s input it’s clear that there was a questionable design or cost reduction or both. The manufacturer told us that it had indeed been obsoleted and replaced (read: redesigned). My use case implicates the mechanic.

Frankly, tonight finds me emotionally reacting. I just want to get rid of this generator head and buy a commercial one to get out of this design.

My ego says I can have a shop rewind this head and I’ll make sure the diodes and diode ring are properly installed.

My logical head says go to sleep. Tomorrow will bring new information!

Good night all and thank you for following along and commenting. It’s way better to approach challenges with a team!
 

peapvp

Well-known member
Steel Soldiers Supporter
1,115
1,229
113
Location
Basehor, KS
Evvy,

I am pretty certain I found the cause:

989237D2-138D-4E7F-808F-E0DC70A856A7.jpeg


the Bracket # 43 is mounted to Fiberglass Disk # 44 with rivets

One rivet broke out on the disk side from centrifugal forces and vibration
this send the assembly off balance and it self destructed

the DoD design uses here hex head bolts with lock washer which screw into a thread in the bracket

D9049BC1-C465-4999-B103-F2477C954115.jpeg

also,
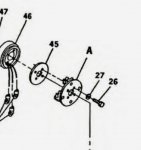
the disk is mounted to the assembly by means of
MS90725-5
Military Standard Hexagon Head Cap Screw
Description:
Fastener Length: 19/32", Thread: 1/4-20, Thread Length: 15/32", MS90725 series screw #26 with split lock washer # 27
1E6CDB81-DEB9-49FE-95BF-D063F9E80E0D.jpeg

You got this here (with remains of the fiberglass disk)

71BD556A-4C17-40D7-B276-7DEA5D9357F9.jpeg
29AF68BB-0C55-407A-9DA8-EF16522CF92D.jpeg

I am pretty sure that one of the rivet connections failed first.

This is completely different from the original Marathon and DoD design in the TM’s

This qualifies and gets the PPD award

Peter
 
Top
AdBlock Detected

We get it, advertisements are annoying!

Sure, ad-blocking software does a great job at blocking ads, but it also blocks useful features of our website like our supporting vendors. Their ads help keep Steel Soldiers going. Please consider disabling your ad blockers for the site. Thanks!

I've Disabled AdBlock
No Thanks