• Steel Soldiers now has a few new forums, read more about it at: New Munitions Forums!

  • Microsoft MSN, Live, Hotmail, Outlook email users may not be receiving emails. We are working to resolve this issue. Please add support@steelsoldiers.com to your trusted contacts.

802a Burned Wiring at J7/P7

Toolslinger

Active member
65
131
33
Location
PA
Ok... Well this came to light here:
No Start - Oil Pressure - 802a

I thought I'd start a fresh thread with a more useful title to keep the further info in.
I haven't gone any further yet really. I expect it may be a slow evolution.

I found someone with a 803a enclosure that had the engine, and generator removed, due to water intrusion/locked up condition. I will probably take a look at that this week. I could see the control box wiring in the photos, and that looked fine, and it might represent some spares of other components as well. I know there's a bit of difference between 802a and 803a, but I believe the harness that I'm looking at would work, even if I had to make the odd change.
I also got an offer from someone here for some of this.

So, I expect I'll be able to come up with parts. I haven't posted a wanted yet, because quite honestly, I don't know fully what I need. I did look in the -24P, but unless I missed it, there's no PN for these harnesses complete. It seems to just tell you what the end connections are, and you build it from the specified wire gauge.

Haven't gotten the machine indoors yet. My tractor that can run a fork is tied up with a firewood trailer currently. I can sling it from a loader, but I haven't really cleared a space in the barn to set it yet. Between social schedule, work, and weather it just hasn't worked out yet. Today, I've got howling wind (~30 mph gusts), which is when we tend to loose power, but I sure don't want to be under the trees messing with it today. I got the old gas fired unit in place in case, but that's the extent of my outdoor time today. Since all the ash trees are dead/dying, any day like today is when you just hear trees crashing down in the woods. Not good outdoor weather unless you're in the middle of a field. No ash over the house, but still not ideal to be out there.

I did pull P7 apart. Unfortunately it does have enough damage that I'll have to deal with that as well. A couple pins from J7 came out when I pulled it.
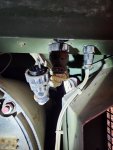
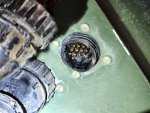
2024-10-14 12.46.46.jpg

2024-10-14 12.47.08.jpg
 

Guyfang

Moderator
Staff member
Moderator
16,924
24,545
113
Location
Burgkunstadt, Germany
NSN: 6150-01-379-0592 30554
Part Number: 88-20256
Nomenclature: WIRING HARNESS, BRAN 60HZ

The MEP-803A Wire Harness will work perfectly. Its just that the wires that go to the engine portion will be longer that the MEP-802A. So cut em off, or coil them.

Do not just look at the pictures. Look at the parts callout too. 🙂
 

Toolslinger

Active member
65
131
33
Location
PA
And there it is... At least that shows me how they've indicated it on the schematic. Now I have the engine side number as well. If I'm lucky, the engine side is still present too.

I still intend to spend time with a meter seeing if I can find anything that caused this. It would be nice to get the replacement harnesses on hand since that may be a bottleneck if I find the time to work on the machine sooner than expected. I expect I could remake everything by hand, but that is likely to be far more expensive, and way more time.
 

Toolslinger

Active member
65
131
33
Location
PA
The shell I ran across is from an 813a, rather than an 803a...
-24P indicates no difference for the engine side harness, so if that's present, it would be ok.
-24P indicates a different PN between the 803a, and 813a in the control box. Looking at the schematics, and parts breakouts, the only thing I see different in the harness is the 3 wires associated with the convienience outlet. I know there are component differences like relays, and switches, but the wire harness looks the same apart from those 3. If that's the only difference, I can run those seperate, and just bundle to the main trunk.

Have I missed something glaringly different? While I have been staring at this for a couple hours, I fully expect I may have missed something.
 

Guyfang

Moderator
Staff member
Moderator
16,924
24,545
113
Location
Burgkunstadt, Germany
I made a quick scan. I think, I would go for it. I too, did not see any big difference. But you need to know what started your set to burn. If its something you overlook, than you will get to see a second one smoke test.
 

Toolslinger

Active member
65
131
33
Location
PA
Test everything I can first is the plan.
Then I'll put in the harness, and test some more before it sees batteries.
I should add that I'll be running through contact cleaner as well.
That many wires is daunting, I don't want to ever do it again.

The shell came home with me. Control box looks ok. Engine side was cut sadly. There's enough left that I can splice on my existing, but that's not ideal. No harm since mine is shot anyway, and I only have to splice 1 of 3 plugs. Gauges look ok. Switches look and feel ok. Relays are present. So the parts that cross over will likely go in the spares stash if they test ok. The shell will get sold. The sheet metal and doors look to be in good shape.
 

Toolslinger

Active member
65
131
33
Location
PA
Well time flies...
Yesterday, it was a balmy 10 degrees out there... Perfect day to do tiny wiring in an unheated garage... At least I put it in my uncle's place which is wind tight. With the propane heater going, it might have gotten above freezing.

The process started with harvesting the harness that ends in J7 out of the 813a. Now, I'm sure we've all looked in the control cabinet, and thought, man that's a lot of zip ties... I'm here to tell you that, yea, it's a ton of zip ties. If you ever need to do this, use/get/buy very sharp, very pointy diagonal cutters. They fit over the tie, and between the wires in the bundle to act as a guide. Obviously you don't want to be cutting wires, and I'd say it's better not to disturb any more than you need to.

Unfortunately, when that harness burned, it cooked the wires right above it that run to the voltage regulator... So more wire needed. That set of wires ends up being connected to J5. Only 4 at J5, but 8 or 9 total involved.

There are 2 wires that run to the diagnostic port, 1 to the fault light panel, and a shielded pair that runs out to the voltage adjustment pot that are not just terminals. I cut those as there's no way I'm messing with those connectors. Everything else is a screw or nut connection.

After 5 hours, I packed it in for the day...

Day 2... 4 degrees... Really?... Well I did a number of errands first, so it was up to 17 when I got back to the 802a...
The hardest part was getting the tiny little screws that hold J5 in place. They're slotted screws coming up from below, and there's almost no room to work, let alone see. Two people would have made it better, but probably not much. Between both machines I couldn't save the 4 needed screws... Found some that are a bit longer, but work fine, so that's done...

I basically started laying the wire back in by bolting down the connection, and then following the burned harness backwards. When I came to a wire the burned bundle, I found the matching number in the new, and replaced it. Almost everything really was perfectly positioned except the 813A didn't have a fuse mod, so I got a little panicky when the wires were not in the right order... Sorted that out, and moved along pretty nicely. I left the 5 splices for last. Good quality crimp connectors, and a really good quality crimper made that reasonable. They're done, and shrink wrapped.

After that, it was just a matter of installing all those zip ties again... The upper wiring is now done. I'm about 10 or 11 hours in to this now. The lower or P7 harness is next. P5 didn't have an issue, so I don't have to worry about that one.

Got a couple more tanks of propane for the heater. I don't think I could have done this without that little bit of comfort. No way you're doing this with gloves on. I should be able to get back at it after Christmas.

So in answer to my earlier question, the control box wiring harnesses from the 813a work perfectly on an 802a. The lower doesn't matter in this case since it was cut, and I'll be splicing.
 
Last edited by a moderator:

CallMeColt

Well-known member
Supporting Vendor
1,060
1,529
113
Location
Wilson County, Texas
Great work. I had wire harnesses posted for sale FOREVER and they didn't move, so I scrapped them to just browse & see this thread. Had someone local need it two weeks after as well. Looks like I will not being doing that again. My next part out, the harnesses will be saved. Though, at the point, I'm sure it will go a few years before they're needed again but I do have more storage now. :)
 

Toolslinger

Active member
65
131
33
Location
PA
Well, on the up side they don't take up a ton of space to store. I think they'd fit in a gallon ziplock pretty well to keep them neat, and from catching on every possible thing they're near...
Instead, I have an entire 813a enclosure to store them in... I'm voting for a ziplock in the future when I scrounge things I don't need this time around.
 
Top
AdBlock Detected

We get it, advertisements are annoying!

Sure, ad-blocking software does a great job at blocking ads, but it also blocks useful features of our website like our supporting vendors. Their ads help keep Steel Soldiers going. Please consider disabling your ad blockers for the site. Thanks!

I've Disabled AdBlock
No Thanks