• Steel Soldiers now has a few new forums, read more about it at: New Munitions Forums!

  • Microsoft MSN, Live, Hotmail, Outlook email users may not be receiving emails. We are working to resolve this issue. Please add support@steelsoldiers.com to your trusted contacts.

12v, 24v alternator, batteries, cutoff switch, fuse box, & wiper install w/pics

Unforgiven

New member
675
18
0
Location
Las Vegas, NV
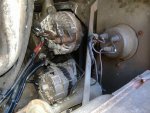
Here is my lengthy & detailed install of 12 volt & 24 volt alternators, batteries, fuse blocks, cutoff switches, & 12 volt wipers:

The problem: Driving home 600 miles through a winter thunderstorm in a just-purchased Army truck, only to realize the wipers don't work.

PC120003.JPGPC130013.JPGPC130014.JPGPC130015.JPG

As you can see, my wife was thrilled with the idea of driving 600 miles to pick up an old Deuce in the middle of winter. Here we're taking her Blazer to buy the truck. She followed me back the entire way ... 18 hours straight.

I realized the wipers wouldn't work at all when one of them, the passenger side, flew off completely when I hit the Interstate.

Continued below ...
 

Unforgiven

New member
675
18
0
Location
Las Vegas, NV
My solution: Two old Landcruisers waiting for a complete rebuild in the distant future. Each with good 12 V wiper motors. The slave cables were too short & kind of junk anyway. So I decided to use two motors for the Deuce.

PC270022.JPGPC270023.JPGPC270025.JPG
PC270024.JPGPC300027.JPGPC300026.JPG

I used some scrap 1" square tube that I had laying around, cleaned it, cut it, & tapped it for water pump studs. The studs are what hold the motors onto the tube. The Deuce windshield needed larger holes, both center & bolts. So I drilled out the original holes larger. I bolted up the square tube mounts, then the motors.
 
Last edited:

Unforgiven

New member
675
18
0
Location
Las Vegas, NV
For the 12 volt power source I decided the best way was to do it properly. I ordered the 24 V & 12 V one-wire alternators from Wolverine Technologies. It came with everything needed (well, except for clear instructions). He's a stand up guy & very helpful. I would definitely buy from him again.

P3120069.JPGP3120070.JPGP3120071.JPG
P3120072.JPGP3120073.JPG

This is DEFINITELY NOT the way Wolverines brackets were supposed to fit. But, it works & aligns both alternators properly. I notched the radiator bracket slightly just to make the installation easier. Once it's bolted up, it clears the radiator.

I used the thick battery cable simply because I had it laying around. The top alternator is 12V, the bottom is 24V replacing the Deuce generator.

The inner belt is stock. The outer belt is replaced by Wolverine. Each alternator takes one of the belts.
 
Last edited:

Unforgiven

New member
675
18
0
Location
Las Vegas, NV
Next, I needed to modify the battery box. So I took the original out of the truck, ground off some of the crossmembers on the box, & welded up a larger box

P1030028.JPGP1040029.JPGP1040030.JPGP1040031.JPGP1040032.JPGP1050038.JPGP1070042.JPGP1070041.JPG

Above you can see the box build, Plasticoat, & how it barely fits in the truck. I'll snap a photo of the completely filled box in the truck tomorrow.

If I had to do this part over, I would make the box about 1" wider. It's a very tight fit. I had to modify one of the pair of hold-downs because I couldn't make it work with 4 batteries without one of the hold-downs modified.

Now, I have 2 batteries wired in series for 24 volts, & 2 batteries wired in parallel for 12 volts. Should the 24 volt alternator or batteries have problems, I can always rewire the 12 volts to "jump start" myself.

It's a completely redundant system. The odds of all 4 batteries going out at the same time are minimal (short of high-centering the battery box on a rock, etc)
 

Unforgiven

New member
675
18
0
Location
Las Vegas, NV
Next I wired in a pair of kill switches. I did this because of an unknown battery drain when the truck sat for a week or so. I suspect it was/is the one-wire alternators though I never bothered to track down the source. Still, I highly recommend the 1-wire alternators. Wolverine sells high quality stuff. Just prepare to install a kill switch

P2210061.JPGP2210060.JPGP2210065.JPGP2210064.JPGP2210062.JPGP2230066.JPGP2230067.JPG

I bought a 20' 4 Ga set of jumper cables. I cut them in half so that I would have a pair of doubled 10' cables. I drilled a hole in the firewall behind the glove box, where the passenger mirror mounts.

I then taped up & fed the 2 sets of wires from the negative of the batteries (all 4 negatives connected to form a common ground) up & through to the dash. I decided to mount the kill switches in a convenient location. There were already knock-out tabs built into the dash. I just punched them out & widened them a bit with a large bit. Why did I use two? Amperage. Each switch is rated at 300 A/12 V or something like that. I believe in overkill. So I simply ran two of the kill switches in parallel. That way I can be sure the starter gets sufficient amperage during cranking. I'm sure you could get away with only one kill switch.

One pair of 10' cable feeds into the top of the switches. The other pair of 10' cables come from the bottom of the switches & run back to the frame to complete the ground circuit. I kept the ground of the frame in the battery compartment for convenience.

Above you can see under the dash where I wired it in parallel. That would be the incoming from the batteries. Imagine another pair outgoing to frame ground.
 

Unforgiven

New member
675
18
0
Location
Las Vegas, NV
As you may note on the previous post, with small gauge wire (large diameter) it is often easier to use a plumber's torch to solder it. Electric solder guns just don't cut it. Also note, I installed the cutoffs for convenience, not for anti-theft. If this is your concern you should find a more suitable location for the kill switches
 

Unforgiven

New member
675
18
0
Location
Las Vegas, NV
Next I wanted to make future electrical upgrades easy. So I put in dedicated 24 V & 12 V fuse blocks. On previous projects I have found the glove box to be the ideal location for new fuse blocks. It keeps the dust out & is a very convenient place to check for blown fuses & wire in new circuits

P3120068.JPGP3130074.JPGP3130075.JPG

You can get these great little fuse blocks at Pep Boys for $5 a piece. They are modular & snap together to form larger blocks. I used 3 each for 12V & 24 V.

I wanted the supply wires to be easily accessible. So I punched out more knockouts on the dash. I then put nylon 1/4-20 bolts, double nutted to act as electrical standoffs. One of the nylon bolts is for a 24V standoff, the other of course is for 12V standoff. This is also where I decided to run the large charging wire from the 12V alternator. The nylon standoffs act as a convenient location battery, charging, & fuse block junctions.

From the standoffs I ran 10 Ga wire to the fuse blocks. 24 V fuse block is on driver's side of glove box. 12 V fuses are on passenger side of glove box.

Right now I only have one fuse in the entire system ... a 30 amp for the wiper motors. Each $5 Pep Boys fuse box will hold 4 mini-fuses. You know, the regular fuses in cars nowadays. For 24 volts just cut the amperage in half. For example, a 30 amp fuse in the 24 V side will pop at 15 amps. If you need more amps at 24 volts (though I don't know why) all you have to do is wire two fuses in parallel.

I didn't snap a picture of that yet. Likewise, I need to install the wiper arms & rubber this weekend. When that's done I'll snap pics of the batteries all wired up & underneath the dash as well.

That's all I have for now.

Now I have to figure out why the parking brake isn't holding.
 

Unforgiven

New member
675
18
0
Location
Las Vegas, NV
I should add, I kept 12 V wires Red from fuse block & 24 V wires White from it's fuse block. That way any future circuits will be easy to do & I won't cross the wrong voltage to the circuit. Also, the glove box itself is back in. I drilled holes in the side to allow access for the wires. I don't worry about all the red & white wires dangling in the box. Without a fuse, they are dead wires. Only until I put a fuse in will they be "hot." And as you can see, it's already pre-wired for more circuits that I will ever use.

I'll post pics of the completed install maybe Sunday so you can see how it looks afterwards. I did all this for convenience, not aesthetics.

Anyway, I hope it gives some ideas. The kill switches work great. Now the truck can sit for weeks without battery drain.
 

Blythewoodjoe

Active member
985
56
28
Location
Blythewood, SC
I don't want to take away from your efforts, but since I was happy with my 12v/24v set up I thought others might want to know of other ways to do it. I put a hummer alternator on my deuce in place of the original, three regular batteries in the box instead of two 6TL's and used the 12 volts to power a dump kit. Here's some threads if any one is interested.

http://www.steelsoldiers.com/deuce-...10023-24-volt-12-volt-set-up-i-need-help.html
http://www.steelsoldiers.com/deuce-...-hmmwv-alternator-deuce-voltage-too-high.html
http://www.steelsoldiers.com/deuce/12943-m35-alternator-pulley-needed.html
http://www.steelsoldiers.com/deuce-modification-hot-rodding/12226-bob-dumpin-deuce-lives-3.html

One more thing, my deuce now has a 24 military wiper set up. Nice working unit and I hear they can be bought for around $250. Still a reliable 12 volt set up is nice for all those phone chargers and so forth.

Joe
 

Unforgiven

New member
675
18
0
Location
Las Vegas, NV
Absolutely there's more than one way to skin a cat (I'm on #37 right now).

The reason I did it this way is because I had the 12V wiper motors sitting in some useless Landcruisers.

Now that it's done, I have more 24 V & 12 V circuits than I will ever use.

It' no longer a matter of "can I find that solenoid in 24V" or "Do they make these LED's in 24V" etc. If I find something I like, no matter what voltage, I can get it.

When I do a crew cab this summer I plan to significantly quiet the truck. I like driving music. So now I'm all wired for 12V stereo equipment, interior lights, etc. It also opens up the possibility of HID off road/driving lights, or at least expands the selection.

I really like the fact of having 4 batteries. That way if the 24V poops out in the back woods I can jump start myself.

Plus with the kill switch knobs (red) removed, it's one more layer of security. Sure, they are plain & in the open, but how many illiterate teenagers now days would even know what half those knobs do, much less be able to rewire it under the dash to steal it?
 

steelandcanvas

Well-known member
6,187
85
48
Location
Southwestern Idaho
Awesome job, very well thought out and nicely done. I'm sure you posted this mod up for comment, so I'll add mine. The only thing I see there might be a problem with "down the road", is photo #30. This is where you run your cabling up behind the glove box and under the cowl towards the firewall. You might think about wrapping this area where it comes in contact with the sheet metal. A piece of rubber tubing tie wrapped or taped around your already taped cabling, just might save you some grief later on. This area is very hidden and you may never look into it's depths again. In other words, it's not something you could keep an eye on.
 

Unforgiven

New member
675
18
0
Location
Las Vegas, NV
You are a mind reader. I couldn't work on the truck today because a neighbor was having a garage sale ... no room to turn around.

When I am done I plan to split some hose/grommets wherever sharp metal contacts any wires. I will grommet & silicone the large firewall hole.

I forgot to mention that since I am using two motors, they will get out of phase. Neither motor's "park" feature worked, even when on the Landcruisers. Therefore, I added a momentary switch to 1 of the motor grounds. I can "park" one of the wipers by using the toggle switch (single pole, double throw connecting motors to ground, one throw low, one throw high). The other motor is parked via the momentary switch.

Again, when I wrap up all the little details I'll snap some more pics & move on to another modification.
 

Unforgiven

New member
675
18
0
Location
Las Vegas, NV
I finished up the wipers today. So snapped some odds-&-ends photos.

P2210059.JPGP2210063.JPGP3210085.JPGP3210086.JPGP3210087.JPGP3210088.JPGP3210089.JPGP3210090.JPGP3210091.JPGP3210092.JPG

1-the kill switches I used. They were about $12 each from some race car website
2-where I decided to punch through the firewall for all the wires
3-all the wires shoved through, it will have grommet/silicone in the future
4-notched out radiator bracket + alternators. They line up very nicely. I couldn't reproduce Wolverine's assembly of the brackets. My way seems to actually align better.
5-all my ducks lined up in a row. Green wired for 12V. Black for 24V. I used all-thread & double nuts to snug the hold downs onto the batteries. Be careful of clearance to battery posts w/hold downs
6-I kept the same frame ground. But I cleaned it up thoroughly & installed a new bolt. All copper connections were sanded.
7-spaghetti wiring greens in parallel & blacks in series. 12V & 24V taps to go to dash standoffs come from here. I doubled up the wires to allow ample amperage to the fuse block.
8-this is what the final dash looks like. Notice the nylon standoffs below the kill switches. I just popped out some knock-outs that were already there.
9-a close up of the fuse blocks, 12V to right, 24V to left
10-inside the glove box I drilled holes on each side for wires. Right side exclusively 12V, left side 24V. That way there's no future mix-up.
 

Unforgiven

New member
675
18
0
Location
Las Vegas, NV
P3210094.JPGP3210096.JPGP3210099.JPGP3210100.JPGP3210101.JPGP3210102.JPG

1-that's what the final, installed motors look like
2-spaghetti of 2 kill switches, 2 nylon standoffs, 1 ground bolt, 1 wiper toggle, 1 momentary switch that allows me to "park" the passenger side motor independently of the driver's side
3-I used diodes to keep the passenger's ground separated from the driver's ground. Otherwise I couldn't park them independently. They will end up out of phase with use b/c the internal resistance, inertia etc. of each motor will vary slightly, i.e. very slightly different RPM's
4-another diode at the momentary switch. Remember, stripe goes closest to ground.
5-the final, installed wipers. I am now able to use any 10" wipers at the auto store. These particular ones are ANCO? I forget the name. They were only about $6 a piece.

Note: That's what you call a propertly-line dispute. I have to fold my passenger mirror in to clear that tree. The jerk next to me planted that tree on the property line. So I grabbed a saws-all and "reclaimed" my territory. :lol:

He's the creep that I'm 99.99% certain broke into my house a few years ago (& therefore why I have cameras pointing everywhere now)

6-that's what the final product looks like.

Man, that took me a LONG time to just fix a pair of wipers!
 

Unforgiven

New member
675
18
0
Location
Las Vegas, NV
Update,

The battery cutoff switches work great. I've let the truck sit for weeks without any problems of dead batteries.

I have to be careful not to leave the headlights on though. Even with the cutoffs "off" there is a complete circuit from the 24 volt batteries through the 12 volt alternator to the + side of the 12 volt batteries. The headlights come on dimly (due to the 12 volt potential difference between the 24&12v batteries).

I would rewire the cutoffs to be on the + side of the system, but the Cummins engine & Allison transmission that I'm swapping in runs on 12v. So it's not worth my effort to rewire the cutoffs. Within a year the entire truck will be 12v.

Plus the cutoffs add a layer of security against joyriders.
 
Top
AdBlock Detected

We get it, advertisements are annoying!

Sure, ad-blocking software does a great job at blocking ads, but it also blocks useful features of our website like our supporting vendors. Their ads help keep Steel Soldiers going. Please consider disabling your ad blockers for the site. Thanks!

I've Disabled AdBlock
No Thanks