• Steel Soldiers now has a few new forums, read more about it at: New Munitions Forums!

  • Microsoft MSN, Live, Hotmail, Outlook email users may not be receiving emails. We are working to resolve this issue. Please add support@steelsoldiers.com to your trusted contacts.

404s losing power

79
4
8
Location
Baton Rouge, LA
I'm losing power going into 4th and can't seem to get to 5th without shifting early.

I've been reading the workshop manual, the user manual and tons of threads on here and BW.

In the maintenance guide in the workshop manual it states to first check Carb (Section 07/47), I cleaned it but looks like a rebuild is in order (or swap it for a rebuilt one from EI). Any thoughts on this?

Step 3 I think is to check Exhaust which I know I need to replace my Exhaust Manifold as it has a crack in it that was apparently sealed (by previous owner(s)) with JB Weld but it broke, colleagues tell me easier to replace than to weld. EI has these for $200. Will need to replace the Exhaust Gasket and the bolts as they're all rusted over. Should be fun to take out and replace.

Checking Compression Pressure is at the top of my list (Section 3.2.8 in the manual), which means compression test, leak down test, valve seals, valve stems, etc) If I have to get to the valve stems, correct me if I am wrong, I will need to take head off without having to take the cab off? (if I have to go that far).

My belts are recent (NAPA XL) and they are tight, I need to check the timing after I replace the spark plugs and update the distributor to Civilian Conversion.

Took my distributor cap off which is the original military style (as suggested from I believe TenMogger from my first post on here).

enQZF1ss.jpg mKuaBdCs.jpg

Larger Image Links:
Rotor - http://imgur.com/enQZF1s
Cap - http://imgur.com/mKuaBdC


Looks like the original rotor (?) is on there and it's been grinding the brass pins at the top of the cap leaving shavings in the distributor base.

I need to order the EI Pertronix Civilian Conversion Kit, but should I replace the pertronix ignitor as well or just go with the kit that completes the conversion without it? Scott has both options on his site.

I'm so bummed about all of this, we have a scout camping trip next week, my son is asking if we can sleep in the Mog and I know the truck won't be ready. I just don't trust it to go far from home.

As always any helpful suggestions from y'all would be appreciated.
 
Last edited:

Karl kostman

Well-known member
Steel Soldiers Supporter
2,305
889
113
Location
Fargo ND
Hey crunchy first off overhauling the carb on the 404 is not bad at all to do and you will 1. learn better how it works and 2. save yourself some money! The Pertronix ignition kit is a very good way to go on the 404 they respond very nicely to the improvements they make available. And 3rd I used to buy all my components for my 404 out of CA and because of some apparent company changes at that organisation I changed all my business Euro truck Importers out of GA! I have been extremely happy with the service these folks provide and they dont charge you 10% additional for asking a question about what your ordering for your 404!
Good luck on the 404 they are a great truck when used within their envelope of operations!

Karl
 

rchalmers3

Half a mile from the Broad River
Steel Soldiers Supporter
1,925
30
48
Location
Irmo, South Carolina
If not for the shavings, I would have recommended setting the point gap and dwell. But it looks like you might be in replacement distributor territory. Can you wobble the top of the shaft a little by hand?

Rick
 

tennmogger

Well-known member
Steel Soldiers Supporter
1,579
542
113
Location
Greenback, TN
Edit: I got a closer view to the upper left of the rotor in your reference photo. Is that a loose yellow wire?

No need to replace the Pertronix, IMHO. If the engine runs at all, the Pertronix is functional. Be sure the magnet ring is seated down on the cam of the distributor so the magnets are passing the detector at the right height.

As discussed before, did you connect the Pertronix power (red wire) to a constant source of 24v? Powering the Pertronix from a source 'strobed' by the Pertronix closure, at the interference filter) is asking for trouble (previous post).

Of course there are no points, or dwell, to set with the Pertronix installed.

If you suspect exhaust problems (the leak will not cause loss of power), check the heat riser valve. For your "cold" winters, ha ha, you do not need the heat riser valve functional so maybe wire it OPEN for now. It restricts the exhaust.

If your timing is too early the 404 will lose power at high rpm. That becomes more noticeable in higher gears. Set the distributor timing to the "S" side and see if it runs better.

If the centrifugal weights buried in the base of the distributor have thrown a spring, timing can go sky high at lower rpm.

Sorry to hear your frustration. Hang in there.
 
Last edited:
79
4
8
Location
Baton Rouge, LA
Edit: I got a closer view to the upper left of the rotor in your reference photo. Is that a loose yellow wire?
That wire (if you watch the video that Scott from EI Posted on YouTube in his Pertronix Install Video is from the original points, he screws down to one of the two screws opposite the ignitor. I will be doing that here.

No need to replace the Pertronix, IMHO. If the engine runs at all, the Pertronix is functional.
The Pertronix is functional as the engine does run!

Be sure the magnet ring is seated down on the cam of the distributor so the magnets are passing the detector at the right height.
Watching the video from EI on the Pertronix Install, this install appears to be missing the spacer plate that is inserted before Pertronix is put in. (Image Link: http://imgur.com/yzBaLKX)
Since the spacer plate is not there, black ring that sits on the spindle is above the ignitor when it should be at the same level or lower. I have contacted Pertronix to see if I can buy a spacer plate.

As discussed before, did you connect the Pertronix power (red wire) to a constant source of 24v? Powering the Pertronix from a source 'strobed' by the Pertronix closure, at the interference filter) is asking for trouble (previous post).Of course there are no points, or dwell, to set with the Pertronix installed.
There are so many fun things going on with my truck that we are discussing 2 different issues here. The Petronix is wired to the bottom of the solenoid which is tied directly to 24v power. My Pertronix is the 32W-24VN (image link: http://imgur.com/oXuUImZ).

The other issue you were referring to is my fuel pump which is connected to a 12v regulator that has it's wire running (through a terminal strip) across the solenoid and up to a switch on the dash and not wired to the ignition switch. I think that issue may be resolved by putting in a 2PSI 24V solid state pump (or putting the original pump back in with a 2 PSI Holley Fuel Pump Regulator). - That's another project for another day, it's on my to do list to take out all that crazy wiring and do it right.

For now the Ignitor appears to be wired correctly, amazingly enough.

If you suspect exhaust problems (the leak will not cause loss of power)
You mentioned that may lead to backfiring when I coast downhill, I've seen posts here and on BW from other 404 owners with the same issue.

..check the heat riser valve. For your "cold" winters, ha ha, you do not need the heat riser valve functional so maybe wire it OPEN for now. It restricts the exhaust.
ok, just googled that, learned something new, now I know what all those parts to the edge of the Right Exhaust Valve do and are for.

If your timing is too early the 404 will lose power at high rpm. That becomes more noticeable in higher gears. Set the distributor timing to the "S" side and see if it runs better.
I was wondering about that. Thanks for the suggestion.
If the centrifugal weights buried in the base of the distributor have thrown a spring, timing can go sky high at lower rpm.
I'd be looking at a new distributor then I guess.

Also of note, by dumb self was not taking into account that my tires are 12.5R20 and the stock tires were 10.5R20 for which the specs for gear shifts are all printed for. I need to calculate (or find a posting of somewhere) what my actual speed is for these tires (https://www.tacomaworld.com/tirecalc?tires=275-80r20-335-80r20).

Sorry to hear your frustration. Hang in there.
Thanks. Perseverance and Patience are two disciplines I've learned in life. I like to learn about as much information as possible while solving problems. I appreciate the feedback. I realize I'm posting more than others and my posts are longer than others. I think it was Swiss that said 3 to 6 months of going through manuals, working with it evenings and weekends, and once I get through the main set of issues, I'll be confident in the truck and myself. I'm keeping that in mind as I get through this.
 
Last edited:
79
4
8
Location
Baton Rouge, LA
Sure, you can look at a new distributor (they can be pretty), but all you would need is new springs for what you have, if it's in good shape otherwise.
Thanks Flu!

I just got off the phone with Scott at EI, he confirmed for me the part I needed was UM161 - Spacer Plate so I ordered the Civi Converstion Kit minus the Ignitor. Should be here in a few days and I'll probably spend my 4th of July day off working on putting it in (assuming it gets here by then).

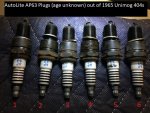
I took the old plugs out as it appears Compression Test will be next.
Looks like Cylinder 2 and 4 are suspect for leaking Valve Seals.

8cVhS3v.jpg

The side of the engine block had oil spill marks as well.

The Workshop manual pg 0.4/1 says tightening torques for 404.1 should be 35 - 40 (3.5 to 4.0). Found this torque conversion site for converting Nm / KPM to foot pounds as my Torque Wrench is only in Foot Pounds.
Can you or anyone recommend a good torque wrench that reads in Nm (kpm) otherwise I'll just use this little online app.
 
79
4
8
Location
Baton Rouge, LA
I got the Civi Conversion Kit from EI, and it went in without an issue.
Now I need to time the engine and all the instructions I read (including the glove box manual) says to jack up rear axle so I can spin the right rear tire with 6th Gear engaged, 4 wheel lock disengaged and e-brake off.
Only question I have is, as this is a safety thing for me, is what is the best method to jack up the rear axle?

I don't like to assume, so I've looked here and on other sites, and in the manual, workshop guide, even the German Microfiche slides I got, still can't find recommendations for how to do this. Found some recommendations on how not to do this like don't put a floor jack under the rear differential, I don't have a floor jack (yet, $800 I need to plan on spending).

My drive way is flat, nonetheless I will point the truck towards the street and chock the front tires.
I have 12.5R20 tires (slightly larger than stock 10.5R20, any suggestions for chocks? will the stock wheel chocks do? otherwise TruckPro has bigger rubber triangle blocks I can get for about the same price as the refurb chocks from Ei or Unipaser.

From what I am gathering, a slice or two of 4x4 or 6x6 wood with a 6T or greater bottle jack (I have 2x 12T jacks) is placed where exactly?
Do I want to put the axle on 2 jack stands? to do this, I would lift one end of the axle at a time? the right side, then the left side?

Recommendations? and/or your experiences doing this?
 

Speedwoble

Well-known member
606
301
63
Location
New Holland, PA
In addition to wheel chocks, you could anchor it to another vehicle with a tow strap. in 6h gear at close to idle, it *should* stall the engine if it falls off.
 

The FLU farm

Well-known member
Steel Soldiers Supporter
3,338
1,319
113
Location
The actual midwest, NM.
Better safe than sorry, but I think you're overly cautious. Take the rear wheels off if you want to be (more) sure that the vehicle won't go anywhere.
But like Speedwoble says, it should stall with the wheels on...which may be why they recommend 6th gear.
Or am I misunderstanding the whole thing, and the engine isn't supposed to be running and 6th gear with one wheel up is to facilitate turning the engine by hand?
 

tennmogger

Well-known member
Steel Soldiers Supporter
1,579
542
113
Location
Greenback, TN
Hi Crunchy,

I do this all the time: stack a layer of cribbage to get at least high enough for a bottle jack to not have to extend much. Don't use much of the 'screw section' for safety. You will be plenty secure with the one good jack under the axle anythere near the wheel.

Yes, the jacked up rear wheel (only one) is used to turn the engine over to set timing as Flufarm said. This method is just easier than bumping a starter or trying to turn the engine by hand. This little engine is easy to turn but the fan is belt driven and not directly connected so there is nothing to turn the engine with. The rear tire, coupled to the engine in 6th (direct drive) makes the job of turning the engine easy, plus you can 'back up' a few degrees and try again at seeing the distributor trigger the spark.

Be sure to recruit a "soldier B". :)

Bob
 

The FLU farm

Well-known member
Steel Soldiers Supporter
3,338
1,319
113
Location
The actual midwest, NM.
I wrote reply a while back, but the "load failed".
In short, I'd buy a HF jack good enough to lift the front axle, and then some. Use a 20% off coupon.
Tennmogger beat me to it, but 6th gear is the easiest way to turn the engine (mechanical leverage) and your taller tires help, too.
Not being one to live by all the OSHA regulations (I'd never get anything done if I did) I would probably even trust the jack to keep the vehicle from moving since you're on flat ground.
The worst two things that can happen is that the jack bleeds down and you'll have to pump it up again, or the vehicle falls off of it. Neither is a problem, really.
 
79
4
8
Location
Baton Rouge, LA
I think I got it. Finding TDC is the 2 degrees BTDC, per the manual.
In order to set the Total Timing at 10-14 BTDC, what RPM do I want to be running the engine at? 1500 or higher?
or do I have this all wrong?
 

The FLU farm

Well-known member
Steel Soldiers Supporter
3,338
1,319
113
Location
The actual midwest, NM.
I'd use a dial back timing light (because it's easier), then adjust the total to 10-14 degrees at whatever rpm it has reached or exceeds full advance.
Or, you can use a regular timing light and mark the 10- 14 degrees on the damper.
 

tennmogger

Well-known member
Steel Soldiers Supporter
1,579
542
113
Location
Greenback, TN
Timing should be set at idle rpm so there is no advance contribution from the centrifugal spark advance. Then you will see much earlier spark as engine is rev'ed. That's ok. I have seen 30 to 40 deg btdc. You would think the engine would never run with that early timing but it does. It all depends an how slow the fuel mixture burn peaks out.

The timing depends significantly on the gas you get. Use your common sense if the engine power drops off at higher rpm, then back off on the timing advance. You really can tune by performance but you need a 'test course' over which to make comparisons.

I realize this advice is contrary to some other advice given. This is simply what has been learned from tweeking 404s for a few years.
 
Last edited:

The FLU farm

Well-known member
Steel Soldiers Supporter
3,338
1,319
113
Location
The actual midwest, NM.
I realize this advice is contrary to some other advice given. This is simply what has been learned from tweeking 404s for a few years.
Hey, I've never messed with a 404 so I don't know how to deal with them, but I thought that total timing was just that; max total advance. In other words, set it to 10- 14 degrees in this case (if that's what it's supposed to be) then take it from there.
In real life I rarely use the timing light, but rather set the timing to whatever a particular vehicle is happy with. Much of my junk is well worn and the tolerances can stack up, making any timing marks and readings fairly meaningless.
I'd go with tennmogger's advice here, Crunchy, rather than what the book says.
 
Top
AdBlock Detected

We get it, advertisements are annoying!

Sure, ad-blocking software does a great job at blocking ads, but it also blocks useful features of our website like our supporting vendors. Their ads help keep Steel Soldiers going. Please consider disabling your ad blockers for the site. Thanks!

I've Disabled AdBlock
No Thanks