• Steel Soldiers now has a few new forums, read more about it at: New Munitions Forums!

  • Microsoft MSN, Live, Hotmail, Outlook email users may not be receiving emails. We are working to resolve this issue. Please add support@steelsoldiers.com to your trusted contacts.

700R4 success, I think.

So, I got M1008 back from Pro Built Transmissions in Weymouth, MA. Those guys did a great job finding/fixing the reverse issue and did the whole 700R4 rebuild/upgrade/swap for a great price. They did a complete high performance overhaul including a Beast sun shell, HD clutch plates, Corvette servo, etc. If anyone here is in the Boston/South Shore area, I highly recommend them for all of your HP transmission needs.
I wired up the external lockup switch but I'm not 100% sure that the transmission has been modified with the correct pressure switch inside (my 700 does not have the external 4th gear pressure test port and I don't trust other people's work since it was done by the previous owner), but I believe I have the correct switch on the bench if I need it. My plan is to install a dash-mounted tach and flip the switch while cruising and check to see if the RPMs drop.
In addition to the internal upgrades and the lockup switch, I also bought a Derale 15845 Dual Cool remote cooler, that I plan on putting between the radiator and the input port of the trans, a Derale 14204 cooling pan, and a temp probe on the output line of the trans to get a good reading on the trans temp at all times.
I proudly posted about the swap on a Facebook CUCV group and it was immediately shit on by guys saying the 700R4 is trash, it's going to blow up, etc. Now, I've been in the hotrod scene for a fairly decent amount of time and the 700R4 is widely respected and regarded as one of the best automatic transmissions GM has ever produced. What gives? Does putting this trans in a 4x4 truck as opposed to a Led Sled or muscle car suddenly make the 700 a fragile hand grenade? My gut and experience told me that the upgrades and improved cooling should make the 700 as reliable in my truck as the original TH400 but since I have precious little experience with 4x4/offroad modifications, these guys have me second guessing myself.
I've come to trust the opinions on this forum above all others so I'll ask you folks: What are the limitations of this swap? Did I spend more money than the Gear Vendors OD unit only to create a weaker setup? Did I let clowns get in my head and I'm worried about nothing?

P.S. For those wondering, it's like driving a whole new truck after the swap. It cruises very comfortably at 65-70 mph and doesn't sound like it's going to throw a rod at any moment.
 
Last edited:

Mullaney

Well-known member
Steel Soldiers Supporter
Supporting Vendor
7,716
19,766
113
Location
Charlotte NC
So, I got M1008 back from Pro Built Transmissions in Weymouth, MA. Those guys did a great job finding/fixing the reverse issue and did the whole 700R4 rebuild/upgrade/swap for a great price. They did a complete high performance overhaul including a Beast sun shell, HD clutch plates, Corvette servo, etc. If anyone here is in the Boston/South Shore area, I highly recommend them for all of your HP transmission needs.
I wired up the external lockup switch but I'm not 100% sure that the transmission has been modified with the correct pressure switch inside (my 700 does not have the external 4th gear pressure test port and I don't trust other people's work since it was done by the previous owner), but I believe I have the correct switch on the bench if I need it. My plan is to install a dash-mounted tach and flip the switch while cruising and check to see if the RPMs drop.
In addition to the internal upgrades and the lockup switch, I also bought a Derale 15845 Dual Cool remote cooler, that I plan on putting between the radiator and the input port of the trans, a Derale 14204 cooling pan, and a temp probe on the output line of the trans to get a good reading on the trans temp at all times.
I proudly posted about the swap on a Facebook CUCV group and it was immediately shit on by guys saying the 700R4 is trash, it's going to blow up, etc. Now, I've been in the hotrod scene for a fairly decent amount of time and the 700R4 is widely respected and regarded as one of the best automatic transmissions GM has ever produced. What gives? Does putting this trans in a 4x4 truck as opposed to a Led Sled or muscle car suddenly make the 700 a fragile hand grenade? My gut and experience told me that the upgrades and improved cooling should make the 700 as reliable in my truck as the original TH400 but since I have precious little experience with 4x4/offroad modifications, these guys have me second guessing myself.
I've come to trust the opinions on this forum above all others so I'll ask you folks: What are the limitations of this swap? Did I spend more money than the Gear Vendors OD unit only to create a weaker setup? Did I let clowns get in my head and I'm worried about nothing?

P.S. For those wondering, it's like driving a whole new truck after the swap. It cruises very comfortably at 65-70 mph and doesn't sound like it's going to throw a rod at any moment.
.
Ignore the Clowns.
The FaceCrook clowns in particular...

The 700r4 is a pretty tough unit behind a hotrod small block Chevy.
I can't see how being in a 4x4 is going to suddenly make it junk.

Of course there are idiots who could break steel marbles with a rubber mallet in a sand box too.
 

adf5565

Well-known member
375
688
93
Location
Tioga, PA
So, I got M1008 back from Pro Built Transmissions in Weymouth, MA. Those guys did a great job finding/fixing the reverse issue and did the whole 700R4 rebuild/upgrade/swap for a great price. They did a complete high performance overhaul including a Beast sun shell, HD clutch plates, Corvette servo, etc. If anyone here is in the Boston/South Shore area, I highly recommend them for all of your HP transmission needs.
I wired up the external lockup switch but I'm not 100% sure that the transmission has been modified with the correct pressure switch inside (my 700 does not have the external 4th gear pressure test port and I don't trust other people's work since it was done by the previous owner), but I believe I have the correct switch on the bench if I need it. My plan is to install a dash-mounted tach and flip the switch while cruising and check to see if the RPMs drop.
In addition to the internal upgrades and the lockup switch, I also bought a Derale 15845 Dual Cool remote cooler, that I plan on putting between the radiator and the input port of the trans, a Derale 14204 cooling pan, and a temp probe on the output line of the trans to get a good reading on the trans temp at all times.
I proudly posted about the swap on a Facebook CUCV group and it was immediately shit on by guys saying the 700R4 is trash, it's going to blow up, etc. Now, I've been in the hotrod scene for a fairly decent amount of time and the 700R4 is widely respected and regarded as one of the best automatic transmissions GM has ever produced. What gives? Does putting this trans in a 4x4 truck as opposed to a Led Sled or muscle car suddenly make the 700 a fragile hand grenade? My gut and experience told me that the upgrades and improved cooling should make the 700 as reliable in my truck as the original TH400 but since I have precious little experience with 4x4/offroad modifications, these guys have me second guessing myself.
I've come to trust the opinions on this forum above all others so I'll ask you folks: What are the limitations of this swap? Did I spend more money than the Gear Vendors OD unit only to create a weaker setup? Did I let clowns get in my head and I'm worried about nothing?

P.S. For those wondering, it's like driving a whole new truck after the swap. It cruises very comfortably at 65-70 mph and doesn't sound like it's going to throw a rod at any moment.
I’m curious how the Derale cooler/pan will work. I just have a standard in front of radiator cooler installed in line after the radiator for my 700R4 but I have considered adding the Derale parts. My setup currently gets the job done but I have a lot of hills around me so the temp can rise a bit faster than I’d like so I’d upgrade as well if it makes a difference.
 
Last edited:
I’m curious how the Derale cooler/pan will work. I just have a standard in front of radiator cooler installed in line after the radiator for my 700R4 but I have considered adding the Derale parts. It currently gets the job done but I have a lot of hills around me so the temp can rise a bit faster than I’d like so I’d upgrade as well if it makes a difference.
I went with the Derale Dual Cooler because it seemed like the highest capacity with the lowest pressure drop for the money. I'm opting to mount it under the truck, away from the engine compartment to try and reduce the chance of it picking up radiant heat from the engine. I think it's going to be especially important when I get around to turbocharging it as that will increase temps all around. Additionally, if I end up adding an intercooler, (and maybe even a condenser coil), a rear mounted trans cooler will free up a lot of room and help the radiator's efficiency. I bought the cooler pan on recommendation from a friend that builds diesel race trucks and swears that it'll bring temps down drastically so I figured for the price, it's worth a shot.
 
You should post the swap details here on SS.

$$$ ??
It was a pretty straightforward swap for me, and some of the parts had already been tracked down and installed by the previous owner of the 700R4 I found, as he was attempting the same swap into his M1010. It came with the diesel governor, new torque converter, correct flex plate, 700R4 to NP208 adapter kit, external lockup wiring all installed already. I don't remember what I paid for it but it was under $500. The only challenge I had was tracking down the TV bracket that was provided by one of the fine folks on the forum. After the rebuild and internal upgrades, it was a bolt in affair and the shop charged me a grand total of $2500.88. I'm sure it could be done cheaper myself but I didn't want to do it. As I install the remote cooler and cooling pan, I'll post all of that here.

Screenshot_20220804-183359_Gallery.jpg
 

Hummermark

Active member
211
31
28
Location
London uk
The U.S. military did have 1983 1009 k5 diesel 6.2 cucvs factory fitted with the 700R as I bought one from the drmo in the uk 🇬🇧 (Uk regersted FLD 206Y if anyone still has it in the uk)
All the 700R 1009 I sore come up for sale through the uk 🇬🇧 drmo also had a winch front bumper with a warn 8274 upright winch fitted .
I still have a folder of paper work from new when the US airforce go it fromCarter Chevrolet 215 w. Oklahoma ave okarche,OK 73762 delivered to Monthan Air Force base Tucson,AZ.
Used it many years a daily transport and towed a fair bit with it never had a fault with the 700R so I would not listen to the naysayers 🤔
 
I did a little bit of driveway work today, installed my trans cooler and ran the cooler lines. I looked at a few potential mounting locations and settled on a spot along side the frame under the passenger door. The spot is close to the ports on the transmission and there's a gap where the frame and body are separated by about an inch, perfect to pass the lines over the frame rail.
Once I had the location pretty much sorted, I lucked out and 2 of the existing holes in the frame worked great but I did have to drill a 1/4" hole through the frame for the 3rd bolt. The 4th mounting hole lands off the frame so I'm just going to tack weld a tab on there. The cooler is held away from the frame with 1" spacers so there will be plenty of air flow.
20220805_184234.jpg
My next step was to disconnect the return line from the transmission and remove that hard line to the radiator completely.
20220805_160623.jpg
20220805_161422.jpg
With everything out, I started planning how I was going to make my hoses and what combination of fittings to use. I opted to leave the female flare to male NPT adapter going into the tranny because I didn't have a swivel NPT fitting to put on the hose (anyone who's ever dealt with non-swivel NPT fittings in difficult spots knows what I'm talking about). I knew I had to go from 1/4 tube size at the tranny all the way up to -10 JIC on the cooler and I wanted to use a 45 degree to approximately match the angle of the hard line. Luckily had a couple of 1/4 flare fittings for -06 hose that I was able to bend.
20220805_161650.jpg
I dug out a couple of -06 male to -10 female JIC 90 degree adapters to go into the cooler so that locked down the cooler-side fittings. All that was left was to test fit all the hose lengths, fitting angles, and adapters before final assembly.
20220805_162323.jpg
Once the hoses were made I routed everything, tightened the fittings, and added copious amounts of zip ties. The new hose going from the radiator to the cooler is just secured to the hard line coming out of the pressure side.
20220805_185340.jpg
20220805_184225.jpg
I still need to add a thermostat switch and temp sensor coming out of the pressure port so the hard line might get replaced with a hose later on. I noticed 2 threaded holes on the bottom of the tranny case, right about where trans lines cross from the passenger side to the driver, so they'll be perfect for a couple of cable clamps.
I still need to wire up the fans with the thermostat but I made good progress today. Next will probably be the new Derale cooling pan and then I'll dive into the wiring. I'm waiting on an auxillary fuse panel to arrive so power to the fans will probably wait until then.
 
Last edited:
Did a little more today after work. I started with dropping the transmission pan and pulling the filter
20220810_165659.jpg20220810_165713.jpg
Next, I located the port where the pressure switch goes and pulled the plug out of it. Looks like some clearance issues
20220810_172808.jpg20220810_180522.jpg
No big deal, I just pulled 2 bolts and loosened the 3rd on the 2nd gear accumulator housing and swung it out of the way. The pressure switch threaded right in and I just had to bend the connectors down so my female spade connectors would fit
20220810_181637.jpg20220810_181652.jpg
Next, I cut the power wire to the solenoid and wired the pressure switch in between. I even got fancy and notched the little plastic conduit to re-route the wire
20220810_182650.jpg20220810_183809.jpg20220810_183814.jpg
Now, I'm no wiring guru but what this SHOULD do is only allow the lockup to engage when the transmission shifts into fourth gear. As soon as it shifts into third, the pressure drops and the switch disconnects power to the lockup solenoid (if anyone sees any issues, please speak up).
 
Last edited:
Next, filter went back in and I got the new pan and fresh gasket ready to install.
20220810_184235.jpg20220810_183928.jpg20220810_184108.jpg
For now, I decided my temp probe can go on the transmission pan so I prepped that as well
20220810_191521.jpg
I put everything back together and started replacing the fluid.
20220810_191738.jpg
After I put in the cooler, I didn't add any fluid because I knew I had more work to do anyway. When I dropped the old pan, I recovered 1 gallon of fluid and with the new pan and cooler it took 2 gallons to fill it back up. Nearly doubled my capacity! 🤯

My auxillary fuse panel came in today along with my high-current 120A relay and 60A maxi fuse holder so I'm ready to start wiring up the fans and thermostat. The inline thermostat housing uses -06AN fittings so I'm going to run another couple of -06 hydraulic hose coming out of the pressure port. I'll probably do a 10" whip hose to the fan thermostat switch and then run the rest of the way to the radiator from there. Stay tuned for more.
 
First major hiccup today... there was a puddle of ATF under the truck When I got home. Found a leak around the pan gasket and I figured the pan bolts just needed to be snugged up again after idling for a while yesterday. I got to business and quickly realized that the rear center bolt had gone from righty-tighty to righty-loosey. 🤬
I drained the pan and pulled all of the bolts and discovered that one of the bolts was slightly longer than the others but it wasn't in the place with the stripped hole.
20220811_160221.jpg20220811_160248.jpg
I'm guessing the shop had found the same problem and just wound a longer bolt in to grab the last few unaffected threads and I put the longer bolt in a different place when I replaced the pan. When I went to snug the shorter bolt in the stripped hole, the last thread or two must've let go. Upon closer inspection, the bolt hole is not only stripped but just slightly oblonged. My guess is that the donkeys who originally "rebuilt" the transmission for the previous owner backed that bolt most of the way out after pulling all of the others and used it as a pivot to drain the fluid out of the pan. Now, I realize how stupid that sounds but I wouldn't even consider it a possibility if I hadn't personally witnessed professional "mechanics" do that very thing on more than one occasion.
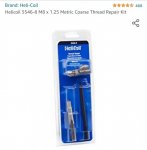
Anyway, I've considered my options and I've decided that a helicoil is the best way to proceed. The silver lining is that I caught the issue before it became a serious problem on the ride to SC and I have a spare pan gasket ready to go on.
Screenshot_20220811-174141_Amazon Shopping.jpg
Tune in next time for another exciting episode of "The Reasons That I Hate Automatic Transmissions"
 

Mullaney

Well-known member
Steel Soldiers Supporter
Supporting Vendor
7,716
19,766
113
Location
Charlotte NC
First major hiccup today... there was a puddle of ATF under the truck When I got home. Found a leak around the pan gasket and I figured the pan bolts just needed to be snugged up again after idling for a while yesterday. I got to business and quickly realized that the rear center bolt had gone from righty-tighty to righty-loosey. 🤬
I drained the pan and pulled all of the bolts and discovered that one of the bolts was slightly longer than the others but it wasn't in the place with the stripped hole.
View attachment 875535View attachment 875536
I'm guessing the shop had found the same problem and just wound a longer bolt in to grab the last few unaffected threads and I put the longer bolt in a different place when I replaced the pan. When I went to snug the shorter bolt in the stripped hole, the last thread or two must've let go. Upon closer inspection, the bolt hole is not only stripped but just slightly oblonged. My guess is that the donkeys who originally "rebuilt" the transmission for the previous owner backed that bolt most of the way out after pulling all of the others and used it as a pivot to drain the fluid out of the pan. Now, I realize how stupid that sounds but I wouldn't even consider it a possibility if I hadn't personally witnessed professional "mechanics" do that very thing on more than one occasion.
Anyway, I've considered my options and I've decided that a helicoil is the best way to proceed. The silver lining is that I caught the issue before it became a serious problem on the ride to SC and I have a spare pan gasket ready to go on.
View attachment 875537
Tune in next time for another exciting episode of "The Reasons That I Hate Automatic Transmissions"
.
Good plan. Heli-Coil is definitely the way to go.
At least it will be a one time and done solution to the bolt problem.

Always makes you wonder WHY when the original fixer knew that he (she) monkeyed the threads - and didn't fix it then and there...
 
.
Good plan. Heli-Coil is definitely the way to go.
At least it will be a one time and done solution to the bolt problem.

Always makes you wonder WHY when the original fixer knew that he (she) monkeyed the threads - and didn't fix it then and there...
The original fixer also couldn't figure out why reverse wouldn't work and said "there must be a leak-by in the case somewhere" when really, the clip for the booster valve wasn't seated completely, the check balls where in the wrong place, and the lip seal had a very obvious slice in it. The stupidity of some of the people that claim to be mechanics astounds me sometimes.
 

Mullaney

Well-known member
Steel Soldiers Supporter
Supporting Vendor
7,716
19,766
113
Location
Charlotte NC
The original fixer also couldn't figure out why reverse wouldn't work and said "there must be a leak-by in the case somewhere" when really, the clip for the booster valve wasn't seated completely, the check balls where in the wrong place, and the lip seal had a very obvious slice in it. The stupidity of some of the people that claim to be mechanics astounds me sometimes.
.
Agreed. And, sad but true
 
I decided to work on the pressure line today while I waited for the helicoils to arrive. At first, I'd planned to replace the hard line with a hose just like the return line, especially because the thermal switch housing for the cooler fans has -06 JIC fittings on either side. I had second thoughts while removing the hard line because it's such a pain to reach and decided to leave at least the first foot of the hard line for now.
20220812_194647.jpg20220812_195657.jpg
At the end of that foot of hard line is a male SAE inverted flare fitting that goes into a female coupler which is an ok spot for my thermal switch.
20220813_190150.jpg
I happen to have a couple of SAE to NPT adapters so a tee fitting for the switch would be perfect. The only one I had laying around had 2 females and a male, which is normally my favorite but wasn't going to work for this. Luckily, I was bored and had some time to kill and started by snipping the male end off.
20220813_153129.jpg
I didn't have the right NPT tap for switch mount so I just went with something close.
20220813_153514.jpg
Then, I just ran a die down the switch mount to match the threads I just tapped.
20220813_154102.jpg20220813_154311.jpg
Next, I heated the tee up with a torch hit it with some silver solder to permanently seal the threads. I stuffed a plug and air fitting in to leak test it just in case and it was good at 150psi of air.
20220813_155719.jpg
Lastly, I waited for it to cool completely and screwed the temp switch into my contraption, dropped it, and broke the damn switch. 🤬
 
While swearing loudly about the broken switch, a nervous Amazon guy peaked his head around a corner and handed me my helicoils. He sure looked relieved when I gave him a big grin and a thank-you. 😆
Here's a fun little tutorial on helicoils:
If you've never used them, helicoils are a dream so long as you take your time and do it right. Step one is to very, very slowly and carefully drill out the old threads with the indicated bit size, in this case, a 21/64". There is no "close enough"; if you don't have the correct drill, go get it. I had to remove the transfer case skid plate to get the right drill angle but once it was out of the way, I had a straight shot.
20220813_171456.jpg
Next, VERY slowly and carefully start tapping the hole using the provided tap and some cutting oil. If your angle is a little off, you can screw up the whole process so make sure you check the angle from the "X and Y axis" for the first few threads. Use the correct tap holder. Vice grips are not "good enough".
20220813_172345.jpg
Once you've bottomed out the tap, clean the chips out of the hole COMPLETELY, put a coil on the insertion tool and gently start threading it in. DO NOT FORCE IT IF IT GETS STUCK. You can break the little tab at the end prematurely and it can be a pain to get the coil back out once that happens. If the coil keeps getting stuck, run the tap back in and then hose out the hole again with some Brakleen.
20220813_172953.jpg
Once the coil is wound in flush with the surface, give it another 1/4 to 1/2 turn in. Next, select a round punch with a flat end that slips into the coil and give it a sharp tap. The tab at the end of the coil should snap off and come right out.
20220813_173849.jpg
Congrats! You've successfully fixed a boo-boo.

Now that I'm past that little annoyance, I'm going to go throw a smear of black RTV on my new pan gasket and bolt the pan back on the tranny so it stops drooling ATF all over my driveway.
 
Last edited:
Plot twist: after going through all of that trouble making a tee adapter and breaking the switch, I found the correct tee and bushing I needed.
20220813_195252.jpg
Well, at least it's all in and ready for when the switch arrives in a couple of days. Looking at it, I kind of like how the hard line will end up tucking the switch up near the starter and I have that threaded hole in the tranny right next to it to build a bracket off of
20220813_195853.jpg
I just finished tourque-ing the pan bolts in and because of the recent drama of the stripped hole, I only went to 87 in-lbs for now. When I refill the trans and let it warm up and idle for a while, I'll re-torque the bolts a final time.
 

Mullaney

Well-known member
Steel Soldiers Supporter
Supporting Vendor
7,716
19,766
113
Location
Charlotte NC
Plot twist: after going through all of that trouble making a tee adapter and breaking the switch, I found the correct tee and bushing I needed.
View attachment 875788
Well, at least it's all in and ready for when the switch arrives in a couple of days. Looking at it, I kind of like how the hard line will end up tucking the switch up near the starter and I have that threaded hole in the tranny right next to it to build a bracket off of
View attachment 875789
I just finished tourque-ing the pan bolts in and because of the recent drama of the stripped hole, I only went to 87 in-lbs for now. When I refill the trans and let it warm up and idle for a while, I'll re-torque the bolts a final time.
.
Looks like you made good progress today!
Hate to hear that your switch jumped down on the floor and broke itself.
 
It's not directly transmission related but I spent a few hours last night wiring up my auxillary fuse panel and gauge pod.

20220816_194732.jpgScreenshot_20220817-130911_Gallery.jpg
The lockup solenoid now has its own protected circuit and I just need to connect the trans temp sensor to the gauge, wire the fans to the panel and switch, and all the transmission wiring will be done... for now.
 
Top