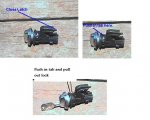
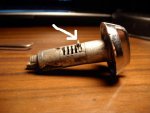
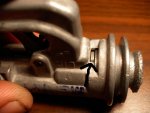
Played with it for an hour - I'm obviously mechanically challenged... Finally found that putting a tiny allen wrench into the small hole in the center after the tab from step 2 is pressed down will occasionally find its way into a hole in the tab that allows it to be retained in the "down" position. Then step 3 can be done. I then installed it onto the glove box I am using also in the same pinned down and latched position. It was a little aggravating trying to figure it out even with the destroyed cylinder I was replacing to look at and the diagram/instructions above. Definitely less than obvious. Something this simple ran me a little hard, I almost changed the whole glove box instead. See pics attached...on the non-locking model you have to press this (White arrow) to release the cylinder. On a locking model, you press this (white arrow) and insert the key with it depressed, and then it will come out. The key will hold it down once you've inserted it.