- 2,677
- 8,648
- 113
- Location
- Alexandria, La
Guys-
I had the issue where my Purge valve was sticking open. Followed some advice and lubed it to no avail. It turns out the O-ring inside had disintegrated, so I had to rebuild.
No one was able to find the TM section for rebuilding the Purge valve on the dryer, so I figured I'd be the lab rat and post my results, so here you go.
(This is literally the easiest thing I've done on the truck).
Here's what you need:
Tools:
8mm socket and 3" extension
Snap ring pliers
Regular pliers
Crescent wrench for the air line.
Parts:
Air Dryer Purge Assembly ( plunger with o rings) (Air Plus and Purest Dryers)Napa/TruckPro/HaldexDA33115 ($109 and change after tax at NAPA).
The rebuild kit comes with lube and everything you need, so you're good there.
In retrospect, I could have done this without dismounting the dryer, but as I didn't know what I was getting into, I removed it from the truck to work on it.
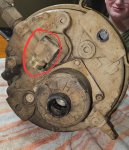
First, using the crescent wrench, disconnect this airline, as it will be in the way:

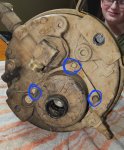
Next, using the 8mm socket, remove these three bolts and half plate and valve cover:

Next is the old snapring, remove it and using pliers, twist and pull the old plunger assembly out:


(I cleaned the valve housing really good at this point).
Install the supplied Orings in the rebuild kit on the new plunger and using the supplied grease, lube it up and insert it into the housing and install the new snap ring included in the kit:

Reinstall your cover, reattach the air line and test!
(Note, there is a wonky half cover that is between the bolt heads and the assembly cover.)
Any questions, feel free to reach out!
I had the issue where my Purge valve was sticking open. Followed some advice and lubed it to no avail. It turns out the O-ring inside had disintegrated, so I had to rebuild.
No one was able to find the TM section for rebuilding the Purge valve on the dryer, so I figured I'd be the lab rat and post my results, so here you go.
(This is literally the easiest thing I've done on the truck).
Here's what you need:
Tools:
8mm socket and 3" extension
Snap ring pliers
Regular pliers
Crescent wrench for the air line.
Parts:
Air Dryer Purge Assembly ( plunger with o rings) (Air Plus and Purest Dryers)Napa/TruckPro/HaldexDA33115 ($109 and change after tax at NAPA).
The rebuild kit comes with lube and everything you need, so you're good there.
In retrospect, I could have done this without dismounting the dryer, but as I didn't know what I was getting into, I removed it from the truck to work on it.
First, using the crescent wrench, disconnect this airline, as it will be in the way:

Next, using the 8mm socket, remove these three bolts and half plate and valve cover:

Next is the old snapring, remove it and using pliers, twist and pull the old plunger assembly out:


(I cleaned the valve housing really good at this point).
Install the supplied Orings in the rebuild kit on the new plunger and using the supplied grease, lube it up and insert it into the housing and install the new snap ring included in the kit:

Reinstall your cover, reattach the air line and test!
(Note, there is a wonky half cover that is between the bolt heads and the assembly cover.)
Any questions, feel free to reach out!
Last edited:


