• Steel Soldiers now has a few new forums, read more about it at: New Munitions Forums!

  • Microsoft MSN, Live, Hotmail, Outlook email users may not be receiving emails. We are working to resolve this issue. Please add support@steelsoldiers.com to your trusted contacts.

How to turn on or diagnose Marker Lights on top of cab and on Van Box (M1079)

radbad

Member
40
3
8
Location
Utah
Hi guys,

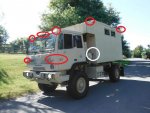
I took the truck in to get Utah Safety and Emissions testing, and everything passed (!) with the exception of the Marker/Clearance Lights on the cab and box. The items circled in red on the picture linked below don't illuminate.

http://i.imgur.com/VLmqdcT.png

Can someone tell me which switch position should make these illuminate? I assume SER Drive would turn them on, but I want to make sure I'm going in the right direction and I haven't found confirmation in the TMs.

Has anyone had this issue before? My plan is to check all circuit breakers and then begin checking the wiring. Any guidance on troubleshooting for these?

Also, I believe the marker lights on the van require the 12/24v connector (circled in white) to be connected. Can anyone confirm this? I know I'm a little bit on my own since I have the van body :)

Cheers,
Brian
 

MtnSnow

New member
1,466
14
0
Location
NSL, UT
Here is the pic for others. VLmqdcT.jpg
Unfortunately not having this model I can't give you a positive answer to your question but I will say if none of the clearance/marker lights are coming on in the SER drive position I would be checking your fuses & relays for the lights
 

bikeman

Well-known member
Steel Soldiers Supporter
2,894
501
113
Location
Ft. Bragg, NC
The cab marker lights should come on in service drive. Double check your relays and circuit breakers. you can also pull one of the bulbs to verify the part number. it should be a 12v bulb NOT a 24v bulb.

As for the workshop box. I'm not sure. Again, make sure your relays and CBs are set...
 

radbad

Member
40
3
8
Location
Utah
Awesome - thanks guys. I'll dig into that tonight or tomorrow.

Are the breakers and relays readily available if I search the PN online? Any tricks to finding them to buy?
 

radbad

Member
40
3
8
Location
Utah
We're in the process of taking everything out. I won't be home in time to take any pics tonight. What do you want to know? In general, it's an open box with a few steel runners on the bottom and sides for bump protection when loading things. There's a circuit breaker like you'd see in a house in the back right side, flourescent light fixtures on top, 110AC outlets on either side dropped from the ceiling, and a few other outlets for phone and 12 or 34VDC. Openable windows on both sides. AC unit mounted on the front with a "window" to the box. Heater can go on the front right opposite the AC, but this vehicle doesn't have one.

We're building into a camper box, so I'm happy that the inside will be a big empty box once we're doing stripping it out.
 

pkl2fly

fixer
Steel Soldiers Supporter
34
27
18
Location
Coronado, CA
RADBAD,

top switch to right two clicks, bottom switch centered if my memory serves me...I will check tonight and post if you haven't sorted it out yet.

Also helps to look over the PDP and check that the resetable CBs are holding and not tripped. My clearance lights tripped the resettable but didn't melt the 25A non-resetable fuse.

I too have one in camperizing mode (abt 75% done).

The interior box lights (not the flourecents) are 24v and are wired through the rear door switch. They are also wired with the blackout switches on the (5)window shades and the covered blackout toggles on the panel. Mine was not wired per the TM so I am in process of re-engineering the wiring for the 24v lights...

Great truck, best of luck with the project.

PM if you have any questions...

Paul
 

radbad

Member
40
3
8
Location
Utah
Thanks Paul!

I forgot to circle back when we figured it out... it was just a circuit breaker mislignment. Half of the breakers were replaced with ones that only fit if you put align them just right with the connectors. I'll replace those soon. Now I can go pass the Safety Inspection :)

We also took the cable that powers to the top front marker lights and hid it behind the interior body panel. It took about 4 hours to get the wires all out and then threaded through and around the body panels and connected back up. Looks much better, and it'll enable us to put more easily upholster the inside.

Would love to see pics of your camper progress!
Cheers,
Brian
 
Top
AdBlock Detected

We get it, advertisements are annoying!

Sure, ad-blocking software does a great job at blocking ads, but it also blocks useful features of our website like our supporting vendors. Their ads help keep Steel Soldiers going. Please consider disabling your ad blockers for the site. Thanks!

I've Disabled AdBlock
No Thanks