Overdrive
Active member
- 411
- 96
- 28
- Location
- Wentzville, Missouri
I posted some of this in the AC thread but thought it would be helpful to have its own write-up for the AC Compressor brackets installation. This is a write up using the two key upper and lower brackets used to install an air conditioning compressor on an LMTV. I did this installation on my 1997 A0 LMTV with the CAT 3116 engine.
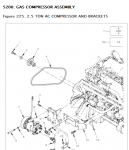
Installing item #12 (upper bracket) and #15 (lower bracket) in the diagram

Here is the compressor mounted up using the two brackets. CAUTION is required as you are unbolting the left front engine mount bolts for the lower bracket, a few front engine cover bolts, and unbolting the ONLY two bolts that hold your air pump/power steering pump to the front cover/engine.
In the diagram for the brackets it shows a spacer (item #14) inserted on the rear engine mount bolt between the block and the lower bracket. I need to find a suitable washer or spacer and stick it in there. As it is, you MUST NOT TIGHTEN the lower bracket bolts (2 engine mount bolts) until you have ALL the upper bracket bolts installed (engine cover, pump) and attached to the lower bracket loosely otherwise you will be cursing and trying to use a pry-bar to get the lower and upper bracket bolts to match up... Don't ask me how I know this, Jedi training


I used longer metric bolts (of the proper strength same as the factory CAT bolts) for all the engine cover and pump bolts since the upper bracket adds about a 1/4". be VERY careful to not jar the air compressor loose when doing this. My Air pump did not move when I unbolted it but do this at your own risk since yours may move. Also, the threads on the lower bracket that attach the upper bracket are easily stripped. I stripped one and was able to drill it out and put a nut on the bolt. You can see the three grade8 bolts with the 4th hole the one I stripped.

I eventually routed the big wire loom behind the bracket for a cleaner appearance and to not pinch anything.

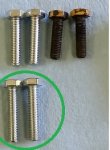
Pic of two longer bolts I used for the Air Pump.
It looks like ALL the threads on the upper bracket are clogged with powder coat and machining residue so you MUST chase them with a tap or you will mess up your bolts/threads.
For the AC compressor to upper bracket and upper to lower bracket I used SAE bolts. All other bolts already on the truck were metric.


When your done please be sure to torque your two left front engine mount bolts... Actually check them ALL since I found all of mine to be scary loose.

You MUST torque the engine cover, air pump, and engine mounts to spec... you do not want your air pump coming loose going down the highway. It is REALLY tight in there once the brackets are in place but I was able to torque those bolts.


I hope folks find this helpful.
OD
Installing item #12 (upper bracket) and #15 (lower bracket) in the diagram

Here is the compressor mounted up using the two brackets. CAUTION is required as you are unbolting the left front engine mount bolts for the lower bracket, a few front engine cover bolts, and unbolting the ONLY two bolts that hold your air pump/power steering pump to the front cover/engine.
In the diagram for the brackets it shows a spacer (item #14) inserted on the rear engine mount bolt between the block and the lower bracket. I need to find a suitable washer or spacer and stick it in there. As it is, you MUST NOT TIGHTEN the lower bracket bolts (2 engine mount bolts) until you have ALL the upper bracket bolts installed (engine cover, pump) and attached to the lower bracket loosely otherwise you will be cursing and trying to use a pry-bar to get the lower and upper bracket bolts to match up... Don't ask me how I know this, Jedi training


I used longer metric bolts (of the proper strength same as the factory CAT bolts) for all the engine cover and pump bolts since the upper bracket adds about a 1/4". be VERY careful to not jar the air compressor loose when doing this. My Air pump did not move when I unbolted it but do this at your own risk since yours may move. Also, the threads on the lower bracket that attach the upper bracket are easily stripped. I stripped one and was able to drill it out and put a nut on the bolt. You can see the three grade8 bolts with the 4th hole the one I stripped.

I eventually routed the big wire loom behind the bracket for a cleaner appearance and to not pinch anything.

Pic of two longer bolts I used for the Air Pump.
It looks like ALL the threads on the upper bracket are clogged with powder coat and machining residue so you MUST chase them with a tap or you will mess up your bolts/threads.
For the AC compressor to upper bracket and upper to lower bracket I used SAE bolts. All other bolts already on the truck were metric.


When your done please be sure to torque your two left front engine mount bolts... Actually check them ALL since I found all of mine to be scary loose.

You MUST torque the engine cover, air pump, and engine mounts to spec... you do not want your air pump coming loose going down the highway. It is REALLY tight in there once the brackets are in place but I was able to torque those bolts.


I hope folks find this helpful.
OD
Last edited:


