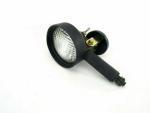
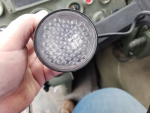
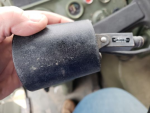
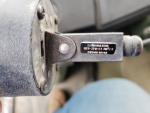
The picture isn’t very good, but I know the M2 Bradley had “map lights” and so did rotary aircraft.View attachment 864789anyone seen a light like this in an LMTV or any other vehicle. does not seem to be in the TM part manual that i can find
-
Steel Soldiers now has a few new forums, read more about it at: New Munitions Forums!
New LMTV owner
- Thread starter FarmingSmallKubota
- Start date

More options
Who Replied?- 1,813
- 1,518
- 113
- Location
- Orlando, FL
I've seen several handheld corded lights that pop up on eBay from time to time. https://www.ebay.com/itm/324487234972View attachment 864789anyone seen a light like this in an LMTV or any other vehicle. does not seem to be in the TM part manual that i can find

I have these lights but with brackets for hanging / stowing - not magnetic bases. I made a cable that connects to the RAWLS receptacle & I changed the bulb from 24V to 12V. They work great!I've seen several handheld corded lights that pop up on eBay from time to time. https://www.ebay.com/itm/324487234972
View attachment 864797
- 469
- 1,116
- 93
- Location
- Wapakoneta, Ohio
- 2,034
- 5,224
- 113
- Location
- Portland, OR
I put one of these on each sun visor. They are bright AF, and have both red and white LED's. CHEAP and won't drain the truck batt if you leave it on:
Bonus - you can pull one and clip it to your hat if you need a work light.
Bonus - you can pull one and clip it to your hat if you need a work light.
- 469
- 1,116
- 93
- Location
- Wapakoneta, Ohio
Slow progress but its progress, brake cage plugs came in so those are sealed up, caging bolts are put back in the storage position around the chambers and i tried to grease the truck. Its been a long time since this truck has seen a grease gun. about half took grease, ran out 2 tubes of grease in the Dewalt and had to switch to the manual gun it luckily got a couple of more to take grease. Grease joint Rejuvenator has been ordered so they will eventually get greased and another batch of grease ordered to restock. next good weather day is to find the leak from the air over hydraulic system. currently makes the bottom of the truck look like there are leaks everywhere. just got the seal kit for the latch, but i believe a hose is leaking. hopefully the wife will push buttons so i can see where it is coming from.
I believe many interior aircraft lights came with red, green, or blue filters or you could “blackout” the white light. Those could be aircraft interior lights but not used where any light would be seen from a door or window.
- 494
- 1,073
- 93
These are a good find. Thanks. Ordering a fistful to have around.I put one of these on each sun visor. They are bright AF, and have both red and white LED's. CHEAP and won't drain the truck batt if you leave it on:
Bonus - you can pull one and clip it to your hat if you need a work light.
Also, I'm digging the UV ones. I ordered a few of those as well. Hopefully they work well with my NOGs.
- 1,813
- 1,518
- 113
- Location
- Orlando, FL
You want IR, not UV, for that (though the NVGs will amplify any light in the visible spectrum too).These are a good find. Thanks. Ordering a fistful to have around.
Also, I'm digging the UV ones. I ordered a few of those as well. Hopefully they work well with my NOGs.
- 469
- 1,116
- 93
- Location
- Wapakoneta, Ohio
Any advise on freeing up the throttle peddle. I tilted the cab up and touched one of the springs and it broke, so i will replace that, but the peddle in the cab has to be pulled up
coachgeo
Well-known member
- 5,147
- 3,462
- 113
- Location
- North of Cincy OH
common issue. Your on the right track.... replace springs, search internet on how to lube bicycle, motorcycle, boat?? brake, fuel cables. Some have modded their fuel pedal with a spring from a screen door hinge even.Any advise on freeing up the throttle peddle. I tilted the cab up and touched one of the springs and it broke, so i will replace that, but the peddle in the cab has to be pulled up
- 1,813
- 1,518
- 113
- Location
- Orlando, FL
The cables are old and corroded inside, so they just don't move smoothly. @Suprman suggested filling the rubber boot with silicone oil and gently using air pressure to force the oil down through the jacket. I tried that, but couldn't get it to work. You may have better luck.Any advise on freeing up the throttle peddle. I tilted the cab up and touched one of the springs and it broke, so i will replace that, but the peddle in the cab has to be pulled up
- 494
- 1,073
- 93
This is kind of on my list as well. There's so much spring on mine that my leg gets tired after a bit of standing on the pedal to keep it up to speed on the highway. I'm wondering if maybe just swapping it for a quality aftermarket replacement is in order.
I have not looked AT ALL yet to see how the cable attaches at each end, but I'm thinking one of these Lokar units might be made to work. https://www.lokar.com/throt-cable-kickdowns.html
I have not looked AT ALL yet to see how the cable attaches at each end, but I'm thinking one of these Lokar units might be made to work. https://www.lokar.com/throt-cable-kickdowns.html
- 469
- 1,116
- 93
- Location
- Wapakoneta, Ohio
I am going to try a cable luber and see if that worksThis is kind of on my list as well. There's so much spring on mine that my leg gets tired after a bit of standing on the pedal to keep it up to speed on the highway. I'm wondering if maybe just swapping it for a quality aftermarket replacement is in order.
I have not looked AT ALL yet to see how the cable attaches at each end, but I'm thinking one of these Lokar units might be made to work. https://www.lokar.com/throt-cable-kickdowns.html
- 469
- 1,116
- 93
- Location
- Wapakoneta, Ohio
made some progress today and had some failures of equipment and pride. so the good news is that the oil, fuel, fuel water filters all got changed. Only issue i had was i had ordered 2 fuel filters from equipment parts sales and unfortunately the nsn was correct on the box, but the Baldwin B6 filters were not even a close match. so not sure what happened, but luckily i had a 3rd correct napa filter at the house. I got the grease rejuvenator out and tried clearing some of the grease zirks but was unsuccessful so i will keep trying. on to the Cab Bushings. Passenger side was not bad to replace except for a rusty bolt. cheater pipe and it came loose. The other side was a whole different ball game. extensions are needed for that side so your already at a disadvantage. Dewalt 18v, 24v robotec, neighbors 1/2" air impact and would not budge. Neighbor helped me steady the ole breaker bar and I snapped off my extension. I have a 3/4 wrench and socket but no extension so went to Tractor supply got back home and the impact socket really is too big to slide in the frame. so not sure what my next move is, but progress is progress. When i came in the house the wife asked if someone had beaten me up head to toe dirt and grease should sleep well tonight.
- 469
- 1,116
- 93
- Location
- Wapakoneta, Ohio
Its sunday nice day but that fight yesterday took a lot out of me so small things today tried grease fittings again no luck, Kroil soaked the cab bushing bolt, replaced the throttle return springs, and tried the cable luber and shot lube in the throttle cable going let things sit for a bit and figure out the next move
- 469
- 1,116
- 93
- Location
- Wapakoneta, Ohio
Happy to report that the cab bushing project is complete. Kroil soaking the bolt for 2 days made it come right off tonight. That was the easy part. 3 hours of later 10:30 pm diesel powered light plant glowing, bruise on the head from the dewalt light impacting the scull, fingers numb, arms cramping, and a wife calling me from the house to see if I was alive we are complete. The only way i would ever do that again was with someone with smaller hands. some tips for anyone else 1) vise grip locking clamp to secure the bolt down so it doesn't keep coming up will trying to put the nut on. 2) Take the front grill off 3) i was able to use the cab lift for the passenger side but needed a bottle jack to lift the driver side to get the bushing in. 4) i used electrical tape inside the nut to give enough ability to push and turn the nut. large hands and a tight space make it tough 5) practice tetris before doing this project as getting the spacer bottom bushing and that washer around the airline bracket and a bolt and nut that come off the frame is tricky.
Last edited:
- 469
- 1,116
- 93
- Location
- Wapakoneta, Ohio
not to much to report. I cant work on anything else until i have all the air/hydraulic leaks fixed. I ordered the rebuild kit for the air/hydraulic pump, the manifold i thought i had fixed is leaking like crazy so i set out on a rabbit hole to get the right parts to rebuild all of the valves. MME has a 78 dollar kit for just 1 valve and that was not going to work. TM says sk10-4 rebuild kit which is a Parker kit, 201 business days to get one as none exist in the country. found a tech manual on Parkers website that gave me the oring sizes, so went to the Parker store got the orings for all 4 valves $7.75 but no back-up rings. Parker will not sell them separate only in the kit but i got the part numbers so orings.com i think i have what i need coming. crossing my fingers i have all the parts, and a spare set for about $40 total.
- 469
- 1,116
- 93
- Location
- Wapakoneta, Ohio
So rain all week had put a damper on truck progress. so this week rebuilt the hydraulic manifold and it still leaks, 2 orings that are not shown on the parts page are the culprit i have not had good weather to take it apart again nor do i have a small enough puller. removed the air/Hydraulic pump from the truck today and did a full rebuild. I do not think the pump needed rebuilt as the reservoir was cracked and leaking. rebuild went well except after i got the part with the large spring together i found a spring i left out. threw in the towel and had to call the wife to help me get it together a second time. The replacement reservoir is aluminum and the self tapping screws were too long so had to cut them off. I will reinstall this week and hopefully my huge loss of fluid all over the place will be fixed, as nothing else seems to be leaking.
- 469
- 1,116
- 93
- Location
- Wapakoneta, Ohio
Well i have had the pump on and it will not pump just hisses, hand pump works. i have rechecked tm manuals taken the pump partially apart to check 1 thing and i am stumped where to go next. any help would be appreciated
- 110,879members
- 165,311threads
- 2,326,199posts
- 2,015online users


