• Steel Soldiers now has a few new forums, read more about it at: New Munitions Forums!

  • Microsoft MSN, Live, Hotmail, Outlook email users may not be receiving emails. We are working to resolve this issue. Please add support@steelsoldiers.com to your trusted contacts.

New M1008 Project

bwilson7990

Member
54
0
6
Location
York, Pennsylvania
Just started working on my buddy's 86 M1008 over this summer which was purchased with a Fisher MinuteMount EZ-V snowplow. The truck was a brush truck for a local fire company and they hacked up the wiring and neglected it for years. I've been using this forum just searching and reading various threads while troubleshooting issues and I had to post something to thank everyone for their contributions here. This forum is much nicer than many others I have been on prior, regardless of subject interest. So thanks guys- keep up the good work.

Now back to the truck...

It's had its fair share of electrical issues that we've been working on, some of which have been repaired some of which need new parts or further troubleshooting. Regardless, I just wanted to share this with everyone and see what people think. We've got big plans for her and plan to work on it as much as we can to get ready for winter.

As of now shes got a 54" roof-mounted LED lightbar, LED reverse lights, doghead starter relay mod, block heater, and a manual glow plug setup. We completely retouched the rear service light wiring harness and are in the process of installing fused power distribution for additional accessories. We also have 33" tires with some aggressive tread ready to mount.

After winter we are painting the entire truck and doing bedliner coating in the bed and cab floor, adding side steps, and a triple guage cluster on the a-pillar for volmeter, oil pressure, and water temp. I'll do my best to take lots of pictures and right up some threads on things that everyone might find interesting.

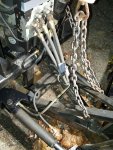
Here's a few pics of what were working with. Thanks again everyone for making this forum such an awesome resource for these old trucks.
 

Attachments

cucvrus

Well-known member
11,473
10,431
113
Location
Jonestown Pennsylvania
I am right up the road from you off I 81 N exit 90 if you want to see a CUC/V that has no hacking done to the wiring harness. I have 5 or 6 on site at all times. And several in the field out back for parts. Just an idea. My Son and I rebuild these things all the time. Mostly after being hacked up and in need of special care. Happy Holidays.
 

llong66

New member
453
2
0
Location
kokomo, In
bwilson, hello and welcome!
I was wondering where you found an a-pillar mount for our trucks, or if not for ours, what you found that fits?
Thanks and good luck!

Greg
 

bwilson7990

Member
54
0
6
Location
York, Pennsylvania
good luck with the truck ..now put that new tires on :D do you plan on painting it back to camo? olive? tan? or will it stay "fire dept." ?
Due to the unfortunate amount of red overspray on this truck from the fire dept I believe the plan is to strip down the reflective tape and other decals and paint her red again. This way we wont find red overspray everywhere forever. :-?
 

bwilson7990

Member
54
0
6
Location
York, Pennsylvania
I am right up the road from you off I 81 N exit 90 if you want to see a CUC/V that has no hacking done to the wiring harness. I have 5 or 6 on site at all times. And several in the field out back for parts. Just an idea. My Son and I rebuild these things all the time. Mostly after being hacked up and in need of special care. Happy Holidays.
This is fantastic. My buddy and I are actually down by the MD/PA line but that's still rather close considering the scope of the forum. I will be sure to reach out for parts or reference. Thanks so much.
 

bwilson7990

Member
54
0
6
Location
York, Pennsylvania
bwilson, hello and welcome!
I was wondering where you found an a-pillar mount for our trucks, or if not for ours, what you found that fits?
Thanks and good luck!
Hey Greg, at this point this is something in the plans but not something that has been acquired yet. I'm sure I'll end up doing a full write-up on this when the time comes if there isn't another thread with this information already. I'll be sure to let you know if I come across anything in the meantime.
 

bwilson7990

Member
54
0
6
Location
York, Pennsylvania
Work on Old Red this weekend

We decided to call her "Old Red". So here's an update:

We spent most of the weekend up to our neck in wiring trying to make sense of what we have and what we don't. There were a few things that we were unsure about but here's what we accomplished:

Glow Plugs-
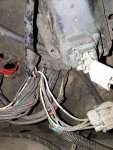
Since the glow plugs were already on a manual switch and the glow plug module was completely missing we decided to tear out the oem glow plug harness and resistors. Should we save these resistors for anything? Has anyone ever used them for anything else? How about the temp sensor or the location atop the intake manifold at the firewall where it connects, any aftermarket uses for that? We did save the oem relay for this system because it's heavy duty (appears identical to the doghead starter mod relay) and does still work properly. Lastly- we salvaged a few connections coming from the fuse box that used to connect to this system, specifically the switched hot pink/blk wire that we will use for acc for a radio and the blue hot for the "wait light" which we connected to the push button for the manual glow plug switch. This way the wait light illuminates when the glow plug button is pushed because I hate leaving things connected that serve no purpose. I grounded the pink/blk wire on the wait light to where the ground "tree" is typically found behind the cluster where the 4x4 light would be. (see wait_ground pic)

Custom switch panel (switches_front and switches_back pics)-
We (almost) completed wiring up the main power distribution and switches to run accessories in the engine bay. (We're powering glow plugs, roof-mounted light bar, CB radio w/PA, AM/FM radio, snowplow controller, and red LED ambient lighting under dash). (See power_distribution pic) I took the ground "tree" from the behind the cluster and bolted it to the shelf next to the starter relay for a master ground for the switch panel. (See switch_ground_tree pic) We are running ground switches that will ground relays for the accessories to keep all of the relays and fuses out in the engine bay and avoid hot electrical issues in the cab. All the wiring between the engine bay and cab is running up over the steering column towards the starter, voltmeter, and GEN 2 relay shelf. (see cable_run pic)

Courtesy Lights-
It's now known that the headlight switch is junk and is the reason for many of our lighting inconsistencies so it will be replaced this week. In light of this and figuring out that the courtesy light circuits (under dash and dome) both do work, were going to add door switch grounds which will ground a relay to power the courtesy lights. This circuit will be splice in after the headlight switch lead to the courtesy lights so that the manual feature of the headlight switch will still work and any time the doors are open the courtesy lights will illuminate. (Will post on this after installed)

Diagnostic Circuit-
Went ahead and removed this as there is really no use for it since we don't have the special military diagnostics reader (ISE something or another?) and it was a huge bundle of wires cluttering up the back side of the dash. (See removed_circuits pic)

LED reverse lights ($30 bucks on amazon)-
These were so easy, and spliced into the reverse light green wire and bolted up. Found a ground on the NATO trailer bracket. Now making daylight in reverse :D They're 60 degree flood style. (reverse and reverse_ground pics)

Batteries-
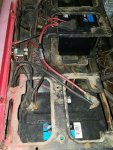
We added new terminals for both batteries and a few new wires where needed. It looks and functions so much better. Also ran an 8 gage hot off the rear battery to our main power distribution. Covered everything we possibly could in the engine bay with wiring loom and black zip ties for a clean look. If you look closely at the engine bay pic you can see where we use zip ties with sheet metal screws to support the wire loom. We cut the slack long to tuck the washer fluid tubing behind. WIN :D (see batteries and engine_bay pics)

To say the least, my fingers are sore and we are sleep deprived but winter is coming so no time to waste.

Let me know what you think.
 

Attachments

Last edited:

cucvrus

Well-known member
11,473
10,431
113
Location
Jonestown Pennsylvania
Risking being a wise guy. I would get the battery terminal ends pressed or soldered and sealed. The type that you added are an absolute failure item waiting to fail at any moment. These vehicles draw a lot of amps and the cable terminal ends you bolted on the ends are temporary ends at best. Have new heavier cable made up with sealed terminals and everything will work out better for you and your truck with the winter weather upon us here in south central Pennsylvania. You ask I am only trying to help. Happy Holidays.
 

bwilson7990

Member
54
0
6
Location
York, Pennsylvania
Risking being a wise guy. I would get the battery terminal ends pressed or soldered and sealed. The type that you added are an absolute failure item waiting to fail at any moment. These vehicles draw a lot of amps and the cable terminal ends you bolted on the ends are temporary ends at best. Have new heavier cable made up with sealed terminals and everything will work out better for you and your truck with the winter weather upon us here in south central Pennsylvania. You ask I am only trying to help. Happy Holidays.
This is a great point and I completely agree, it's actually been working discussion point already. We are on a budget so that's why we went with what we did. Could we get away with soldiering them really nice by hand and coating them heavily with liquid electrical tape? Trying to avoid buying brand new pressed/sealed terminal when we already put 50 bucks into what we have.
 

cucvrus

Well-known member
11,473
10,431
113
Location
Jonestown Pennsylvania
I don't see you being able to solder and seal the cables good enough. The steel plates are not fastened that well to the clamps. But if it is a budget item. I understand. Whatever works for you. I just wanted to lend a little advise and not get you worried. I never take into account the costs of things that I already have laying around to use and others don't. Selfish on my part. Happy Holidays.
 

bwilson7990

Member
54
0
6
Location
York, Pennsylvania
Yeah this is my first time working on one of these so any thing that's needed has to be bought or made. I appreciate the advice though and will take it into consideration while moving forward with this project. Thanks cucvrus!
 

tim292stro

Well-known member
2,118
41
48
Location
S.F. Bay Area/California
A few questions:

Where is the "ground-tree" grounded to?
How far away from the battery is the new power distribution block fused? (looks like the other side of the engine bay - too far IMHO, should be within 18" of the battery, the point is to protect that entire wire from the battery to the distribution block)
 

Skinny

Well-known member
2,130
488
83
Location
Portsmouth, NH
I agree, kill those terminal clamps.

I have to re-do everything on my M1010. I just bought $150 worth of cable and lugs on McMaster Carr to do this...not cheap. I would also run the cables on top of the battery hold downs or add some protective chaffe cover to them. Project looks like it is coming along! Always good motivation to see this. I am stuck trying to resolve starting/charging/glow plug issues on my new purchase because it was so hacked up. I would love to actually move on to fun stuff instead of trying to make battery and alternator cables.
 

cucvrus

Well-known member
11,473
10,431
113
Location
Jonestown Pennsylvania
I only ever fixed one M1010 for a customer. His was also hacked up from new it did not charge properly. I dismantled at least 5 or 6 M1010's myself. My method to repair the customers was to sacrifice an M1009 or an M1008/M1028 that was scrap and remove the entire wiring harness and alternator brackets to make it like a normal M1009 or M1008/M1028 with the standard dual alternators. His had A/C issues and the 13 R system was wasted from being hacked into also. But it was a low mileage M1010 and he wanted a camper so I did that and he lived happily ever after. He has since passed and M1010 went bye bye with a relative in another state. But I have done the same thing with the M1010's that I converted to regular snow plow trucks. Maybe someone here has it. Who knows.
 

Skinny

Well-known member
2,130
488
83
Location
Portsmouth, NH
I am converting mine over to how a normal CUCV charging system works except I am using a pair of Leece Neville 12v 160A self exciting units instead of the 27si units. I still have to integrate it to the batteries and bus bars. I pulled the entire engine harness and cut out the already hacked up DUVAC wires to clean it up. I just found out that someone hacked my GP harness and card holder too. I am beginning to hate volunteer fire department mechanics!

I will keep the compressor in case I want to run A/C in the cab since the overhead unit is going to be a cheap window shaker running off an inverter.
 

cucvrus

Well-known member
11,473
10,431
113
Location
Jonestown Pennsylvania
Have you ever camped in one of them M1010's? I hope you are a midget. I would put a hitch on the back and get a nice tow behind camper. Or get a pick up camper and mount it on back in a bed. That's Me. I like comfort. Not being able to stand up and being crowded in the back with no windows is eerie. Even it you converted it to a pop up it would have stand up room. I picture myself back there stuck in inclimate weather and not able to get comfortable. I slept in one many times when my Son's were young. I still have several of the Mark M1010's bodies in the field behind my barn. I don't sleep in them anymore. My Son's are all grown up. Maybe the grand children. Then maybe NOT. Only if my Son wants to accompany them. Not me. Happy Holidays. I will rent a camper. Or sleep in the barn.
 
Top