- 3,250
- 3,337
- 113
- Location
- NORTH (Canada)
Ok, so you have the plastic air wiper motors that many people hate and yours does not work - like mine. If you absolutely need to spend $80-100 on a new one, do not read any further.
If you want to see if you can fix yours, here is what you need:
Disassembly:
Remove wiper motor from truck (2 philips screws, adjustable wrench to take wiper arm off), remove air lines.
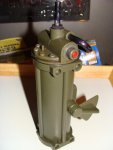
Remove the philips screws that hold the end cap on. Remove end cap and set aside.
Look at the wiper axle where the square cut-out is on the wiper motor body. Can you turn the lever and access the philips screw that locks the axle to the toothed pie-shaped lever that connects to the pistons inside the housing? If so, you are in luck. Remove the philips screw and pull the axle out.
If your motor is seized, look through the square cut-out and try to see the "toothed rod" that connects the pistons. Insert a flat screw driver, get leverage and move the piston towards the opening where you removed the end cap. Take it easy, do not go crazy. If you do not know what I am talking about, look at the pics below!
It is a double-piston setup. Once you moved the toothed rod far enough, you may be able to insert your screwdriver just beyond the O-ring of the second piston, in the gap between the piston face and the square cut-out and push the piston assembly further.
If the assembly locks up while you try to pry:
Check inside the wiper body whether the metal axle bushing on either side sticks into the lumen of the wiper body; the piston will get hung up there. If so, you need to remove the metal mounting bracket from the plastic wiper housing. Do not fret - just grind or cut the plastic rivets off, flush with the metal surface of the mounting bracket, and remove mounting bracket with the tube-like bushing and foamy spacer. The pic shows the rivets ground off:
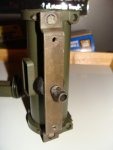
Now you should be able to push the piston assembly all the way out.
Look at the assorted parts:
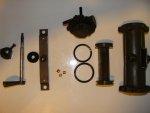
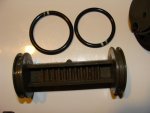
Notice the O-rings? The left one is swollen to significantly larger size - thanks to some air tool oil I had used for preventive maintenance. NO OIL into these wiper motors! Petroleum products cause the O-rings to swell up and make the wiper motor seize.
If your problem is a swollen O-ring or a broken O-ring or a gunked up wiper motor, clean everything, replace O-rings as needed, spray the inside of the wiper motor body lightly with silicone spray and re-assemble. See further below for how to deal with the mounting bracket you cut off.
If you have a broken wiper axle bushing, read on:
The three broken metal pieces visible in the parts overview picture are what's left of the wiper arm bushing that sits near the lever, on the wiper arm axle. Mine was in fragments.
If your bushing is broken or corroded (it is mystery metal, after all), and you are like me and do not stock a box full of replacement copper bushings, then you need to make your own.
I could do it, and so can you!
Cut a short segment off your 1/2 inch copper pipe.
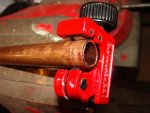
Put the segment into a vise and make a transverse cut. A Dremel with a mini metal grinding circular blade comes in very handy here.
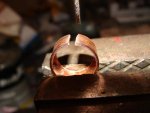
Select a drill bit that is as thick as the wiper arm axle close to the plastic lever. Slide the copper section over the drill bit and gently hammer the ring smaller so that the ends overlap. You need to keep turning the drill bit bit with the copper section to get it even.
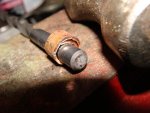
Put the copper segment back into the vise and cut off the overlapping piece.
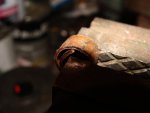
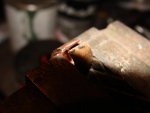
Put the copper segment back over the drill bit and and hammer it a little more snug.
Take some emery cloth or fine sand paper and polish the wiper axle. Ensure that the copper bushing fits over the wiper axle and the axle turns inside the new copper bushing with only slight resistance. Congratulations, you just fabricated a bushing!
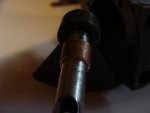
You will need to drill out the hole in the plastic wiper motor body where the new bushing is going to sit. I needed an 11/32 drill bit for mine. And - drill out the OTHER hole, not the one shown in this picture! You drill the hole OPPOSITE of where the metal mounting bracket sits!
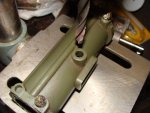
Start a tad smaller and use the drill to "grind" the hole a little larger if you cannot get the bushing in by gently (!) tapping it in with a hammer.
Check right away that the wiper axle slips into the bushing and turns with little resistance! If not, remove the bushing, re-size it and the hole, try again. The bushing needs to sit snug in the hole, flush with the outside of the wiper motor body and should not stick out into the inside of the wiper motor body. If it does, push it out a little, for re-assembly and push it back after the pistons are inserted.
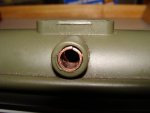
Assembly is pretty much the reverse of disassembly.
How to deal with the metal mounting bracket:
Drill a hole corresponding to the size of the sheet metal screws you selected into the centre of each of the plastic nipples the metal mounting bracket sits on.
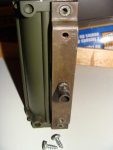
Attach the bracket and put the screws in - do not tighten all the way; leave a little wiggle room to make inserting the wiper axle easier!
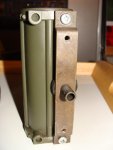
Spray the front wiper axle bushing (the metal pipe attached to the bracket) with silicone spray on the inside and insert the wiper axle as well as the pie-shaped lever that connects to the toothed rod and the pistons; if the piston you can see is flush with the opening of the wiper motor body, then the lever on the axle should be in middle and the philips screw inserts from straight up. Affix the lever with the philips screw. Exact adjustment of the lever position is not crucial, you can compensate when you mount the wiper arm.
Re-attach the end cap with the philips screws.
Congrats, you just rebuilt your plastic piece of garbage wiper motor, instead of trashing it or spending $$$.

If you want to see if you can fix yours, here is what you need:
- philips screw driver
- flat screw driver, large
- 2 new O-rings, 1 7/16" ID, 1/8 thickness work fine for most; someone said that 7/16 OD worked for him, so you may want to get a couple of both sizes.
- short piece of 1/2" copper pipe, hammer, drill bits, dremel or metal saw (if you need to replace the wiper axle bushings)
- 2 short sheet metal screws (if you have to grind off the plastic rivets that hold the mounting bracket)
- silicone spray
Disassembly:
Remove wiper motor from truck (2 philips screws, adjustable wrench to take wiper arm off), remove air lines.

Remove the philips screws that hold the end cap on. Remove end cap and set aside.
Look at the wiper axle where the square cut-out is on the wiper motor body. Can you turn the lever and access the philips screw that locks the axle to the toothed pie-shaped lever that connects to the pistons inside the housing? If so, you are in luck. Remove the philips screw and pull the axle out.
If your motor is seized, look through the square cut-out and try to see the "toothed rod" that connects the pistons. Insert a flat screw driver, get leverage and move the piston towards the opening where you removed the end cap. Take it easy, do not go crazy. If you do not know what I am talking about, look at the pics below!
It is a double-piston setup. Once you moved the toothed rod far enough, you may be able to insert your screwdriver just beyond the O-ring of the second piston, in the gap between the piston face and the square cut-out and push the piston assembly further.
If the assembly locks up while you try to pry:
Check inside the wiper body whether the metal axle bushing on either side sticks into the lumen of the wiper body; the piston will get hung up there. If so, you need to remove the metal mounting bracket from the plastic wiper housing. Do not fret - just grind or cut the plastic rivets off, flush with the metal surface of the mounting bracket, and remove mounting bracket with the tube-like bushing and foamy spacer. The pic shows the rivets ground off:

Now you should be able to push the piston assembly all the way out.
Look at the assorted parts:


Notice the O-rings? The left one is swollen to significantly larger size - thanks to some air tool oil I had used for preventive maintenance. NO OIL into these wiper motors! Petroleum products cause the O-rings to swell up and make the wiper motor seize.
If your problem is a swollen O-ring or a broken O-ring or a gunked up wiper motor, clean everything, replace O-rings as needed, spray the inside of the wiper motor body lightly with silicone spray and re-assemble. See further below for how to deal with the mounting bracket you cut off.
If you have a broken wiper axle bushing, read on:
The three broken metal pieces visible in the parts overview picture are what's left of the wiper arm bushing that sits near the lever, on the wiper arm axle. Mine was in fragments.
If your bushing is broken or corroded (it is mystery metal, after all), and you are like me and do not stock a box full of replacement copper bushings, then you need to make your own.
I could do it, and so can you!
Cut a short segment off your 1/2 inch copper pipe.

Put the segment into a vise and make a transverse cut. A Dremel with a mini metal grinding circular blade comes in very handy here.

Select a drill bit that is as thick as the wiper arm axle close to the plastic lever. Slide the copper section over the drill bit and gently hammer the ring smaller so that the ends overlap. You need to keep turning the drill bit bit with the copper section to get it even.

Put the copper segment back into the vise and cut off the overlapping piece.


Put the copper segment back over the drill bit and and hammer it a little more snug.
Take some emery cloth or fine sand paper and polish the wiper axle. Ensure that the copper bushing fits over the wiper axle and the axle turns inside the new copper bushing with only slight resistance. Congratulations, you just fabricated a bushing!

You will need to drill out the hole in the plastic wiper motor body where the new bushing is going to sit. I needed an 11/32 drill bit for mine. And - drill out the OTHER hole, not the one shown in this picture! You drill the hole OPPOSITE of where the metal mounting bracket sits!

Start a tad smaller and use the drill to "grind" the hole a little larger if you cannot get the bushing in by gently (!) tapping it in with a hammer.
Check right away that the wiper axle slips into the bushing and turns with little resistance! If not, remove the bushing, re-size it and the hole, try again. The bushing needs to sit snug in the hole, flush with the outside of the wiper motor body and should not stick out into the inside of the wiper motor body. If it does, push it out a little, for re-assembly and push it back after the pistons are inserted.

Assembly is pretty much the reverse of disassembly.
How to deal with the metal mounting bracket:
Drill a hole corresponding to the size of the sheet metal screws you selected into the centre of each of the plastic nipples the metal mounting bracket sits on.

Attach the bracket and put the screws in - do not tighten all the way; leave a little wiggle room to make inserting the wiper axle easier!

Spray the front wiper axle bushing (the metal pipe attached to the bracket) with silicone spray on the inside and insert the wiper axle as well as the pie-shaped lever that connects to the toothed rod and the pistons; if the piston you can see is flush with the opening of the wiper motor body, then the lever on the axle should be in middle and the philips screw inserts from straight up. Affix the lever with the philips screw. Exact adjustment of the lever position is not crucial, you can compensate when you mount the wiper arm.
Re-attach the end cap with the philips screws.
Congrats, you just rebuilt your plastic piece of garbage wiper motor, instead of trashing it or spending $$$.

Last edited:


 they only had air wipers.

