- 1,233
- 2,242
- 113
- Location
- Wenatchee, WA
OK - one last project before the snow flys! 
For as sexy as an M813 with a cargo cover is, it has a massive blind spot behind it which could hide a Prius or a taco truck or even a short bus full of children. I installed a rear view mirror that is actually a backup camera to show me the whole picture while I'm driving, parking or backing up and prevent crunching something I don't want to.
I started with an Auto-Vox V5 Pro because it only has 1 wire running to the mirror, it has front & rear cameras to record trips, and the GPS will display my actual speed since my speedo won't (16.00R20s).

A picture of a TV screen is usually polarized or whatever that distortion is called. To the human eye it's bright and clear.


So here's what involved:
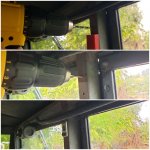
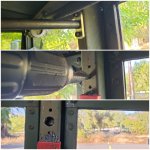
Our center windshield frame post is already drilled for what I assume is a rear view mirror so I'm using those original holes that were already sized at a #21 bit to tap to 10-32. The plan is to hide all the wiring inside the hollow post.


Since the mounting arm that came with the camera and even the optional mounts are made for angled windshields instead of flat/vertical glass, I decided to make my own mount and the flange of that helps locate the transfer punch for the 1/2" wiring hole.
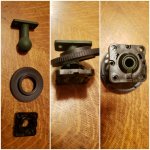
The bracket is simply a 10 gauge flange with 1/2" hole, a section of 1/2" x 0.049" wall stainless hydraulic tubing and a 22mm ball bearing drilled thru at 11/32" and then slightly counterbored to 1/2" on one end.


After the trial fit I shortened the tube 1/2" and got it tig welded all the way around. The ball bearing ended up being made out of heat treated 521000 alloy so it had to be annealed before it would drill.

~800°F

For as sexy as an M813 with a cargo cover is, it has a massive blind spot behind it which could hide a Prius or a taco truck or even a short bus full of children. I installed a rear view mirror that is actually a backup camera to show me the whole picture while I'm driving, parking or backing up and prevent crunching something I don't want to.
I started with an Auto-Vox V5 Pro because it only has 1 wire running to the mirror, it has front & rear cameras to record trips, and the GPS will display my actual speed since my speedo won't (16.00R20s).

A picture of a TV screen is usually polarized or whatever that distortion is called. To the human eye it's bright and clear.


So here's what involved:
Our center windshield frame post is already drilled for what I assume is a rear view mirror so I'm using those original holes that were already sized at a #21 bit to tap to 10-32. The plan is to hide all the wiring inside the hollow post.


Since the mounting arm that came with the camera and even the optional mounts are made for angled windshields instead of flat/vertical glass, I decided to make my own mount and the flange of that helps locate the transfer punch for the 1/2" wiring hole.
The bracket is simply a 10 gauge flange with 1/2" hole, a section of 1/2" x 0.049" wall stainless hydraulic tubing and a 22mm ball bearing drilled thru at 11/32" and then slightly counterbored to 1/2" on one end.


After the trial fit I shortened the tube 1/2" and got it tig welded all the way around. The ball bearing ended up being made out of heat treated 521000 alloy so it had to be annealed before it would drill.

~800°F

Last edited:


