You guys convinced me. I'll tear the block the rest of the way down. Really weird how the crank pulls out the side since there is no oil pan to drop like on most engines (at least the car engines I've worked on). Will be an interesting exercise I'm sure. I'm glad I got the TM and this forum to guide me!
-
Steel Soldiers now has a few new forums, read more about it at: New Munitions Forums!
Picked up 6 MEP-802A gensets and will be documenting making them all runners here
- Thread starter pclausen
- Start date

More options
Who Replied?So on the rings, there appears to be 2 different part numbers:
Piston ring set - standard ............................................750-11401 Up to 4100323LPW2
Piston ring set - standard ........................................... 750-13120 From 4100324LPW2
Since this particular unit is from 2009 (assuming the engine hasn't been swapped at some point), would it be safe to assume I should go with the newer/later part number?
The other thing I'll need to check to to make sure these are not oversize pistons which logically they wouldn't be, but those "050" stamps on the pistons would seem to indicate otherwise. I'll find out soon enough I suppose.
steelypip
Active member
- 769
- 68
- 28
- Location
- Charlottesville, VA
That piston looks great. Once you get the old rings off you might have to buff it a bit with fine abrasive to get the rust deposits off the tops of the ring lands. Looks completely serviceable.
Got the governor, cam and crank out.
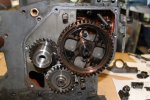
Here's the governor and timing rack pulled:
http://www.cstone.net/~dk/MEP802-8-9-01.JPG
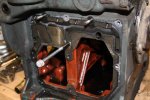
Pulling out the center bearing oil tube using intake manifold bolt:
http://www.cstone.net/~dk/MEP802-8-9-02.JPG
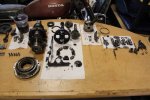
And here's the guts from the engine:
http://www.cstone.net/~dk/MEP802-8-9-03.JPG
I guess I might as well remove the center bearing to inspect and measure the center crank journal. Btw, I did get the 2 stuck piston rings off after soaking overnight in diesel. I broke both rings after getting them out so that I could use a piece of each to scrape out the grooves.
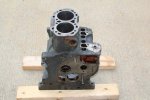
Some shots of the bare engine block. After doing the light hone, I'm debating if I should take it to the machine shop and have them drop it in their aluminum hot tank, or just power wash it real good myself. If I go the latter router, I would of course blow it out real good right afterwards and mist a film of out all over it.
http://www.cstone.net/~dk/MEP802-8-9-04.JPG
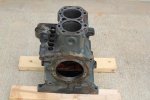
http://www.cstone.net/~dk/MEP802-8-9-05.JPG
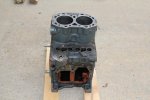
http://www.cstone.net/~dk/MEP802-8-9-06.JPG
Here's the governor and timing rack pulled:

http://www.cstone.net/~dk/MEP802-8-9-01.JPG
Pulling out the center bearing oil tube using intake manifold bolt:

http://www.cstone.net/~dk/MEP802-8-9-02.JPG
And here's the guts from the engine:

http://www.cstone.net/~dk/MEP802-8-9-03.JPG
I guess I might as well remove the center bearing to inspect and measure the center crank journal. Btw, I did get the 2 stuck piston rings off after soaking overnight in diesel. I broke both rings after getting them out so that I could use a piece of each to scrape out the grooves.
Some shots of the bare engine block. After doing the light hone, I'm debating if I should take it to the machine shop and have them drop it in their aluminum hot tank, or just power wash it real good myself. If I go the latter router, I would of course blow it out real good right afterwards and mist a film of out all over it.

http://www.cstone.net/~dk/MEP802-8-9-04.JPG

http://www.cstone.net/~dk/MEP802-8-9-05.JPG

http://www.cstone.net/~dk/MEP802-8-9-06.JPG
rustystud
Well-known member
- 9,364
- 3,273
- 113
- Location
- Woodinville, Washington
I've said before but I'll say it again. Your doing an excellent job "pclausen" !
Name is Peter rusty. 
Part number on the current pistons is 751-42670/5
The diameter across the bottom of the skirt faces is 85.96mm using my cheap digital calibers. Spec states the initial dimension as 85.891 - 85.901mm. I'll re-measure with my new digital micrometer once I get it calibrated. But it looks like I got standard sized pistons despite the /5 at the end of the part number. I'll also take a look at the ring part numbers to see what they say.
rustystud
Well-known member
- 9,364
- 3,273
- 113
- Location
- Woodinville, Washington
Peter, your doing an excellent job ! 
Thanks Rusty 
So I calibrated my 4" micrometer against a 3" calibration stick and measured from there. So adding 3" to the below reading, I get 3.38555"

http://www.cstone.net/~dk/MEP802-8-11-01.jpg
Normal size piston in standard units is 3.3815 - 3.3819, so mine are over sized by 0.00365 - 0.00405". In metric, that's 0.09271 - 0.10287mm.
Oversize pistons are available in 0.25 or 0.50mm, so my current "oversize" is 0.10mm, so I'm not sure what's going on... I guess I'll measure the bores next to try to figure this out.
That said, every indication is that I have standard size pistons (0.10mm over is closer to standard size than 0.25mm over).
So I calibrated my 4" micrometer against a 3" calibration stick and measured from there. So adding 3" to the below reading, I get 3.38555"

http://www.cstone.net/~dk/MEP802-8-11-01.jpg
Normal size piston in standard units is 3.3815 - 3.3819, so mine are over sized by 0.00365 - 0.00405". In metric, that's 0.09271 - 0.10287mm.
Oversize pistons are available in 0.25 or 0.50mm, so my current "oversize" is 0.10mm, so I'm not sure what's going on... I guess I'll measure the bores next to try to figure this out.
That said, every indication is that I have standard size pistons (0.10mm over is closer to standard size than 0.25mm over).
Last edited:
rustystud
Well-known member
- 9,364
- 3,273
- 113
- Location
- Woodinville, Washington
Peter, did you measure 90 degrees from the first measurement ? You should have a measurement less then the first. Most pistons are ground concentric so that under load the area around the wrist pin can expand and the larger skirt area will contract back. So your right, these are standard pistons.
It would measure a lot less Rusty since the skirt doesn't extend out to the full bore diameter 90 degrees from the first measurement. I would have to measure the top of the piston if I want to take 2 measurements.Peter, did you measure 90 degrees from the first measurement ? You should have a measurement less then the first. Most pistons are ground concentric so that under load the area around the wrist pin can expand and the larger skirt area will contract back. So your right, these are standard pistons.
This picture shows what I'm talking about:
http://www.cstone.net/~dk/MEP802-8-7-01.JPG
That's exactly what I did CDR.Take an old piston ring and break it now use the broken end and scrap were the ring-land grove in the piston is. Use that to clean out all the carbon and debris
Btw, I did get the 2 stuck piston rings off after soaking overnight in diesel. I broke both rings after getting them out so that I could use a piece of each to scrape out the grooves.
Got the generator bearings ordered. Turns out the local Onan guy was able to get them dropped shipped for $8 a pop with very little shipping. So I went ahead and got 3 of them.
Was also finally able to find a reasonable price on standard ring sets at $40 per bore. This was for the Onan versions (the Lister sourced ones were $80 a set and the local Onan guy wanted $170 per set!
So that's all inbound. I also gave giving the bores a light hone a shot. I ended up using a mix of kerosene and Marvel Mystery Oil. After starting out by dipping the stones in it every 15 seconds, I finally got smart and poured it into a spray bottle and gave it a squirt on each down stroke.
I have no idea if this looks about right for a light hone. What do you guys think?
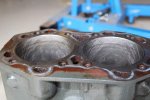
http://www.cstone.net/~dk/MEP802-8-12-01.JPG
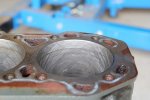
http://www.cstone.net/~dk/MEP802-8-12-02.JPG
Also also figured I'd try to get rid of some of the rust from the generator rotor and stator. I soaked some shop towels in Evaporust, wrapped it around the rotor and then sealed it with cling wrap. On the stator, I'll do 1/4 at a time and just let gravity hold it in place. Hopefully it will at least help a little bit.
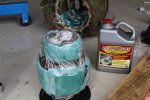
http://www.cstone.net/~dk/MEP802-8-12-03.JPG
Taking the block to the machine shop in the morning to be hot tanked.
Was also finally able to find a reasonable price on standard ring sets at $40 per bore. This was for the Onan versions (the Lister sourced ones were $80 a set and the local Onan guy wanted $170 per set!
So that's all inbound. I also gave giving the bores a light hone a shot. I ended up using a mix of kerosene and Marvel Mystery Oil. After starting out by dipping the stones in it every 15 seconds, I finally got smart and poured it into a spray bottle and gave it a squirt on each down stroke.
I have no idea if this looks about right for a light hone. What do you guys think?

http://www.cstone.net/~dk/MEP802-8-12-01.JPG

http://www.cstone.net/~dk/MEP802-8-12-02.JPG
Also also figured I'd try to get rid of some of the rust from the generator rotor and stator. I soaked some shop towels in Evaporust, wrapped it around the rotor and then sealed it with cling wrap. On the stator, I'll do 1/4 at a time and just let gravity hold it in place. Hopefully it will at least help a little bit.

http://www.cstone.net/~dk/MEP802-8-12-03.JPG
Taking the block to the machine shop in the morning to be hot tanked.
rustystud
Well-known member
- 9,364
- 3,273
- 113
- Location
- Woodinville, Washington
I see what you mean.It would measure a lot less Rusty since the skirt doesn't extend out to the full bore diameter 90 degrees from the first measurement. I would have to measure the top of the piston if I want to take 2 measurements.
This picture shows what I'm talking about:
http://www.cstone.net/~dk/MEP802-8-7-01.JPG
rustystud
Well-known member
- 9,364
- 3,273
- 113
- Location
- Woodinville, Washington
I would hone them again with a finer stone, and move up and down slowly. The cross hatch pattern should be more of a 30 to 45 degree pattern. Looking good though !
Keith_J
Well-known member
- 3,657
- 1,327
- 113
- Location
- Schertz TX
I found a gun cleaning product called Pro Shot Copper Solvent IV takes the gunk off diesel pistons faster than scraping, especially in ring grooves. It is water based, a few Q-tips full cleans the ring grooves fast. It also works on gasoline engine pistons.
Thanks. Yeah, the NAPA honing tool came with medium 240 grit stones, it does look a little rough but really helped knock the deposits off. I stopped by and picked up the 400 grit fine stones from NAPA this morning. I'll go over it again with the new stones tonight, speeding up the drill some or move up and down slower, whichever I find easier.I would hone them again with a finer stone, and move up and down slowly. The cross hatch pattern should be more of a 30 to 45 degree pattern. Looking good though !
Thank's for the tip. I just ordered an 8 oz bottle of that stuff.I found a gun cleaning product called Pro Shot Copper Solvent IV takes the gunk off diesel pistons faster than scraping, especially in ring grooves. It is water based, a few Q-tips full cleans the ring grooves fast. It also works on gasoline engine pistons.
Redid the bores using the 400 grit. Here's what they look like now:
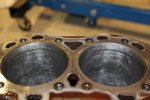
http://www.cstone.net/~dk/MEP802-8-13-01.JPG
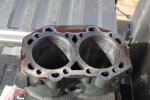
http://www.cstone.net/~dk/MEP802-8-13-02.JPG
I've had the cylinders soaking in carb cleaner and this is where they are at. The #1 (on left) looks a lot better than #2.
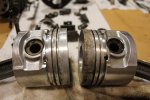
http://www.cstone.net/~dk/MEP802-8-13-03.JPG
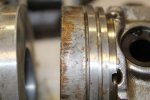
http://www.cstone.net/~dk/MEP802-8-13-04.JPG
Most/all of those marks on #2 are probably from when I forced the crank to turn before I had added ATF into the bores...
Anyway, I think they will both be fine.

http://www.cstone.net/~dk/MEP802-8-13-01.JPG

http://www.cstone.net/~dk/MEP802-8-13-02.JPG
I've had the cylinders soaking in carb cleaner and this is where they are at. The #1 (on left) looks a lot better than #2.

http://www.cstone.net/~dk/MEP802-8-13-03.JPG

http://www.cstone.net/~dk/MEP802-8-13-04.JPG
Most/all of those marks on #2 are probably from when I forced the crank to turn before I had added ATF into the bores...
Anyway, I think they will both be fine.
Munchies
Member
- 417
- 3
- 18
- Location
- Keesler Air force base/ MS
Looking much better. I would hone a bit more with the fine grit and just get the scratches out from the course stones. Low/medium speed, smaller angle. Consider it therapeutic 
- 112,662members
- 166,238threads
- 2,341,272posts
- 1,417online users

