• Steel Soldiers now has a few new forums, read more about it at: New Munitions Forums!

  • Microsoft MSN, Live, Hotmail, Outlook email users may not be receiving emails. We are working to resolve this issue. Please add support@steelsoldiers.com to your trusted contacts.

Piston Rings Worn Out, Time for a Rebuild

Wildchild467

Well-known member
Steel Soldiers Supporter
2,052
57
48
Location
Milford / Michigan
That is the exact thing I am trying to do, document as much as I can and give lessons learned to help the next guy that decides to do the same thing as me. Its a big job so organization and attention to detail is key.
 
Last edited:

Wildchild467

Well-known member
Steel Soldiers Supporter
2,052
57
48
Location
Milford / Michigan
Last night I made some good progress on the truck. I got both heads off and put them on the bench. I also pulled the oil pan to see what things looked like under there. I was also curious as to what rod bolts I had in my engine, 6 point or the latest and greatest 12 point. I don't think my engine was ever apart because there is no rebuild tag and it has a date of 7-21-69 cast on the side of the block. Another thing I saw was my oil pressure regulator in the side of the engine is also the early style. So everything to me says the engine was never apart with the exception of me putting head gaskets on it a couple years ago (just as a PM). I did notice the idler gear of the oil pump felt loose as in it walked forward and back on the shaft quite a bit. I don't know what that is all about and it does not seem right, so i will need to investigate that further later.

20150714_211942.jpg20150714_211921.jpg20150714_211912.jpg20150714_211845.jpg20150714_211829.jpg

Cylinder Heads:

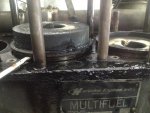
After I got these on the bench I was able to look at these further. At first I noticed quite a bit of white powder on the cylinder heads (as shown in the photo) which I contribute that to burning WMO as fuel. I then used my valve spring compressor to remove the valve spring and remove the valve for inspection. I removed the valve and noticed quite a bit of black crunchy baked on oil or whatever it is on the intake valve. This seems odd because the only thing going in the intake should be air. Maybe my turbo is leaking oil a little bit? If somebody knew why I have crud on my intake valve, let me know, because all I can think of is a leaky turbo. I then pulled an exhaust valve I noticed some bad pitting on the valve where it meets the seat. I also wiped the oil off the valve stem and put it back in the head to feel if the guide is worn at all. I am estimating i felt .010' of slop in the valve guide. Just by feeling the valve stem with my fingers (not measuring) I could feel a little wear. So it might be time for new valve guides and exhaust valves anyway. The intakes felt a lot better as far as slop within the guides, which makes sense because they take less abuse. I did not investigate for any cracks on the heads yet between the valve seats. I heard that is a common place for them to crack, but I have not cleaned them up yet.

20150714_203916.jpg
Above: Intake valve. The valve may look pitted, but its not... It is oil on the surface that I did not wipe off.

20150714_204626.jpg

Above: Exhaust valve. Notice the pitting.
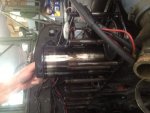
20150714_195833.jpg
Above: Engine rear to the left, engine front to the right.

20150714_194746.jpg

20150714_193710.jpg

I might take tonight off from doing any major work on the truck. 2 nights of beating myself up working on it and I should take a night to clean the house and maybe grocery shop eating mac and cheese for the past couple nights gets old. haha! If I did anything, I could inspect the heads further and clean them up.

If anybody has any questions during my rebuild process, please let me know. I will try to answer them clearly if somebody has questions. Not many people dig this deep inside a multifuel. I will try to post as much information as I can for little tips and tricks I learn along the way.
 
Last edited:

Wildchild467

Well-known member
Steel Soldiers Supporter
2,052
57
48
Location
Milford / Michigan
I went home for lunch today and checked my engine to see if it had piston oil squirters for piston cooling, and it does. My engine model on my truck is an LD-465-1 I believe. I will double check when I get home, but I know for sure it is an LD-465 anyway (not an LDT).

20150715_115701-1.jpg
Piston oil squirters for piston cooling circled in red (shown above).
 

Wildchild467

Well-known member
Steel Soldiers Supporter
2,052
57
48
Location
Milford / Michigan
I lied. I am working on the truck more today. I can't help it! :-D

I just measured how much slop was in the one exhaust valve of the #3 cylinder. I did my best to measure it with digital calipers and it moved up and down somewhere in the neighborhood of .024" and .030". I measured the valve itself and it was worn about .004" compared to the diameter to the upper portion of the valve stem.

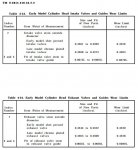
Here are the valve dimensions as In the TM 9-2815-210-34-2-2

Valve Dimensions.JPGValve Dimensions 2.JPG

Intake valve seat inserts and counterbore wear limits.JPGExhaust valve seat inserts and counterbore wear limits.JPG

Early Model Cylinder head Exhaust and Intake Valves and Guides Wear Limits.JPGOuter Valve Spring Wear Limits.JPGInner Valve Spring Wear Limits.JPG
 
Last edited:

gimpyrobb

dumpsterlandingfromorbit!
27,786
755
113
Location
Cincy Ohio
Most of the motors I have worked on have the squirters(that I can recall). In the past I had posted they didn't, I was wrong. I am interested in seeing if the dual squiters will work in place of the single.
 

rustystud

Well-known member
9,260
2,945
113
Location
Woodinville, Washington
As far as the piston oilers go, all multifuel engines have them according to all the TM's I have read. Some have double squirters, most have single. The reason was the amount of heat build-up the pistons get due to the cup design that allows a slow burn of fuel. This means the pistons are exposed to a longer time of heat on them. Hence the oil cooling.
Many of the German built "MAN" engines also use oil cooling "squirters" on their pistons.
 
Last edited:

Wildchild467

Well-known member
Steel Soldiers Supporter
2,052
57
48
Location
Milford / Michigan
I pulled a bearing cap off last night and checked with plastigauge the clearance on the rod bearing of #5 cylinder (it was the easiest to get to). I measured between .002" and .003" clearance. The bearing showed some signs of wear, but it was not scored at all. I have to check the TM and see what the proper clearance should be. I also noticed a date code of "2 91" on the back side of the bearing. So I now think that the engine was apart once before... at least after February of 1991. I have the 6 point head on my rod bolts also, so it raises the question to me, when did these newer 12 point rod bolts get introduced to these engines? Anyway, chances are I will just put new rod bearings in it and not main bearings. Main bearings would be a pain to put in, especially if I have to pull the flywheel to put the main bearings in.

20150715_163300.jpg20150715_161102.jpg

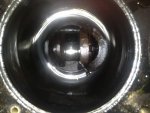
Below: I also rotated the engine about 1/16th of a turn and noticed the piston liner came up with the piston on the #1 cylinder. This makes sense because #1 had the most compression out of all of the cylinders which means the most ring friction. Also some pistons might have been on the down stroke, but still, This is just an observation

20150715_163828.jpg
 

Wildchild467

Well-known member
Steel Soldiers Supporter
2,052
57
48
Location
Milford / Michigan
The reason you have a oily crud on the intake valves is your guides are leaking oil. By the amount of wear you mentioned you where probably burning more then fuel !
Well the intakes felt good, the exhaust were the ones really worn. These engines do not have valve seals either, which I don't understand why they do not.
 

74M35A2

Well-known member
4,145
330
83
Location
Livonia, MI
Well the intakes felt good, the exhaust were the ones really worn. These engines do not have valve seals either, which I don't understand why they do not.
There are no valve stem seals because there is no vacuum on the intake side. Pressure on both manifolds is either zero or positive.
 

74M35A2

Well-known member
4,145
330
83
Location
Livonia, MI
Hey, nice starter Jerry! That MF'er looks like one of those expensive, lightweight, long life, gear reduction units. Totally high speed!!!

 
Last edited:

Wildchild467

Well-known member
Steel Soldiers Supporter
2,052
57
48
Location
Milford / Michigan
There are no valve stem seals because there is no vacuum on the intake side. Pressure on both manifolds is either zero or positive.
I agree with the positive pressure all the time on the valves, but what about the non-turbo deuces? I don't think they had valve seals either. Also does that explain the oil/crustyness buildup on my intake valves?
 

74M35A2

Well-known member
4,145
330
83
Location
Livonia, MI
Non-turbo same thing, no vacuum.

There is always yuck on intake valves. There is "reversion" of flow during operation due to harmonics, and thus slight spit-back occurs.
 

74M35A2

Well-known member
4,145
330
83
Location
Livonia, MI
Actually the Delco clones are inexpensive, and cheaper than NOS units and more reliable in my experience.
http://www.steelsoldiers.com/showthread.php?78375-Replacing-my-starter-with-a-gear-reduction-style
They will work short term, but not long term, and they do not meet the requirements for OEM use (corrosion resistance, water intrusion, cycle count, over-running clutch performance, contact welding, pinion hardness, etc...). Probably OK for what we use these trucks for, but $70 more you can get an OEM unit designed and tested to last a minimum of 50,000 cycles (70,000 cycles typical), has O-ring seals, and 5 different types of grease inside depending upon load/speed/moisture/temp/etc of each area lubricated.
 

74M35A2

Well-known member
4,145
330
83
Location
Livonia, MI
Stopped by to help Jerry at lunch today. Not sure he made it back to work, but here are the updates for this thread:
465-1.jpg
Pulling up cylinder sleeve.
465-2.jpg
We laid the truck on its side to pull the sleeves. Why is this sideways?
465-3.jpg
Piston cooling oil squirt line visible, look closely.
465-4.jpg
Best way to get over one, is to get under another! Jerry with his pre-marital smile, attempting to make his arms match his shirt.
465-5.jpg
Brokenrings.com, girly drinks too....
465-6.jpg
Uh huh.....on right had decent compression, left little piggy had none.
 
Last edited:

Katahdin

Active member
1,303
24
38
Location
Scarborough, ME
They will work short term, but not long term, and they do not meet the requirements for OEM use (corrosion resistance, water intrusion, cycle count, over-running clutch performance, contact welding, pinion hardness, etc...). Probably OK for what we use these trucks for, but $70 more you can get an OEM unit designed and tested to last a minimum of 50,000 cycles (70,000 cycles typical), has O-ring seals, and 5 different types of grease inside depending upon load/speed/moisture/temp/etc of each area lubricated.
My experience has been different. I purchased a NOS OEM starter for $440. It got stuck cranking almost immediately, I had to pull the dogbone to stop the cranking. I paid (my dime) to ship it back to the seller, he shipped me another NOS OEM that failed after maybe a dozen starts in less than year. That's when I gave up on OEM and purchased the new gear-reduction starter, its been 100% reliable for 3 years. In any event, lets not derail the thread further. Back to the engine rebuild!
 
Top
AdBlock Detected

We get it, advertisements are annoying!

Sure, ad-blocking software does a great job at blocking ads, but it also blocks useful features of our website like our supporting vendors. Their ads help keep Steel Soldiers going. Please consider disabling your ad blockers for the site. Thanks!

I've Disabled AdBlock
No Thanks