• Steel Soldiers now has a few new forums, read more about it at: New Munitions Forums!

  • Microsoft MSN, Live, Hotmail, Outlook email users may not be receiving emails. We are working to resolve this issue. Please add support@steelsoldiers.com to your trusted contacts.

MEP-803A won't start

mesias

Member
62
55
18
Location
South Florida
Hi there,

As the title reads my new to me genset doesn't want to start... I purchased this unit recently with 147 hours and I replaced all fluids, filters, added fresh fuel to get it ready to go. I turn the master switch and it cranks but it won't start. The fuel solenoid pulls back and holds just fine and I can hear the pump priming. I think I bled the fuel lines all the way to the fuel injection pumps by releasing the two top screws in the fuel filter and cracking the lines to the injectors. I see fuel rushing out of the pumps with the pump priming. Next logical step is to check the injectors. Am i in good path? Am I missing any important step before checking the injectors? I don't have a machine to check them so I'm not sure what would be the best diy approach. Thanks in advance!
 

Guyfang

Moderator
Staff member
Moderator
16,744
24,036
113
Location
Burgkunstadt, Germany
Hi there,

As the title reads my new to me genset doesn't want to start... I purchased this unit recently with 147 hours and I replaced all fluids, filters, added fresh fuel to get it ready to go. I turn the master switch and it cranks but it won't start. The fuel solenoid pulls back and holds just fine and I can hear the pump priming. I think I bled the fuel lines all the way to the fuel injection pumps by releasing the two top screws in the fuel filter and cracking the lines to the injectors. I see fuel rushing out of the pumps with the pump priming. Next logical step is to check the injectors. Am i in good path? (No, you are not. First remove the MPU, (Magnetic Pickup) and clean, inspect and test it. Then reinstall it PROPERLY. Failure to do so, will require you to find and buy another. The procedure is in the TM. If you need help finding it, say something. Then you need to look at the injectors.) Am I missing any important step before checking the injectors? I don't have a machine to check them so I'm not sure what would be the best diy approach. Thanks in advance!
Open to see what I wrote.
 

mesias

Member
62
55
18
Location
South Florida
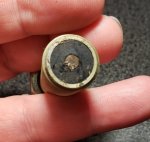
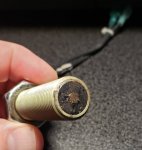
It took some digging around but I found it... The tip was covered in a black dust that I blew with just my mouth and it looks ok... I think. Should I clean it more? Is there a way to test it while off?

20200427_195701.jpg

20200427_195730.jpg

Edit: Is the Dry Cleaning Solvent P-D-680 common mineral spirits?
 
Last edited:

Guyfang

Moderator
Staff member
Moderator
16,744
24,036
113
Location
Burgkunstadt, Germany
I think you should have about 950 ohms when mesuring between the leads.

Open TM9-6115-642-24. Turn to PDF reader page #169. Start reading how to properly reinstall the MPU. The closer to 3 VAC you are, the better. BUT DO NOT go higher.
 

mesias

Member
62
55
18
Location
South Florida
I'm not sure a magnetic speed sensor can be tested by just reading resistance. I'll clean it up and install it back properly following the TM. Hopefully it will make a difference.
 

Guyfang

Moderator
Staff member
Moderator
16,744
24,036
113
Location
Burgkunstadt, Germany
What you are testing is the continuity of the wire wrapped about a billion times around a magnet in the MPU. If you get no ohms, or a bad reading, then its no good.
 

mesias

Member
62
55
18
Location
South Florida
Well... this can't be good. The MPU read around 139 ohms, but that is not the worst.
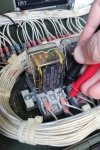
I cleaned it up and installed back. I screwed it in all the way until it touched the flywheel, then I backed it 1-1/2 turns as the TM reads. I plugged the leads back and connect the battery negative cable. My son cranked the engine from the dead crank switch and I got ZERO volts in the automatic switch. This is how I connected the multimeter leads:

20200428_190416.jpg

Am I doing this correctly?

Thank you for your time and knowledge!
 

mesias

Member
62
55
18
Location
South Florida
I just tested it, I'm getting zero VAC directly from the leads of the MPU or from its leads connected to the wire harness. I'm not sure what is supposed to generate the voltage but I assume it's the inductive coil inside the MPU. Should I just try replacing it?
 

Guyfang

Moderator
Staff member
Moderator
16,744
24,036
113
Location
Burgkunstadt, Germany
I just tested it, I'm getting zero VAC directly from the leads of the MPU or from its leads connected to the wire harness. I'm not sure what is supposed to generate the voltage but I assume it's the inductive coil inside the MPU. (correct) Should I just try replacing it?
I assume, not always a good thing, it gets me in deep almost every time, but assume you followed the TM. Bottom out the MPU, then turn it out 1 and a 1/2 turns back out. Now, try and screw it a tad deeper into the bell housing. Not much, a tad. Then test it again. Someone cranks the set at the S10, and you measure at the two leads that come out of the MPU. Because it could be that you are too far out from the flywheel. If you turn it in more then 1 complete turn, and you get no AC voltage, then yeah, get a new one.
 

mesias

Member
62
55
18
Location
South Florida
Yes, I followed the TM... all the way in, back 1.5 turns. BTW, how long should I crank the motor? It should register before 15 secs, right? I'll try in a few turning it in a bit more and see what happens...
 

mesias

Member
62
55
18
Location
South Florida
I screwed it back in all the way and then out like 1/2 turn... I squeezed 0.8 VAC out of it. It definitely needs replacement. I'll keep you guys posted.
 

Zed254

Well-known member
866
466
63
Location
S. Hampton Roads, VA
Yes, I followed the TM... all the way in, back 1.5 turns. BTW, how long should I crank the motor? It should register before 15 secs, right? I'll try in a few turning it in a bit more and see what happens...
From TM:
CAUTION
Do not crank engine in excess of 15 seconds. Allow starter to cool at least 15 seconds
between attempted starts. Failure to observe this caution could result in damage to the
starter.
 

mesias

Member
62
55
18
Location
South Florida
I purchased a new MPU and installed it... same readings. It maxed out at 1.0 v just half turn away from the flywheel. Resistance is the same 139 ohms. This is very confusing... what now?!
I took pictures through the hole where the MPU screws... i don't see anything blocking it. Any ideas?

20200502200218.jpg 20200502200104.jpg
 

Guyfang

Moderator
Staff member
Moderator
16,744
24,036
113
Location
Burgkunstadt, Germany
If you are only getting 1 volt AC, its not far enough into the hole.


Screw magnetic pickup (7, FIGURE 2-25) into flywheel housing until pickup bottoms out on flywheel.
Back magnetic pickup out 1-1/2 turns and finger tighten nut (6).
Connect electrical connectors and remove tags.
Adjust magnetic pickup (7) in accordance with paragraph 2-94.4.
Set mutlimeter for AC volts and connect to terminals 3 and 6 on crank disconnect switch, (or at the leads on the MPU) (35, FIGURE 2-11 ).
Connect negative battery cable and dead crank engine with DEAD CRANK switch.
Do not adjust magnetic pickup more than 1/8 of a turn at a time. Failure to observe
this caution could result In damage to magnetic pickup.
Multimeter should read 2 to 3 VAC. , (the closer to 3 Volts AC the better) Adjust magnetic pickup in or out, no more than 1/8 of a turn at a time, to
obtain proper reading.

Tighten nut (6, FIGURE 2-25) and dose access doors.
 

mesias

Member
62
55
18
Location
South Florida
Guyfang, i appreciate your effort reiterating what the TM explains. I'm 100% positive that's what I'm doing... today i just tried again the old MPU. I measure the distance it's going in with a smaller bolt and it is reaching the flywheel. This time i sanded lightly with 400 grit the tip of the MUP and screwed it in as far as i could... it is probably 1/8 of a turn from touching the flywheel. I cranked the engine and it maxed out at 2.8 VAC. I'm more hopeful now... but the batteries are discharged... I'm now installing a battery charger.
I don't know if it's ok to leave the MPU so close to the flywheel but i see no other option for now. If the genset starts later today I'll order some other MPU to test.
 

Daybreak

2 Star Admiral
Steel Soldiers Supporter
1,522
770
113
Location
Va
Howdy,
You know it rides maybe 2 hairs away from the flywheel don't you. That is the purpose of going all the way in, and then backing off 1 1/2 turns, then moving a 1/8 turn at a time to get a good reading. Then to keep it exactly there as you tighten the locking nut.

Sometimes in the field someone screwed it to far in and it gets physically shaved, and damaged. The metal filings clinging to the magnet are from flywheel strikes.
 

mesias

Member
62
55
18
Location
South Florida
That was definitely my major confusion, I was not expecting the MPU would reach so close to the flywheel. Anyhow, It's now reading 2.8 - 3.0 VAC after the batteries got re-charged and I could crank it again. Unfortunately it didn't start... What would be the next logical step, check injectors? I also confirmed the voltage in the terminals 3 and 6 on crank disconnect switch, behind the control panel.
 
Last edited:

Guyfang

Moderator
Staff member
Moderator
16,744
24,036
113
Location
Burgkunstadt, Germany
OK, you have it at 2.8-3 VAC and that's good. Lock it down.

Now, you said the fuel cut off solenoid, (L5) pulls back, and holds. That's good.
You also said that the Electric fuel pumps run? You also said you had bled the fuel system. So lets start here. I know you bled the system, but lets try it again, in this order.

Place the Master Switch, (S1) in the run position. You should hear the Electric Fuel Pump, (E2) run. It should slow down a bit, after a few seconds. And it wont hurt to let it run even a few minutes. Then, let it continue running, go to the fuel filter, and open the screw on top, to let out air. When you get a good stream of fuel coming out, (no bubbles) turn the screw in and lock it down. Turn off the S1.

Then go to the fuel line from the Injector Pumps, (IP's) to the Injectors. Unscrew them a bit. Do not remove them yet, just loosen them up, so you can turn the the engine over, with the S1 and see if you are getting good fuel out of the IP's. It may take a bit if there is air in the system. But soon, you should get good fuel. Lock the fuel lines down one at a time, from right to left, while turning the engine over with the S1.

Then try starting the engine. If it still will not start, remove an injector. Do not loose the copper washer that the Injector should have on the end of it. Most of the time, it stays on the engine, but not always. Then take the Injector line off the IP, and turn it around. Hook up the line to the IP, and the injector. Now you have the fuel system hooked back up, but one Injector pointing down at the floor. Turn the engine over with the S1, and see if you have good fuel coming out of the Injector.

Do not get overly concerned about turning the engine over. Yes the book says 15 seconds. Well, you can go even 30-60 seconds. But then let the starter cool down.

Try this, and tell us what happens.
 
Last edited:
Top
AdBlock Detected

We get it, advertisements are annoying!

Sure, ad-blocking software does a great job at blocking ads, but it also blocks useful features of our website like our supporting vendors. Their ads help keep Steel Soldiers going. Please consider disabling your ad blockers for the site. Thanks!

I've Disabled AdBlock
No Thanks