• Steel Soldiers now has a few new forums, read more about it at: New Munitions Forums!

  • Microsoft MSN, Live, Hotmail, Outlook email users may not be receiving emails. We are working to resolve this issue. Please add support@steelsoldiers.com to your trusted contacts.

MEP-003A RPM Adjust

Jim Layton

New member
18
14
3
Location
Saint Petersburg Florida
I'm trying to adjust (lower) the rpm on the generator. It is a running unit and will start right up and head for redline rpm until I can get to the governor linkage and hold it at any speed I want. If I let this governor go I believe the engine would rev until it blew up. I have adjusted the cable all the way out, the linkage adjustment all the way out, and the governor arm spring all the way to the bottom as light as it can be. These have made zero change. There seems to be a lot of pressure pulling the governor arm into a wide open position. Do I need to start adjusting linkage down on the fuel pump? I think that is all that is left
 

rickf

Well-known member
Steel Soldiers Supporter
3,146
1,683
113
Location
Pemberton, N.J.
Pulling out on the cable is increasing the RPM! It sounds like all of the adjustments you are making are going the wrong way. You need to look up the manual and get the right procedure. I don't have it in front of me right now so can't help much but as I said pulling out on the cable increases rpm.
 

Jim Layton

New member
18
14
3
Location
Saint Petersburg Florida
I'm not pulling out the cable at the throttle adjust end, at the control box. I'm letting the cable out above the oil filter., making it longer. I could take it off and it would make no difference. The only speed I get without manually holding it back is blow up speed.
 

Ray70

Well-known member
2,595
5,914
113
Location
West greenwich/RI
When the machine is off the governor spring ( droop adjustment spring ) will attempt to fully open the throttle by lifting up on the arm.
As soon as the engine starts the governor weights inside the timing cover should push outward and begin to counteract the "Pull" of the spring on the throttle lever.
If your machine is running wide open and you can't adjust it down, you might have a problem with your governor.

Typically you will want to start with the spring on the 3rd notch up from the bottom.
All the way at the bottom will typically result in severe RPM hunting and higher than normal RPM's
Higher up on the adjustment yields slower reaction, more droop and decreased RPM ( at a given throttle position )

As Rick F mentioned, you should follow the governor adjustment and the max throttle and linkage adjustments in the TM. once that is all done if you are still getting full throttle you may have to open up the timing cover.

When the machine starts, do you feel if pushing the arm down at all or is the lever still in the full upward position with the tip slightly above the top of the shut off solenoid, same as when it is off?
 

Jim Layton

New member
18
14
3
Location
Saint Petersburg Florida
When the machine is off the governor spring ( droop adjustment spring ) will attempt to fully open the throttle by lifting up on the arm.
As soon as the engine starts the governor weights inside the timing cover should push outward and begin to counteract the "Pull" of the spring on the throttle lever.
If your machine is running wide open and you can't adjust it down, you might have a problem with your governor.

Typically you will want to start with the spring on the 3rd notch up from the bottom.
All the way at the bottom will typically result in severe RPM hunting and higher than normal RPM's
Higher up on the adjustment yields slower reaction, more droop and decreased RPM ( at a given throttle position )

As Rick F mentioned, you should follow the governor adjustment and the max throttle and linkage adjustments in the TM. once that is all done if you are still getting full throttle you may have to open up the timing cover.

When the machine starts, do you feel if pushing the arm down at all or is the lever still in the full upward position with the tip slightly above the top of the shut off solenoid, same as when it is off?
When the machine starts it does not attempt to push the arm down at all, in fact it seems to pull it to wide open when in the run position before starting and then it stays there when it starts. It will move freely by hand so it's not stuck in that position. I will review the manual to verify that all the linkage/cable/spring are as they should be. The timing cover was off for a gasket and now I'm wondering if everything is in it's place inside the cover.
 

rickf

Well-known member
Steel Soldiers Supporter
3,146
1,683
113
Location
Pemberton, N.J.
When the machine starts it does not attempt to push the arm down at all, in fact it seems to pull it to wide open when in the run position before starting and then it stays there when it starts. It will move freely by hand so it's not stuck in that position. I will review the manual to verify that all the linkage/cable/spring are as they should be. The timing cover was off for a gasket and now I'm wondering if everything is in it's place inside the cover.
Ah, Now we find out there is more to the story. :rolleyes: If the governor was apart then yes, you need to check it out and be sure it is set to specs.
 

Jim Layton

New member
18
14
3
Location
Saint Petersburg Florida
Ah, Now we find out there is more to the story. :rolleyes: If the governor was apart then yes, you need to check it out and be sure it is set to specs.
There is probably a lot more to this story as I am the guy that gets to discover everything the guy who took it apart did. It acts like the flyball cover does not come forward enough to turn the shaft coming out of the cover. I do know that fork that rides on the cover to turn the shaft can be installed curved towards the engine or 180 deg away from the engine. In the manual this fork appears to be flat, it is not. Maybe I'll add some pictures as I take it apart of what I find for the next guy who has to do this as I can't find any.
 

Ray70

Well-known member
2,595
5,914
113
Location
West greenwich/RI
The fork is definitely not flat. There is a curve in it and if I recall correctly, the tips have a fairly obvious "Business side" that goes against the cover of the flyweight assembly. Sounds like you quite possibly might be 180 out on the fork orientation.
When you put the timing cover back on, make sure the pin in the cover aligns with one of the holes in the flyweight cover to hold it from spinning.
 

Ray70

Well-known member
2,595
5,914
113
Location
West greenwich/RI
Wow, I think you got lucky! There have recently been several threads about people with catastrophic timing and oil pump gear failure, possibly caused by that pin falling out ( breaking the boss its pressed into ) and falling into the gears and destroying a whole bunch of stuff!
If the pin doesn't stay in there good now, the member who posted about his falling out drilled out the boss and put a bolt right through the cover to replace the pin entirely.
 

Jim Layton

New member
18
14
3
Location
Saint Petersburg Florida
Wow, I think you got lucky! There have recently been several threads about people with catastrophic timing and oil pump gear failure, possibly caused by that pin falling out ( breaking the boss its pressed into ) and falling into the gears and destroying a whole bunch of stuff!
If the pin doesn't stay in there good now, the member who posted about his falling out drilled out the boss and put a bolt right through the cover to replace the pin entirely.
Well, I do have it apart and waiting on a gasket so I have the time to drill it. Besides that I still dont see this pin causing the engine to rev to redline because the flyballs and cup will still come forward and push the governor arm even if that pin is not there. I have noticed that my cup will only come forward about 1/8" and there is no adjustment on that. Sure don't seem like that's enough.
 

Ray70

Well-known member
2,595
5,914
113
Location
West greenwich/RI
Well as far as the pin relates to the operation of the governor, you might think it is working fine without the pin, but ask yourself, WHY would they put the pin there if it wasn't necessary?? It may seem like it still works correctly, but when the gear and cup are flying around at 900 RPM's things may not work the same as when it's sitting still. Your governor isn't working and the pin has fallen out, so there's a good chance that's the reason, or at least part of it.
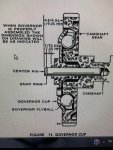
On the 1/8" of movement, it sounds a little low, but have you tried checking the distance from the center pin to the gear face to see if that is 25/32" as seen on page 7-25 of the manual? That pin to gear distance controls the total amount of movement in the governor.
According to the manual if the pin is too far in, the engine may race high because there isn't enough movement in the flyball assembly to counteract the spring.
 

Jim Layton

New member
18
14
3
Location
Saint Petersburg Florida
Well as far as the pin relates to the operation of the governor, you might think it is working fine without the pin, but ask yourself, WHY would they put the pin there if it wasn't necessary?? It may seem like it still works correctly, but when the gear and cup are flying around at 900 RPM's things may not work the same as when it's sitting still. Your governor isn't working and the pin has fallen out, so there's a good chance that's the reason, or at least part of it.
On the 1/8" of movement, it sounds a little low, but have you tried checking the distance from the center pin to the gear face to see if that is 25/32" as seen on page 7-25 of the manual? That pin to gear distance controls the total amount of movement in the governor.
According to the manual if the pin is too far in, the engine may race high because there isn't enough movement in the flyball assembly to counteract the spring.
Yes I understand that the pin goes there to keep the cup from turning. I just checked gear face to pin and I have 17/32...now this makes sense as to why no adjustment outside made any difference. The balls can't move out. We're onto something here. However I have no idea where I can get a replacement center pin.
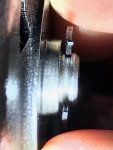
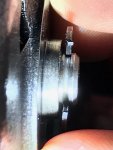
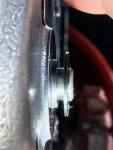
Here is a pic of the amount that cup can move, the cup is fully compressed so you can see all the forward movement it has. It's forward movement is less than the thickness of the clip, or 1/16" max.Cup Endplay.jpg
 
Last edited:

Chainbreaker

Well-known member
1,796
1,992
113
Location
Oregon
...However I have no idea where I can get a replacement center pin.
Isn't it just a common roll pin? However, since it already came out once you were very lucky, as Ray70 pointed out, to having avoided it doing major damage to engine... I would think twice about how to replace it or whether it's best to replace it with a bolt. You need to review post # 25 and post #37 in this thread. I post #37 I believe the video attached shows a method of how to replace it using a bolt instead.

The issue of replacing it with another roll pin is that the boss that holds it may be worn or damaged and would not reliably hold another roll pin. You could use some JB Weld to help hold it but that is still risky considering the damage it can do if it works its way out again. Given your situation with it having come out already once, I would use the bolt method shown in the video to avoid any possibility of future disaster.
 

Ray70

Well-known member
2,595
5,914
113
Location
West greenwich/RI
C.B , he has another issue here. The center pin we're talking about is the pin that goes into the center of the governor assembly and the camshaft.
Not only did he loose the roll pin in the timing cover, but it appears his governor assembly may be out of spec. with regards to the distance from the tip of the cam pin to the face of the timing gear.
The TM says to REPLACE it but first thing I would do is try to remove it and see if it gets damaged or not. Can't make it any worse than it is already....
Meanwhile I have a couple parts motors, Not sure if I sold the cam out of the disassembled one already but I'll check.
 

Chainbreaker

Well-known member
1,796
1,992
113
Location
Oregon
Ahhh, that pin. Didn't see the expanded photo of the one he was talking about in posts 11 & 13. I was making the suggestion on the pin he shows laying loose in post #9.
 
Last edited:

Jim Layton

New member
18
14
3
Location
Saint Petersburg Florida
C.B , he has another issue here. The center pin we're talking about is the pin that goes into the center of the governor assembly and the camshaft.
Not only did he loose the roll pin in the timing cover, but it appears his governor assembly may be out of spec. with regards to the distance from the tip of the cam pin to the face of the timing gear.
The TM says to REPLACE it but first thing I would do is try to remove it and see if it gets damaged or not. Can't make it any worse than it is already....
Meanwhile I have a couple parts motors, Not sure if I sold the cam out of the disassembled one already but I'll check.
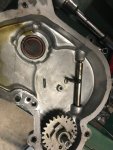
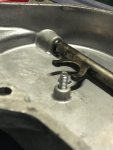
Okay guys, Update time...I found a diagram from Onan on the flyball cup travel that says replace the center pin OR machine down the protruding cup hub to reach the desired measurement. I went with option two as I had nothing to loose. I went slow and measured it installed several times until I got exactly 7/32" travel. I believe this problem is fixed. Next, after reading and a video here there was no way that roll pin was going back in the cover to fall out again. So I drilled the hole out and tapped it to 1/4 20, that way I don't need a nut to hold it in place. A 1" bolt put in all the way from the outside will leave 25/32" to the cover face like the manual says and it could only ever come out not fall in. I'm calling it the Roll Pin Mod. I'll locktite it in place also. I included all the pics with this post for an easy before and after of the cup hub modification, and the Onan diagram. Now I wait for a gasket.Cup Endplay.jpgCup Endplay#2.jpgFlyball Specs.jpgRoll Pin Mod.jpg
 

Ray70

Well-known member
2,595
5,914
113
Location
West greenwich/RI
Nice work Jim! It's good that you found that Onan manual, it looks to have more dimensional info than the generator TM has. The TM doesn't talk about the 7/32" dimension or machining the cup to gain adequate clearance.
Hopefully once the gasket arrives you will be back in business.
 

rickf

Well-known member
Steel Soldiers Supporter
3,146
1,683
113
Location
Pemberton, N.J.
Not knowing what that pin does I am just throwing this out there. If there is something moving against the pin then you might want to go with at least a grade 8 bolt for the hardness. A roll pin is very hard and will not wear much from friction. A standard grade 5 or Chinese grade -0 bolt will wear quickly.
 
Top
AdBlock Detected

We get it, advertisements are annoying!

Sure, ad-blocking software does a great job at blocking ads, but it also blocks useful features of our website like our supporting vendors. Their ads help keep Steel Soldiers going. Please consider disabling your ad blockers for the site. Thanks!

I've Disabled AdBlock
No Thanks