• Steel Soldiers now has a few new forums, read more about it at: New Munitions Forums!

  • Microsoft MSN, Live, Hotmail, Outlook email users may not be receiving emails. We are working to resolve this issue. Please add support@steelsoldiers.com to your trusted contacts.

M35A3 wheel beadlocks

gringeltaube

Staff Member
Super Moderator
Moderator
Steel Soldiers Supporter
6,995
2,565
113
Location
Montevideo/Uruguay
I've got the wheel halves pried and blocked with 6" separation
That won't help. To the contrary, the more you separate the wheel halves, the tighter the tire beads will grab the wheel.

And don't use any solvents! Just regular dish-washing detergent and driving some improvised (hardwood) wedges in between both surfaces, working your way all around.
 

HDN

Well-known member
2,127
5,128
113
Location
Finger Lakes Region, NY
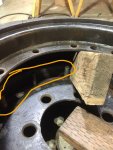
@ldmack3 thank you for posting those pictures, I see what you're talking about now. Although I'm a little perplexed about something:

InkedIMG_2728-marked_LI.jpg

What's that part inside the tire that I circled? Is that just the inside of the tire I'm looking at?
 

ldmack3

Well-known member
Steel Soldiers Supporter
849
1,740
93
Location
N. Central Idaho
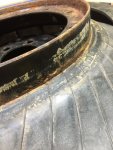
Hosed it down with more soap/water for the night. I did work my way around the rim and the tire appears to be unattached on that surface. Also removed my blocks. Still no joy. Worn out for the day. I'm ready to destroy the tire, was replacing it anyway.
 

ldmack3

Well-known member
Steel Soldiers Supporter
849
1,740
93
Location
N. Central Idaho
4 more hours and no success..except for a fist size hole in the sidewall hoping to break/cut the bead for some relief.
And I was mistaken, there is a beadlock inside. Next step I guess will be to get a saws-all and go around the rim where the side wall is thinnest so I can get to the other mating surface.

I even called it dirty names!
 

glcaines

Well-known member
3,917
2,608
113
Location
Hiawassee, Georgia
4 more hours and no success..except for a fist size hole in the sidewall hoping to break/cut the bead for some relief.
And I was mistaken, there is a beadlock inside. Next step I guess will be to get a saws-all and go around the rim where the side wall is thinnest so I can get to the other mating surface.

I even called it dirty names!
Don't get the Sawzall out. I've removed and reassembled 7 different M35A3 wheels and beadlocks on my A3 by myself. It isn't that difficult if you use the correct tools and procedure. I use either tire lube or Dawn dishwashing liquid for lubricant. Using lubricant is very important. Without lubricant the friction increases and the ring won't move. I have a set of forks on my John Deere 5520 tractor. I spread the forks out until they clear the ring by about 3 or 4 mm and press down on the tire very tightly. I also have a heavy pry bar about two meters in length. I pry up on the ring a small amount using the fork as a fulcrum and place a block of wood in the space. I repeat this procedure all around the tire and then start using thicker blocks of wood, all while pouring more lube into the gap. I keep it soaked with lube. I end up going around the wheel with this procedure anywhere from 2 to 10 times until the ring slides off the bead. Where I don't have a fork available as a fulcrum, I place a thin block of wood on the tire and use that to pry against. Make sure your upward pressure is uniform around the ring. You don't want to cock it. If you use enough pressure it will come loose. When I did the 7 A3 wheels, the first one was somewhat difficult. The more I did, the easier it got.
 

HDN

Well-known member
2,127
5,128
113
Location
Finger Lakes Region, NY
4 more hours and no success..except for a fist size hole in the sidewall hoping to break/cut the bead for some relief.
And I was mistaken, there is a beadlock inside
I thought I saw a bead lock insert in there, but I didn't want to push it since my eyes aren't on location :p

When I made my first cut in the sidewall, I cut a square in line with the turret valve so I could remove the nut and remove the turret valve, and work the tire off. That worked for the second tire. For the rest of them I decided to cut them off completely because I was running out of summer and wanted to get the job done before October. I learned that one of the Bauer bi-metal wood blades from Harbor Freight will only last two tires before losing teeth and requiring a change ;)

I have no qualms cutting up dry-rotted tires if I know they won't pass inspection. If they're as bad as I think they are, the cracks will be at least halfway through the sidewall, and I've heard Michelin XL tires were pretty weak in the sidewall in comparison to the newer XZL tires.

Now if I wanted to save the tires, like needing to dismount a new 395 to tighten the turret valve grommet, that would be different! Just follow the A3 rim instructions in the TM carefully and you'll get it bang-on each time as long as your brass fittings screwed into the turret valve/air pipe aren't cracked or sealed at the threads completely.
 

ldmack3

Well-known member
Steel Soldiers Supporter
849
1,740
93
Location
N. Central Idaho
Yea our weather starts to go down hill tomorrow. Fortunately this is my spare. The other 2 I did came off with little effort in comparison. Since the tire is already bad I just want to be careful not to damage the rim. I'll get a saws-all tomorrow.

Time for some liquid numbs-it.
 

Sgt Jiggins

Potato Peeler
Steel Soldiers Supporter
440
213
43
Location
Lynchburg, VA
Haven't tried tire lube....I would but I don't have any. After soaking with what I mentioned I'm leaving it sit for a while to see if it comes loose.
Man, having had one do that, I can relate: it sucks.

Brought out the torch yet? :confused:
 
Last edited:

HDN

Well-known member
2,127
5,128
113
Location
Finger Lakes Region, NY
Is that bead rusted to the rim? o_O Since this is the spare, I think I can understand that if it was in the regular spare tire position, with water collecting on the rim and probably soaking its way into the rim-bead interface.

But this is an M35A2 involved - I don't think a 14.5R20 will fit on the spare tire mount unless a spacer was added to the mount on the frame like what was done on the M35A3.
 

7bdiver

Active member
92
170
33
Location
idaho panhandle
Ha, I spent a little while trying to break the bead on one for a while. Was slamming a 120 lb dumbell on it for a good half hr. I assumed there weren't inserts in there. I was wrong!

Figured I'd share the method I used to put the beadlock inserts back in the new tires. Not sure how others have done it.

Once its in there, I used a 2x4 to twist it back around right, then just kick it around a little to get er centered.
 

Attachments

HDN

Well-known member
2,127
5,128
113
Location
Finger Lakes Region, NY
Ha, I spent a little while trying to break the bead on one for a while. Was slamming a 120 lb dumbell on it for a good half hr. I assumed there weren't inserts in there. I was wrong!

Figured I'd share the method I used to put the beadlock inserts back in the new tires. Not sure how others have done it.

Once its in there, I used a 2x4 to twist it back around right, then just kick it around a little to get er centered.
Ratchet strap method is best method (y)

Instead of wedging 2x4s in there I just used a bottle jack to split the bead enough to make it easier to twist and center the beadlock insert.

To break the bead I used a combination of a mallet, the flat end of a pick axe, and a pair of 4-ft pry bars.
 
Last edited:

glcaines

Well-known member
3,917
2,608
113
Location
Hiawassee, Georgia
Ratchet strap method is best method (y)
Instead of wedging 2x4s in there I just used a bottle jack to split the bead enough to make it easier to twist and center the beadlock insert.
To break the bead I used a combination of a mallet, the flat end of a pick axe, and a pair of 4-ft pry bars.
To break the bead I have a tractor with forks and I place the forks on top of the tire almost touching the wheel. This makes a good firm base for using the pry bars.
 

7bdiver

Active member
92
170
33
Location
idaho panhandle
I used a rock chisel and hammer. All the edges and tip on it were polished from use, and I was really careful. Took minimal effort, especially when applying gear oil as I went around. Made the beads slip right off.

I also used the chisel to hop the bead over the turret nut too. Didnt mar anything and the paint didnt get tore up.
 

Attachments

HDN

Well-known member
2,127
5,128
113
Location
Finger Lakes Region, NY
I used a rock chisel and hammer. All the edges and tip on it were polished from use, and I was really careful. Took minimal effort, especially when applying gear oil as I went around. Made the beads slip right off.

I also used the chisel to hop the bead over the turret nut too. Didnt mar anything and the paint didnt get tore up.
My tires were shot so I just sawzall'd them off at the sidewall. Made removal from the rim super easy:D
 
Top
AdBlock Detected

We get it, advertisements are annoying!

Sure, ad-blocking software does a great job at blocking ads, but it also blocks useful features of our website like our supporting vendors. Their ads help keep Steel Soldiers going. Please consider disabling your ad blockers for the site. Thanks!

I've Disabled AdBlock
No Thanks