• Steel Soldiers now has a few new forums, read more about it at: New Munitions Forums!

  • Microsoft MSN, Live, Hotmail, Outlook email users may not be receiving emails. We are working to resolve this issue. Please add support@steelsoldiers.com to your trusted contacts.

M1010 ambulance box build reference

ballencd

Active member
210
80
28
Location
Columbus, NC
That does not look bad at all. I would think that foam panels might have a bit more R value but not sure the cost of money and time would be worth it. I guess I will look into how the wires get into that box and see if I can make them work.
Thanks for the pictures!
 

kapnklug

Member
234
3
18
Location
spencer,ny
So, do you think pulling the walls out and replacing the old insulation is worthwhile? I only want to do this once and I have a blank canvas right now. Seems it would help to get wires where I need them too....?View attachment 925773
That does not look bad at all. I would think that foam panels might have a bit more R value but not sure the cost of money and time would be worth it. I guess I will look into how the wires get into that box and see if I can make them work.
Thanks for the pictures!
Well, Chevymike's insulation is in a lot better shape than mine was, and my M1010 only has 20K miles. I've been replacing the stock bagged fiberglass with 1.5" rockwool & sheathing the inside with R2 DiBond (half the box done now). The plastic vapor barrier on the original insulation had rodent holes, and the wall insulation had settled to only about 3/4 full in each bay. I'm using Rockwool to avoid anything flammable inside the wall (like foam). Also the Dibond is a real help with heat conduction thru the studs -- when the sun was hitting the outside wall, the stock inside aluminum sheathing would get too hot to hold your hand on. The Dibond feels room temp.
 

ballencd

Active member
210
80
28
Location
Columbus, NC
Well that is definitely worrisome. I wonder if there is a way to test the insulation value with a infrared monitor and put a heater on the inside of the box. It probably would not work well unless it is cold out which it is not in NC these days. I may reconsider pulling some liner down and see what I find. My M1010 only has about 19K miles on it now and has been in a metal shed for about 25 years but no telling if there were rodents around. I wonder how they would get inside the walls.
 

kapnklug

Member
234
3
18
Location
spencer,ny
Well that is definitely worrisome. I wonder if there is a way to test the insulation value with a infrared monitor and put a heater on the inside of the box. It probably would not work well unless it is cold out which it is not in NC these days. I may reconsider pulling some liner down and see what I find. My M1010 only has about 19K miles on it now and has been in a metal shed for about 25 years but no telling if there were rodents around. I wonder how they would get inside the walls.
Replacing the interior aluminum with DiBond made such a difference in heat conduction, the work was worth it just for that (still passenger-side wall to go, but the difference is obvious). That aluminum sheet does not come out without a fight tho, the interior corners are doubled and the upper "crown molding" is tough to remove without kinking. Very early into the project, I decided to leave all the corners and just cut the sheathing 1" inside the corner molding, very lightly with a cutoff wheel, then drill out the interior pop-rivets. Then I siliconed over the remaining 1" lip and screwed the DiBond into it, flush with the crown molding at the edges. The DiBond is also the vapor barrier. As I mentioned I also replaced the slumped bags of fiberglass with rockwool, which slips right in but has no vapor barrier of its own. It was alot of work but totally worth it.
 

kapnklug

Member
234
3
18
Location
spencer,ny
Have you got some pictures of your partial and completed walls and ceiling?
Sorry I didn't take any pics while I was doing it, and now there's not much to see. The driver's side with the DiBond is smooth & white like shower board, while the pass side is still stock. But the DiBond barely gets warm in the sun while the stock side could cook a pancake. For the ceiling, I wanted to significantly increase the R-value without reducing the interior height at all, since I already have to duck my head. So I left the ceiling stock but on the outside put 1" Celotex foam board over the entire roof, aluminum facing up to reflect heat. It's held down by 2x2x8's laid across the truck 16"OC, which are held down at the ends by tie-wires to small C-clamps in the rain gutters. The rain gutters are part of the extrusion that forms the outer corner of the box, they can't come off. There are no fasteners into the roof at all. Then there is a 1/2" treated plywood deck screwed into the 2x2's over the entire roof. So above the stock roof (painted with aluminized trailer roofing) there is R7 foamboard, then 1-1/2" air gap, then plywood deck. Eventually i'd like to replace this with an alumium diamondplate deck with it's own rain gutters, but it's worked well for the last couple years & was super cheap. I could snap some pics of this setup if you like.
 

ballencd

Active member
210
80
28
Location
Columbus, NC
I'd love to see some pictures of the roof. Do you walk on it? Solar panels? Plywood seems like it would be heavy....? I like the diamond plate idea......Maybe glue foam to the roof and then glue diamond plate to the foam.I'm planning a RV with mine and think I will pull the walls to verify the insulation is OK before adding anything else. I've got the beds, racks, heater and A/C out so far. It is going very slowly.
 

kapnklug

Member
234
3
18
Location
spencer,ny
I'd love to see some pictures of the roof. Do you walk on it? Solar panels? Plywood seems like it would be heavy....? I like the diamond plate idea......Maybe glue foam to the roof and then glue diamond plate to the foam.I'm planning a RV with mine and think I will pull the walls to verify the insulation is OK before adding anything else. I've got the beds, racks, heater and A/C out so far. It is going very slowly.
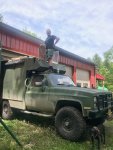
You can totally walk on it. I often use the top of the truck as mobile scaffolding, recently to paint my house with a brush & roller. I have (3) 100W flexible solar panels up there screwed into the plywood with battens, but for scaffolding I throw a blanket over them & then another piece of plywood. It's not super heavy, it's only (2) sheets of 1/2". I wouldn't trust any glue at 65mph. Mechanical connection to the front & side rain gutters is the way to go.
Ya I wish I had started the truck by re-doing the insulation & inner sheathing. I pretty much finished the inside THEN realized this needed to be done.
In the first pic (with me standing on the cab) you can see the orange c-clamps in the rain gutters. A heavy wire goes thru the c-clamp & up to a hole drilled thru the 2x2x8 cross beams. Then plywood screwed into that long-ways, connecting them. Awnings are 8' ARB.
 

Attachments

Top
AdBlock Detected

We get it, advertisements are annoying!

Sure, ad-blocking software does a great job at blocking ads, but it also blocks useful features of our website like our supporting vendors. Their ads help keep Steel Soldiers going. Please consider disabling your ad blockers for the site. Thanks!

I've Disabled AdBlock
No Thanks