• Steel Soldiers now has a few new forums, read more about it at: New Munitions Forums!

  • Microsoft MSN, Live, Hotmail, Outlook email users may not be receiving emails. We are working to resolve this issue. Please add support@steelsoldiers.com to your trusted contacts.

MEP-002A, will Start, Run then dies....any suggestions?

1FAST4

Member
80
89
18
Location
NorCal
One thing to note: The IP rebuild instructions in the generator's TM are incorrect, they are for the PSU injection pump, not the Ambac M-50 that you have, but I have the instructions and diagrams for the M-50 if you need them. I assume the Ambac manuals etc. are also available in the TM section, but not positive.
Ray,
I'll happily take any instructions, guides, diagrams, pointer or anything else you would like to provide that would be helpful. Also, in this post of yours (Click Here) you mentioned you made a few tools that "made it a lot easier" for you...I'm pretty handy with a Mig welder and Plasma Torch so if you could send me any Pic's, descriptions and/or drawing of the tools you made....even a stick figure drawing on a nappkin would work, it would be greatly appreciated.

Sending you a PM with my contact info now.
 

1FAST4

Member
80
89
18
Location
NorCal
Ray,
I'll happily take any instructions, guides, diagrams, pointer or anything else you would like to provide that would be helpful. Also, in this post of yours (Click Here) you mentioned you made a few tools that "made it a lot easier" for you...I'm pretty handy with a Mig welder and Plasma Torch so if you could send me any Pic's, descriptions and/or drawing of the tools you made....even a stick figure drawing on a nappkin would work, it would be greatly appreciated.

Sending you a PM with my contact info now.
Ray, PM sent
 

Ray70

Well-known member
Steel Soldiers Supporter
2,694
6,332
113
Location
West greenwich/RI
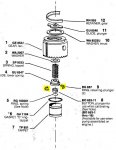
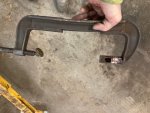
Great news that you can fabricate things. I will send info to your email, but for others here, the most helpful tool I made was to take a 5/8" deep socket and cut out about 1/3 of it, essentially creating a slot all the way down 1 side ( looks like an oxygen sensor removal socket ) then welded the socket to a large C-clamp ( 8" I think ) This tool makes removing and installing the 2 small retaining clips that hold the bottom spring onto the plunger. With the large hex cap on the hydraulic head, use the clamp to compress the spring, then go in through the "window" cut in the socket with a magnetic pick to retrieve the clips.
Press against item #4 to compress the spring #3 then pick out #9, allowing the gear to come off the plunger and giving access to the plunger guide, #11 which in many cases will either be split in half ( if your IP is not delivering any fuel ) or if you engine runs but is hard starting, runs poorly, stalls or gets hot quickly, it may have skipped on the plunger, causing it to be orientated wrong.
clips.JPG
 

2Pbfeet

Well-known member
523
998
93
Location
Mt. Hamilton, CA
Great news that you can fabricate things. I will send info to your email, but for others here, the most helpful tool I made was to take a 5/8" deep socket and cut out about 1/3 of it, essentially creating a slot all the way down 1 side ( looks like an oxygen sensor removal socket ) then welded the socket to a large C-clamp ( 8" I think ) This tool makes removing and installing the 2 small retaining clips that hold the bottom spring onto the plunger. With the large hex cap on the hydraulic head, use the clamp to compress the spring, then go in through the "window" cut in the socket with a magnetic pick to retrieve the clips.
Press against item #4 to compress the spring #3 then pick out #9, allowing the gear to come off the plunger and giving access to the plunger guide, #11 which in many cases will either be split in half ( if your IP is not delivering any fuel ) or if you engine runs but is hard starting, runs poorly, stalls or gets hot quickly, it may have skipped on the plunger, causing it to be orientated wrong.
View attachment 939285
Do you have a photo of your spring clamp tool? Just curious. I'm visualizing something like a better version of a valve compression tool.

All the best,

2Pbfeet
 

Ray70

Well-known member
Steel Soldiers Supporter
2,694
6,332
113
Location
West greenwich/RI
I could take a picture when I get home from work tonight. Essentially it works on the same idea as a valve spring compressor, only with a screw clamp rather than a squeeze clamp. In the Ambac service manual they basically show a tube with a hole cut in the side being used in an arbor press to do the same task, but I found it easier to clamp the pump in a vise ( I clamp it upside down by the large hex cap that covers the delivery valve ) and use the modified c-clamp.
Only reason I welded the socket directly to the clamp is to keep everything aligned, so you don't need 4 hands to hold everything in place.
 

2Pbfeet

Well-known member
523
998
93
Location
Mt. Hamilton, CA
I could take a picture when I get home from work tonight. Essentially it works on the same idea as a valve spring compressor, only with a screw clamp rather than a squeeze clamp. In the Ambac service manual they basically show a tube with a hole cut in the side being used in an arbor press to do the same task, but I found it easier to clamp the pump in a vise ( I clamp it upside down by the large hex cap that covers the delivery valve ) and use the modified c-clamp.
Only reason I welded the socket directly to the clamp is to keep everything aligned, so you don't need 4 hands to hold everything in place.
@Ray70 Thanks! The description above helped me understand the whole process a lot better as well. Thank you.

I have a vague memory of working on an engine with a set of similar split retaining rings. What I chiefly remember was what a pain it was. Herding cats doesn't do it justice.

All the best,

2Pbfeet
 

Ray70

Well-known member
Steel Soldiers Supporter
2,694
6,332
113
Location
West greenwich/RI
Yup, they work on exactly the same principle are a pair of valve spring retainer, just 20X smaller and 100X harder to grab with ANYTHING!
The trick I found was to pick them out with something magnetized, like a small pick etc. just don't drop one and loose it in the mess on and around the workbench... :( , been there....
But putting them back in is a whole other chore, magnetized tools won't let you release them and drop the into place, so I use a pair of tweezers and just drop them into the cavity, then lift unscrew the clamp slowly, watching to see if they fall into place as the spring and retainer come up around the plunger.
Just don't drop one into the space on the outside of the spring....
 

2Pbfeet

Well-known member
523
998
93
Location
Mt. Hamilton, CA
FWIW: I have used reverse forceps, also known as Dieffenbach for those fiddly items. For me, the forceps can do the holding while I do the maneuvering. (Less of "pat your head while rubbing your tummy thing" for me.) These days you can get them in all sorts of sizes and strengths. For those with better coordination, I am sure that it is probably unnecessary, but I need all the help that I can get...

All the best,

2Pbfeet
 

1FAST4

Member
80
89
18
Location
NorCal
With the dreaded anticipation of tearing into the IP I have spent the last few days reading through Threads and Posts here on SS related to the IP (Ambac 50), its removal, disassemble, cleaning, reassemble and install; I’m sure I did not read them all but I did read a LOT…I also read, then reread, then read again through the applicable sections of TM 5-6115-584-34. I feel I absorbed most of it but do have a few questions for you all which I will put in a following Post.
 

1FAST4

Member
80
89
18
Location
NorCal
Here’s my plan:

1. IP: remove, disassemble, clean, inspect, reassemble and reinstall.

2. Injectors: remove, see if a local diesel shop can inspect, clean, and test them then reinstall.

3. Remove and replace Glow Plus and Manifold Heaters as a preventative measure.


Questions:
  • Can I /Should I use CRC Knock’er Loose on all “connection threads” for the Injector Nozzle Assemble, IP, Glow Plugs and Intake Manifold Heater Plugs? There’re pretty corroded.
  • Since this IP and Engine have run fine in the past do I need to worry about any “Timing” issues or do I just need to turn the flywheel clockwise until the “PC” mark on the flywheel lines up with the Timing Pointer (and leave it there) in order for proper remove and reinstall of the IP?
  • Should I give the IP (and Injector Nozzle Assembles) an Acetone bath while whole or after disassemble or both?
  • What IP parts (i.e. O-Rings) should I for sure replace during reassemble?
  • Does anyone have any recent experience getting parts from Ambac directly? I’ve read mixed Posts.
  • Any suggested sources for IP parts, Injector Assembles, Glow Plugs and Intake Manifold Heater Plugs other than Ambac, GMG, or eBay?
  • Any other “Tips & Tricks” you all would suggest?
I didn’t want to sound like a broken record but again, thank you all in advance. This Forum and its Members are an invaluable source of information and help for me and others!!!!!
 

Scoobyshep

Well-known member
1,216
1,737
113
Location
Florida
Knocker loose for sure

Timing, yes and no. Button, shouldn't have to, pc mark yes. Be sure you are on compression of cyl 1 of you rely just on the PC mark you have a 50% chance (Murphy says 100%) you'll end up 180 out

If you are sending the injectors out remove them and send them. Don't mess with them.

There's an o ring behind the ip. Id replace it. Don't loose the spacer plate.

Not sure on sources these days

If you're this far I would change glow plugs. Be careful removing them. Manifold heater has an insulator , don't loose it.
 

rickf

Well-known member
Steel Soldiers Supporter
3,243
1,962
113
Location
Pemberton, N.J.
Those glow plugs are tough to find. I just got a full box of 10 Champion 182 CH42 plugs online $170.55. That was a rarity, you will need to search to find them, they have not been made for quite some time now. Generally they are going for $50.00 each.
 

2Pbfeet

Well-known member
523
998
93
Location
Mt. Hamilton, CA
Those glow plugs are tough to find. I just got a full box of 10 Champion 182 CH42 plugs online $170.55. That was a rarity, you will need to search to find them, they have not been made for quite some time now. Generally they are going for $50.00 each.
I think that is about the going rate (eBay), though you can spend more buying it elsewhere. Wasn't there a batch of mislabeled ones that were 12V inside awhile back?

The issues finding the 182CH42 keeps coming up. I think that the glow plug cross references with an Onan 333-0107, and also Wellman 6a843g042k, who may have made the part originally. I have a vague memory of someone wiring an 12V version of the 182CH42 (181CH42??) wired in series (pairwise)? (As part of that part mix up. Somewhere here I think.)

All the best,

2Pbfeet
 

Scoobyshep

Well-known member
1,216
1,737
113
Location
Florida
I think that is about the going rate (eBay), though you can spend more buying it elsewhere. Wasn't there a batch of mislabeled ones that were 12V inside awhile back?

The issues finding the 182CH42 keeps coming up. I think that the glow plug cross references with an Onan 333-0107, and also Wellman 6a843g042k, who may have made the part originally. I have a vague memory of someone wiring an 12V version of the 182CH42 (181CH42??) wired in series (pairwise)? (As part of that part mix up. Somewhere here I think.)

All the best,

2Pbfeet
Head glow plugs can't be wired in series since the thread in the block is ground.

Sent from my SM-S908U using Tapatalk
 
Top
AdBlock Detected

We get it, advertisements are annoying!

Sure, ad-blocking software does a great job at blocking ads, but it also blocks useful features of our website like our supporting vendors. Their ads help keep Steel Soldiers going. Please consider disabling your ad blockers for the site. Thanks!

I've Disabled AdBlock
No Thanks