• Steel Soldiers now has a few new forums, read more about it at: New Munitions Forums!

  • Microsoft MSN, Live, Hotmail, Outlook email users may not be receiving emails. We are working to resolve this issue. Please add support@steelsoldiers.com to your trusted contacts.

Air comprssor belt adjustment

Recovry4x4

LLM/Member 785
Super Moderator
Steel Soldiers Supporter
34,012
1,808
113
Location
GA Mountains
Ever tighten a belt on a VW Bug? If so, you can now tighten it. The compressor pulley is a threaded 2 piece design with pinch bolts on the outer flange. Tightening up the outer half on the inner half makes the pulley bigger and tightens up the belt. Go forth and explore.

BTW, all this and more is covered in the technical manuals.

Educate oneself by reading the TM.s We have made them available free of charge here on Steel Soldiers. Go to the top, click on resources then scroll down to technical manuals. Once there search for TM 9-2320-361-10 and TM 9-2320-361-20 as starters. Right click on them and save them to your computer for best results. The -10 is the operators and the -20 is the unit maintenance manual. You can also grab the TM 9-2320-361-34, TM 9-2320-361-20P and TM 9-2320-361-34P. That completes that series of TM. All of the 209 manuals are a different series.
 

WyoDeuce

Member
236
0
16
Location
Laramie WY 7220 ft.
There is a special wrench which makes the job easier. I do not have this wrench and was able to do it without it. Tap the pulley with a hammer to help get the threads unstuck.
 

littlebob

New member
1,548
26
0
Location
Baton Rouge LA
Welcome to the site. Everything is in the resources and be can found here. Please look first and ask after you look. I've been on here 5yr's and still have to ask the experts. if you can't find it PM me. I'd spell it all out but typing isn't my strong point. You can buy a wrench in the classifieds to do it.
 

Recovry4x4

LLM/Member 785
Super Moderator
Steel Soldiers Supporter
34,012
1,808
113
Location
GA Mountains
Thanks for the help, iam new to the site also.
New isn't bad. You will find that this is, for the most part, a friendly community. There are a few curmudgeons around here but overall, a helping bunch.

Let me say Welcome Aboard from sunny S Fla.
 

JCKnife

Well-known member
1,367
46
48
Location
Kentucky
Rather than start a new thread on the same topic, I'll bump this old one.

Quoting from the -20 TM:


1. Turn engine serveral revolutions, by turning crankshaft bolt ( 8 ), to equalize tension on both sides of drivebelt (5).
2. Holding straight edge (6) along drivebelt (5), use 6-inch rule to push in center of drivebelt (5).
Correct drivebelt tension is 0.75 in. (1.905 cm) with firm finger grip on 6-inch rule.
3. Using pulley wrench and holding pulley flange (3), adjust drivebelt (5) tension:
a. Turn adjustable pulley flange (4) counterclockwise to loosen tension on drivebelt (5).
b. Turn adjustable pulley flange (4) clockwise to increase tension on dvebelt (5).
4. When drivebelt (5) tension is correct, install two new lockwashers (1) and screws (2) in adjustable pulley flange (4).


Two questions:

1. What the **** does item #1 above mean? I can't make sense of that.
2. For the tension, is it saying that, at the center of a 6-inch ruler, I should be able to deflect the belt only 0.75 inches from the straightedge?

Thank you.
 
Last edited:

SCSG-G4

PSVB 3003
Steel Soldiers Supporter
5,370
3,382
113
Location
Lexington, South Carolina
1 - Means turn the engine over by hand (not the starter), slowly, so that any drive tension is relieved and the tension is as close to being the same all the way around the belt. Drive tension is created by the rapid stroke of the air piston (resistance to turning) and also by the firing of the cylinders of the engine. Moving it slowly allows the compression to bleed away (a bit) and not put so much strain on the belt in one section.
2 - Correct, there should only by .75 inch deflection on that segment of the belt when properly tensioned.
 

LanceRobson

Well-known member
1,638
206
63
Location
Pinnacle, Stokes County, NC
JCKnife;615684[SIZE=3 said:

[/SIZE]
Two questions:

1. What the **** does item #1 above mean? I can't make sense of that.
2. For the tension, is it saying that, at the center of a 6-inch ruler, I should be able to deflect the belt only 0.75 inches from the straightedge?

Thank you.
For #1: When the engine is stopped the crankshaft stops turning and the accessories keep turning forward until belt tension and bearing friction stop them. The result is that any slack tends to be piled up in front of the accessory between the accessory and the drive pulley. Checking the belt tension now will result in the belt seeming looser than it really is. Locking the engine stop cable out and rotating the engine with a wrench on the crankshaft pulley bolt relieves the situation. FWIW, in 29 years I never saw anyone do this.

For #2: Yup. The intent is for you to use a stiff steel or wooden ruler (a steel one is part of the General Mechanics Tool Set issued to every mechanic) and push down on the belt to measure deflection. Again, in all my years, I've never seen anyone do it that way except when demonstrating the principle. The Mark I eyeball is good enough.

To adjust the belt:

The pulley is what is known as a "split sheave pulley". The inner and outer halves are threaded together on a central hub. Turning the outer half in has the effect of making the part of the pulley that grips the belt a larger diameter pulley and tightens the belt.

Use a 9/19 wrench to loosen the front half lock bolts and use a 2' pipe wrench or large slip joint pliers to turn the front half inward a half turn or so and then snug the bolts up. You may need to flush the pulley threads with penetrating oil to get things to turn. It won't harm the belt.

Make sure the engine stop is pulled out and locked. If the ratcheting mechanism is tired use a pair of vise grips to pinch the shaft and lock it all the way out. That will keep the engine from starting. Give the starter button a firm stab. Soft wishey-washy pokes will cause it to eventually burn out from arcing) since it carries a lot of amperage. After a revolution or so to free up the belt and keep it from being pinched or crushed by the outer part of the pulley, check the tension and keep doing iall this until the tension is correct. Then tighten the lock bolts.

You do NOT need to replace the bolts and washers. The bolt is not a "stretch to torque" bolt and the DOD long ago realized that split lock washers could be reused. Most TMs have not been updated and even some new one perpetuate the myth. Serrated lock washers can also be reused with one exception. When the serrated washer is used to establish a ground and the edges of the serrations are no longer sharp enough to cut through the paint to make a good ground they must be replaced.

Welcome to the family and good luck.

Lance
 

JCKnife

Well-known member
1,367
46
48
Location
Kentucky
Thanks, guys. The TM says the radiator must be removed for changing the belts. Must it be removed here also?
 

JCKnife

Well-known member
1,367
46
48
Location
Kentucky
Thanks, gimpy. I love your sig. I saw one about a month ago, a frickin' palm tree in an Indiana govt. office building on GL. The description was crazy.
 

Crazyguyla

Active member
817
124
43
Location
Altus, OK
...Use a 9/19 wrench to loosen the front half lock bolts...
Lance
9/19 wrench., must be one of those rare tools wispered about in secluded company.. LOL

Don't forget us with the old old style compressor (water cooled) and pulley. The pully is adjusted the same way, but there is a set screw instead of pinch bolts. The set screw is on the inside pulley. loosen the set screw and the pulley can be adjusted. Don't have a picture of the pulley, but IMHO, it is much easier to adjust than the "newer"pulley.
 

frank8003

In Memorial
In Memorial
6,426
4,985
113
Location
Ft. Lauderdale, Florida
It is an old thread but the correct title
Lots of good information here.
I didn't see

1. disconnect the battery, engine stop full out secured, use flat wrench on the aft end and attempt turning the compressor. If it will not turn very easily then your belt is OK.
2. If it does need to be tightened use the flat wrench to turn the deal the 180° needed to loosen the 9/16" bolts a bit, put Kroil on the outer adjustment threads, and let it sit a while.
3. Put the Ridgid on the outside and turn the inside with a flat wrench. When it gets difficult to tighten more than check the belt to find it much tighter. It doesn't go monster tight.
4. Turn the whole deal in tightening direction and secure the two 9/16" drive bolts.
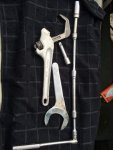
About the tools needed I put a picture. I can't buy anymore "special" tools.
IMG_7243.jpgIMG_7245.jpgIMG_7246.jpg

That is a 1-13/16" Bonnet flat wrench for behind the pulley.
 
Last edited:

Floridianson

Well-known member
Steel Soldiers Supporter
7,409
2,503
113
Location
Interlachen Fl.
Thanks, guys. The TM says the radiator must be removed for changing the belts. Must it be removed here also?
You might be able to get away with just the top bracket and lean it forward enough. I also after putting on the new belt just leave the two jam bolts loose and start the motor and the pulley almost pulls all the slack out of the belt and is real close to right tight. Then tighten the two jam bolts and drink a beer.
 

rustystud

Well-known member
9,280
2,988
113
Location
Woodinville, Washington
You might be able to get away with just the top bracket and lean it forward enough. I also after putting on the new belt just leave the two jam bolts loose and start the motor and the pulley almost pulls all the slack out of the belt and is real close to right tight. Then tighten the two jam bolts and drink a beer.
I've used this technique for years. Works great ! To get it tighter I just rev the engine a bit more.
 
Top
AdBlock Detected

We get it, advertisements are annoying!

Sure, ad-blocking software does a great job at blocking ads, but it also blocks useful features of our website like our supporting vendors. Their ads help keep Steel Soldiers going. Please consider disabling your ad blockers for the site. Thanks!

I've Disabled AdBlock
No Thanks