I had to move the antenna mount from the existing front location to the rear on my M1009 Blazer. The problem was that the rear did not have nutserts in place on this vehicle- I have seen other M1009 Blazers with both locations ready to accept the antenna mount. I looked around the web and found that the inserts used can be a pain, at best, to install without a costly tool. Since this type of application is seldom used, a costly tool seemed unjustifiable.
I found a few encouraging threads on how to install these with various homemade tools and plain old American Ingenuity. This design was inspired by one from Dwayne Verhey. As I came to understand the mechanics of the "nutsert" through other people's explanations, I came up with the following tool design. You only need to use tools you probably already have and if you buy anything, it would be the Simpson Strong Tie. These are used in home construction. Home Depot had them for around .60 cents. The model number is LSTA9- you only need one.
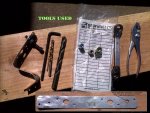
I bought four steel Nutserts to hold the antenna bracket. The ones I needed were *5/16 thread- 1/2" outside diameter. The tool will work for most size inserts; but you'll have to use the appropriate Hex Cap screw to match the insert. The allen wrench and final drill size would also need to match the insert size. Here is the outline of the job I did. If you are mounting one you'll also need:
Thread inserts *(Nutsert or Riv-nut) Steel or aluminum.
Enlarge this hole to 5/16" for this job- larger or smaller for other applications.
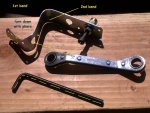 Bend the Simpson tie where indicated. The wrench is held in the hole to keep it from spinning- this helps keep you focusing on keeping the insert square in the hole.
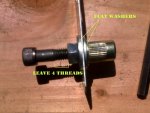 Grease the threads lightly to reduce friction and make for easier buckling of the nutsert. Tighten the Insert onto the bolt so that there are at least 4 threads left as shown or you'll not be able to turn the nut enough to fully collapse the insert.
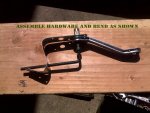 If you use a closed end wrench, put it in place before the allen wrench is inserted into the Hex Cap.
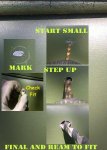 When you buy the insert, there is usually some info on what size to drill- I forgot what it was so I just drilled the 1/2" and rotated the bit; reaming the hole until the insert slid it snugly.
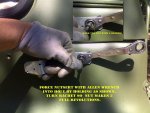 Mark a corner of the nut plainly with a Sharpie so you can keep track of how many turns you are making.
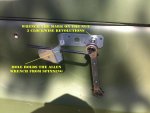
Grip allen wrench firmly and force the nutsert squarely into the hole, while turning the ratchet. The first of three revolutions will be the hardest as the insert buckles- keep it square in the hole until completing the third revolution- no more than 3 though or the insert will deform.
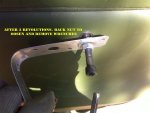 "OOSEN?" for crying out oud! Should be an "L" here.
Sorry about the long post, I just like to be thorough as I know there are guys, like me, that are new to some of these hardware designs, and since the truck wall is double, you have to use a Nutsert instead of regular nuts and bolts to attach the bracket. Best of luck.
I found a few encouraging threads on how to install these with various homemade tools and plain old American Ingenuity. This design was inspired by one from Dwayne Verhey. As I came to understand the mechanics of the "nutsert" through other people's explanations, I came up with the following tool design. You only need to use tools you probably already have and if you buy anything, it would be the Simpson Strong Tie. These are used in home construction. Home Depot had them for around .60 cents. The model number is LSTA9- you only need one.
I bought four steel Nutserts to hold the antenna bracket. The ones I needed were *5/16 thread- 1/2" outside diameter. The tool will work for most size inserts; but you'll have to use the appropriate Hex Cap screw to match the insert. The allen wrench and final drill size would also need to match the insert size. Here is the outline of the job I did. If you are mounting one you'll also need:
Thread inserts *(Nutsert or Riv-nut) Steel or aluminum.
- 1 5/16"x2" Hex Cap screw (black oxide or grade 5 or
 .
. - 1 5/16" nut to match Cap Hex screw (black oxide or grade 5 or
 .
. - 2 5/16" Washers- Zinc are okay.
- Simpson Strong Tie LSTA9
- 1/8" Starter bit
- 5/16" intermediate bit
- 1/2" final size bit
- a 1/4" long allen wrench matching the Hex in the Hex Cap screw.
- 1/2" Ratchet wrench
- dab of moly lube or white lithium grease
- Power Drill

Enlarge this hole to 5/16" for this job- larger or smaller for other applications.
 Bend the Simpson tie where indicated. The wrench is held in the hole to keep it from spinning- this helps keep you focusing on keeping the insert square in the hole.
 Grease the threads lightly to reduce friction and make for easier buckling of the nutsert. Tighten the Insert onto the bolt so that there are at least 4 threads left as shown or you'll not be able to turn the nut enough to fully collapse the insert.
 If you use a closed end wrench, put it in place before the allen wrench is inserted into the Hex Cap.
  When you buy the insert, there is usually some info on what size to drill- I forgot what it was so I just drilled the 1/2" and rotated the bit; reaming the hole until the insert slid it snugly.
 Mark a corner of the nut plainly with a Sharpie so you can keep track of how many turns you are making.
Grip allen wrench firmly and force the nutsert squarely into the hole, while turning the ratchet. The first of three revolutions will be the hardest as the insert buckles- keep it square in the hole until completing the third revolution- no more than 3 though or the insert will deform.


 "OOSEN?" for crying out oud! Should be an "L" here.
Sorry about the long post, I just like to be thorough as I know there are guys, like me, that are new to some of these hardware designs, and since the truck wall is double, you have to use a Nutsert instead of regular nuts and bolts to attach the bracket. Best of luck.
Last edited:


