• Steel Soldiers now has a few new forums, read more about it at: New Munitions Forums!

  • Microsoft MSN, Live, Hotmail, Outlook email users may not be receiving emails. We are working to resolve this issue. Please add support@steelsoldiers.com to your trusted contacts.

M215/m221 build

blizzardwarrior7

New member
72
0
0
Location
Northampton, MA
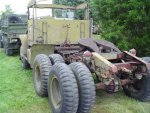
Well finally here are a few pictures of the m215 after a day or 2 spent on painting. Im doing small sections at a time for convenience sake and because of the recoat times on the paint that Im using.

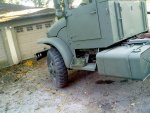
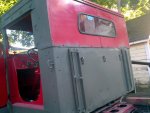
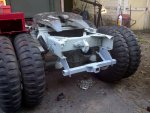
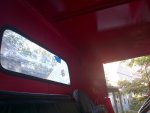
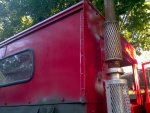
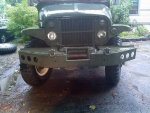
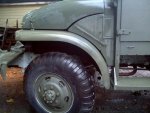
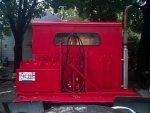
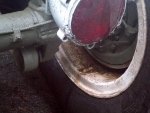
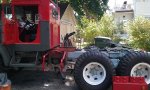
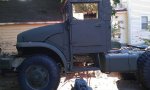
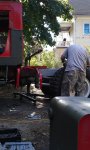
The green that you see is the result of sandblasting the section to be primed, priming with sandable primer and than handsanding it. 1 coat of rustoleum primer, and than 1 coat of rustoleum enamel primer mixed with rustoleum camo paint. I plan on doing the entire truck like this, and than shooting the final color coat over it, possibly a semi gloss OD. Not the greatest pics as it has been rainy here for a few days. 1 pictures shows the back of the truck and the platform that is there now. Tommorow I plan on cutting the entire platform off and starting to design the new one to replace it. The rear of the frame needs to be straightened out a bit, and than I plan on extending it 4-6 inches to get the clearance needed for installing the centerpanel and mudflaps. The pintle hitch will also be mounted on a relocated crossmember closer to the rear, and than I will be mounting a 2 1/2" receiver on the bottom of the centerpanel. I manged to get the spare tire off the truck by myself (it was mounted on top of the deck), wasnt as heavy as I thought it would be. The last picture shows the passenger side rear inside wheel with what looks to be a hub leak of some sort. More pics tommorow, assuming the weather improves as they say it will!
 

Attachments

M215

Member
478
3
18
Location
Spotsylvania, Virginia
What was your GMC originally, M215 dumper or M221 truck tractor? The sheet metal looks straight and clean, nice project. Your leaking rear is either a bad wheel cylinder or leaking hub seal.
 

blizzardwarrior7

New member
72
0
0
Location
Northampton, MA
It was originally an m215 dump the 5 the wheel was added by tom at Alfa heaven sometime in the 80s. Any easy way to tell if its a wheel cylinder or a hub? Upon closer inspection it is in fact gear oil so it seems like it is a hub seal.
 

M215

Member
478
3
18
Location
Spotsylvania, Virginia
gear oil

Smell and feel, you will know the difference. Hubs seals are easy to change once you have every thing apart. You have two rubber flex hoses to the rear axle. One is the brake line the other is part of the vent system for the rear axle. Make sure the vent system is not clogged, common reason for blown / leaking hub seals.
 

blizzardwarrior7

New member
72
0
0
Location
Northampton, MA
Well, I removed the rear platform today, did some more painting, removed the fuel tank cleaned it out, and painted it as well. Did a bit of sandblasting on the frame that was under the platform. Started working on fabricating the 2 1/2" hitch receiver that will be going on the back. And also completely degreased, and hand sanded/wire brushed the 5th wheel, too heavy to take off by myself today, maybe tommorow.

Ordered the steel for constructing the new platform and rear centerpanel/mudflap hangars. Finally had a nice day today, and its forecast to stay this way for the next week!

Tommorow the plan is to test fit my receiver hitch, possibly paint the rear of the cab, and do some more grinding and sanding on the frame.
 

Attachments

Last edited:

Gunfreak25

Well-known member
1,561
620
113
Location
Yuma, AZ
Cool! The leak at your wheel is caused by the cork keyway gasket on the hub spindle leaking. This is the only thing that keeps gear oil in the axle housing and out of your bearings. So if it goes, your bearings get a nice oil bath. The only way to detect this leak is if it makes it's way onto the rim, meaning the hub seal is also poop. Replace the keyway gasket with a good bead of RTV silicone. Be sure to degrease the keyway for good adhesion. Let the RTV dry before installing the wheel bearing nut. I also seal the axle flange with RTV although you can pickup the proper gaskets for 80 cents from Memphis Equipment. Personally, when I have a wheel hub that has been filled with gear oil, I let it drain out for a few hours. Come back with a couple sheets of paper towel to soak up any remaining gear oil in the hub, pack a little fresh grease in and button it back up. No reason to remove all the grease in there unless it's been homogenized ie "mixed up".

Beautiful trucks, guys!
 
Last edited:

blizzardwarrior7

New member
72
0
0
Location
Northampton, MA
Couldn't tell ya, but I can tell you that it was a really tough enamel paint, handsanding pretty much does nothing to it. Loved the red as all of my trucks are red, but it was in need of a repaint anyway.
 

nattieleather

Well-known member
1,879
138
63
Location
Cleveland, OH
It looks like the 5th wheel is in the correct location. The military 5th wheels are neat in that not only do they articulate front to back but also side to side for off road. Keep the pics comming!
 

blizzardwarrior7

New member
72
0
0
Location
Northampton, MA
Well, got more work done again today. Got slowed up a little bit because my freaking metabo angle grinder went out on me :shock:. So had to run to tractor supply and pick myself up a new one. Did a bit more painting, and got my hitch fabricated and attatched (more or less). Still need to drill holes for two more bolts, and hit it with the welder in 2 spots, but it looks good enough for pictures. Did a bit more grinding on the frame, not really visible in pics, but trust me, I did! Ordered some metal today also. I ordered 1 1/8" thick plate for my rear center panel, which will be bolted to the end of the frame rails, and than be cut out at the bottom for the 2.5" hitch receiver to poke through, and it will also be gusseted to the receiver itself, also the pintle hitch will be mounted to this plate, and I will probably mount the electrical plugs, and air hookups onto it as well. Im going to the local weatherguard dealer tommorow hopefully to take a look at toolboxes I plan on mounting as well.

Tommorow, I plan on painting the rest of the back of the cab, drilling the other 2 holes for the hitch, taking some more measurements for new steel, and possibly removing the 5th wheel. I took a few pictures of the hardtop as well, once I move onto painting the inside, you will no doubt get more pictures of it also.

**Almost forgot, also mounted the jerrycan holder on the step, which I beleive is the correct location. There were already holes on the step, is it normal the the left side of the holder is about 1/4" farther off the step than the right side? If not I will just drill new holes.

Also I plan on doing the axle/hub seal in the next few days, is there an easy way to do this? Sounds like a job maybe better suited for doing in a garage rather than in the driveway?
 

Attachments

Last edited:

hendersond

Well-known member
Steel Soldiers Supporter
1,171
29
48
Location
Galesville, WI
Very nice truck and great work! I must admit, seing that red getting covered gives me a bit of a sick feeling. :) The step is a little wider in the back than the front. It gently tapers from the fender to the tank. That is why the overhang is more on the left. The gas can will sit parallel to the cab. Put a can in and see.
I can't wait to see more pics of your progress.
You are motivating me! :beer:
 

hendersond

Well-known member
Steel Soldiers Supporter
1,171
29
48
Location
Galesville, WI
Let us know how the axle/hub seal goes. I have a Left rear to do too. Was thinking about trying to pull the axle and take the duals/hub/drum off as a single unit.
 

blizzardwarrior7

New member
72
0
0
Location
Northampton, MA
I know what you mean about feeling sick :(, but Im liking the green better everytime I look at the pictures. Didnt even think that the step would be tapered, I would have put a can in, but I dont have one! I will get one at my local army surplus store one of these days, Im sure they would have one.

Good idea about the axle, Im not looking forward to doing it myself, but it has to be done.
 

hendersond

Well-known member
Steel Soldiers Supporter
1,171
29
48
Location
Galesville, WI
I put an add on craigslist for a gas can and got probably 10 calls. I paid anywhere from $20 all the way down to $3 for gas cans. One farmer sold me 10 cans. Some are rusty inside but they cleaned up nice on the outside. I will leave mine empty so no one has reason to steal it.
 

Gunfreak25

Well-known member
1,561
620
113
Location
Yuma, AZ
Yeah, the can holder is supposed to sit like that since the running boards taper. My truck came with a 1944 Cavalier Water Can. A bit rusty inside, but it too cleaned up great on the outside. I was going to stencil "Miller Light Only" on the side. :lol:

I'd kill a rabbi with a pork chop to get my hands on a hard top like that. I like how the side pieces are were cut out of single sections of sheet metal. I am working with a board member here on getting a Memphis Fiberglass hard top traded, or I might end up making one out of high grade exterior plywood that's been fully sealed and finished to be 100% waterproof. You'd be amazed at how nice well the newer plywoods hold up especially when properly sealed and painted.
 

blizzardwarrior7

New member
72
0
0
Location
Northampton, MA
Now that would be something to disguise a small kegerator as a Jerry can.. I bet a plywood top would look amazing, and it might possibly help with noise inside the cab as well?

I'm beginning the search for a trailer for the truck as well o.o
 
Top
AdBlock Detected

We get it, advertisements are annoying!

Sure, ad-blocking software does a great job at blocking ads, but it also blocks useful features of our website like our supporting vendors. Their ads help keep Steel Soldiers going. Please consider disabling your ad blockers for the site. Thanks!

I've Disabled AdBlock
No Thanks