• Steel Soldiers now has a few new forums, read more about it at: New Munitions Forums!

  • Microsoft MSN, Live, Hotmail, Outlook email users may not be receiving emails. We are working to resolve this issue. Please add support@steelsoldiers.com to your trusted contacts.

1986 Camp Shelby M1008 Restoration

Sharecropper

Well-known member
Steel Soldiers Supporter
1,836
987
113
Location
Paris KY
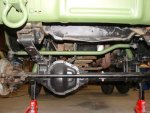
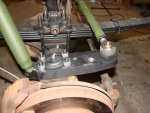
That thingy on the tie rod is the steering damper. The stabilizer is the big bent bar that runs from one spring over to the other spring and is attached to the frame under the radiator. This will interfere with the cross-over steering rod.

I have not installed the steering brace because I don't intend for my truck to leave the pavement except to drive down across my pasture every now and then. If you plan on doing serious off-roading, you need to install it, especially with the lateral stresses associated with cross-over steering. Heck, my truck hasn't been out of my climate-controlled warehouse for about a year.

It may be helpful for you to look through my rebuild thread. I learned a lot during the process and tried to share as much as I could by posting photos.

Hope this helps.
 

rlltide12

Member
227
1
18
Location
Alabama
Yea im using mine as a road queen so i may not need it as well. You are talking about the sway bar? It bolts into the spring holders on both springs at the axle
 

Sharecropper

Well-known member
Steel Soldiers Supporter
1,836
987
113
Location
Paris KY
Yeah some folks call it a sway bar, and I guess that's what is does. But I always called it a front stabilizer for whatever reason.
 

rlltide12

Member
227
1
18
Location
Alabama
Installed a new water pump, upper hose, lower hose, and the little hose over the past two nights. The WP was weeping so I felt it was time to take care of it. The job was quite the task but it may have been made tougher by having no light and it raining the entire time. I would suggest not doing it in the rain as it just was not any fun at all. Installed a gasket for the timing cover rather than RTV. Instead of using RTV to hold the gaskets, I have always been taught to use 3M Yellow Weatherstriping and Gasket Glue and Sealant pt# 08001. I also used this glue on the threads of the bolts. All is sealed and in good condition so far. Also, if anyone is doing their WP and there are no studs with the new one as mine was, Dorman 23733 or 23735 are the stud kits that will get you going. The thread is 5/16th 24 TPI. Next up I am going to install X-Over steering with a straight drag link due to the fact that I dont have a tubing bender and a bent one is so overpriced id rather do some X-Member modifications instead. Stay Tuned!
 

rlltide12

Member
227
1
18
Location
Alabama
Went to work the other morining (16 mile drive) and forgot that I left the hubs locked in. So when I got to work I had a plesant transmission fluid spray down the side of my truck and a puddle of trans fluid under the transfer case. Changed the front output seal when I got home with a National Seal part# 3946. The nut on the front output of a 208 is a 1 1/8" socket. No problem changing it. But when I got done I did a once around on my truck and dangit if there wasn't water leaking from somewhere around the passenger side of the radiator. Started investigating and it looks like the passenger side end tank of the radiator is leaking around where it attaches to the cores. So I am going to pull it and have it rebuilt. If its not one thing its another.
 

M1009 NEWBEE 2013

New member
164
0
0
Location
Colorado
This is Headquarters and Headquarters Company of the 199th Infantry Brigade logo (Army) from Desert Storm or Shield. I was a Jarhead but I do recognize it. It was a window placard that needed to be displayed to get thru thru the checkpoints.
 

rlltide12

Member
227
1
18
Location
Alabama
Awesome! Does this sticker being on this CUCV mean it served overseas? I always heard most of the cucvs that went over didnt come back.
 

rlltide12

Member
227
1
18
Location
Alabama
Just out rompin around. With the new crossover, this thing has much better road manners. And i can actually get in the first lane of traffic when i turn out of a driveway

uploadfromtaptalk1396976768026.jpg
 

CPAPPY

Member
313
6
18
Location
Xenia , Ohio
Looking good there, I really like the way it looks with the 6" lift and the yellow bumpers sets it off. Good luck with your new toy.
 

rlltide12

Member
227
1
18
Location
Alabama
Attempted to change the back glass gasket and shattered the back glass in the process. I dont suggest anyone who isnt a glass professional trying that.


Update. So i got a new glass today and installation is fairly easy. So if you are removing your back glass, cut it out. I wouldnt recommend prying it out with a screwdriver.
 
Last edited:

rlltide12

Member
227
1
18
Location
Alabama
More updates. After a long trip the other day I woke up the next morning to a puddle of diesel in front of the left rear tire (I park it on an incline). You guessed it, a hole in the tank. After inspection, it appeard that the rear tank bracket had rubbed a hole in it. So I drained it by punching a hole in the tank right in the bad spot, dropped the tank down as far as I could, and used a very precise tool to cut the fuel lines going to the tank (knife taped on to a broom handle). I ordered a GM1B fuel tank and a new set of tank straps. To remove the old straps, drill the rivets. Install the new straps with 1/4-20 bolts and lock nuts. Here is something I did to make tank maintenance a whole lot easier next time. Instead of trying to replace the rubber lines with the same length, I used 3 feet for each line. Reinstall was a breeze. I let the hoses naturally curl back into the shape they came off the roll and they rested nicely on top of the tank and I bolted it all back up. As for the sending unit wires, I clipped them and installed a waterproof blade connection for easy removal next time if needed. Next comes the window and door weatherstripping for both sides. I ordered a kit from 1AAuto that does doors, window glass, and window sweeps. Till next time!
 

rlltide12

Member
227
1
18
Location
Alabama
Also, I found a great product if anyone is having trouble with a leaking back glass. It is made by 3M part number 08509 called Automotive Bedding and Glazing Compound. It comes in a caulking tube. Even after my new gasket install I had leaks. Take the tube and force the tip down inside the rubber seal (easier to GENTLY use a screwdriver to pry the seal back a little) and apply a good bead of this stuff all around the inside of the gasket. Your leaks will be gone immediatly. It can be applied wet. Wipe off the excess and you are all done.
 
Top
AdBlock Detected

We get it, advertisements are annoying!

Sure, ad-blocking software does a great job at blocking ads, but it also blocks useful features of our website like our supporting vendors. Their ads help keep Steel Soldiers going. Please consider disabling your ad blockers for the site. Thanks!

I've Disabled AdBlock
No Thanks