• Steel Soldiers now has a few new forums, read more about it at: New Munitions Forums!

  • Microsoft MSN, Live, Hotmail, Outlook email users may not be receiving emails. We are working to resolve this issue. Please add support@steelsoldiers.com to your trusted contacts.

AcuTemp Refrigerator

Third From Texas

Well-known member
2,766
6,498
113
Location
Corpus Christi Texas
Interesting!! So I assume each port goes to one battery with a 12 volt charger? Could a 24 volt charger be used so only one plug is needed or wired I wonder. I see how that will work as it wouldn't be any different for the acutemp with the batteries hooked up and charged and being charged at the same time if that makes sense. No damage would occur to it and the fan wouldn't run all the time. I guess a basic trickle charger for a motorcycle is all that is needed, they use that style plug too. Great upgrade!! Not expensive either. I'd bet it could be used in the other direction as well if you can pull 12 volts from one battery for a phone charger if need be but I'd only use it that way if it were getting external power.

The batteries are independent on that side of the box. They are not in series (so not 24v) and not even in parallel. The unit will in fact run off 12/24v (even solar) thru it's internal controller. I just didn't want to push a charge thru that controller w/o knowing what it might fry.


I just top off each side with a couple small 1a NOCO chargers.


You could get two of those for half the price on a single charger that would push 5a to each.
I run this one on my LMTV and it's a great charger.


But for the smaller equipment I use the 1a chargers..
 

Third From Texas

Well-known member
2,766
6,498
113
Location
Corpus Christi Texas
Great upgrade!! Not expensive either. I'd bet it could be used in the other direction as well if you can pull 12 volts from one battery for a phone charger if need be but I'd only use it that way if it were getting external power.
Yeah, I added a USB 3 charging port inside the cooler. But I only use it when the unit is either pulling from the truck or solar. As you said, the damned thing will stop charging if even one battery gets low.

I tapped it back to a single battery.

Seemed like a nice place to set your phone while charging.. Still puts out a god bluetooth signal from in there and I can hear it if it rings. I feel safer at the beach having the phone out of sight anyway.


Untitled.png
 

WWRD99

Well-known member
Steel Soldiers Supporter
1,117
1,715
113
Location
York Pa
Yeah, I added a USB 3 charging port inside the cooler. But I only use it when the unit is either pulling from the truck or solar. As you said, the damned thing will stop charging if even one battery gets low.

I tapped it back to a single battery.

Seemed like a nice place to set your phone while charging.. Still puts out a god bluetooth signal from in there and I can hear it if it rings. I feel safer at the beach having the phone out of sight anyway.


View attachment 905398
As many times I've had those batteries out I never noticed they weren't wired at the batteries for 24 volt...makes this charging setup much easier. A small maintaining charger would work perfectly.

Sent from my SM-S906U using Tapatalk
 

thewams

Member
13
25
13
Location
Florida
Before I even ask a question, thanks so much to everybody here who provided technical input on this thread. I've read through the whole thing and making notes as I'm the new owner of an AcuTemp AX56L that I got off GovPlanet.

Sadly, mine was one of the units where they decided to drain the refrigerant, and unfortunately they did more than just a pinprick. There's one spot of the copper tubing that's punctured and crushed. My plan is to cut out the damaged section and solder in a new piece. What I'm wondering about is the recharge. Has anybody soldered in a charging valve or some other mechanism for making follow-up services easier? I'm starting at square 1 learning about refrigeration, so quite possible that my idea sounds totally stupid to the folks with more experience. Happy to hear it if it is! :LOL:
 

WWRD99

Well-known member
Steel Soldiers Supporter
1,117
1,715
113
Location
York Pa
Before I even ask a question, thanks so much to everybody here who provided technical input on this thread. I've read through the whole thing and making notes as I'm the new owner of an AcuTemp AX56L that I got off GovPlanet.

Sadly, mine was one of the units where they decided to drain the refrigerant, and unfortunately they did more than just a pinprick. There's one spot of the copper tubing that's punctured and crushed. My plan is to cut out the damaged section and solder in a new piece. What I'm wondering about is the recharge. Has anybody soldered in a charging valve or some other mechanism for making follow-up services easier? I'm starting at square 1 learning about refrigeration, so quite possible that my idea sounds totally stupid to the folks with more experience. Happy to hear it if it is!
Charging you'll need a basic kit to hook up with. That's easy...one can of r134a. Tough part is you'll need vacuum to charge properly. You can buy one of those too. You can take it to a shop and let them charge it but I'm not sure what an auto shop would charge plus if it leaked out you have to fix that and charge it again. I bought this kit a long time ago when I did remote repair for ac in cars. People come to me now but I still do rv rooftop ac and I don't have room for them to be parked all over so I'll go to them most of the time. I fixed a ton with that set. It only takes, I think, 10 ounces of charge...but I'm not sure. I don't go by weight and use the guages and temp output to set how much it needs anyhow. Creep up on what the guages say and stop. You definitely don't want to over charge these those little compressors get really mad if you do. A cooking scale will work so you know how much you've put in for that since I doubt you know exactly how to read the guages. It's not magic really. Post up pics of the damaged pipe. It should only be a pin hole but sounds like they got nuts on something.


Sent from my SM-S906U using Tapatalk
 

thewams

Member
13
25
13
Location
Florida
Post up pics of the damaged pipe. It should only be a pin hole but sounds like they got nuts on something.
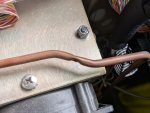
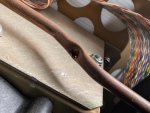
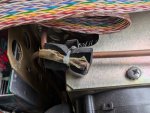
Yeah, I don't know what the hell was goin on, but somebody definitely didn't care about re-use. Included here are two pictures of the damaged tube section I need to replace, and one picture of what I'm guessing is where they charged it from the factory. I don't know if it's helpful or just overkill to try to add a serviceable charging valve. It's going to be a non-trivial repair to get new tubing soldered in anyway, so I figured while I was at it, I'll try to future proof for easier maintenance as much as I reasonably can.

And I didn't even think about compressor oil until I read this thread. Hopefully all they did was mangle the refrigerant line. Will be pulling the whole apparatus out to be certain.

Win some lose some with these auctions. Hopefully at a grand total of $200 I'll still be able to salvage a win with this.ax56l_copperdamage_1.jpgax56l_copperdamage_2.jpgax56l_factory_charge_location.jpg
 

WWRD99

Well-known member
Steel Soldiers Supporter
1,117
1,715
113
Location
York Pa
Yeah, I don't know what the hell was goin on, but somebody definitely didn't care about re-use. Included here are two pictures of the damaged tube section I need to replace, and one picture of what I'm guessing is where they charged it from the factory. I don't know if it's helpful or just overkill to try to add a serviceable charging valve. It's going to be a non-trivial repair to get new tubing soldered in anyway, so I figured while I was at it, I'll try to future proof for easier maintenance as much as I reasonably can.

And I didn't even think about compressor oil until I read this thread. Hopefully all they did was mangle the refrigerant line. Will be pulling the whole apparatus out to be certain.

Win some lose some with these auctions. Hopefully at a grand total of $200 I'll still be able to salvage a win with this.View attachment 927570View attachment 927571View attachment 927572
That one kit I posted has 2 ports you can install in this. Did yours come with the manuals? That looks like they pierced it 2x in one spot...I'd try one of those valves on the line before I'd replace the line...you can pop the pin out when you install it and hit one of those holes. It has a good chance to cover that up and not leak. I've seen worse. Are your batteries good? They're around 160 a pair now. You'd probably have to buy those irregardless though. If you can find someone that has the vacuum you could borrow for a day you'd be out under 50$ to charge it. I don't think I'd worry about oil right now. Those compressors don't like to let it out unless you turn it upside down. Not sure if you've ever moved a fridge but did it on its back instead of straight up...gotta wait a few hours for the oil to get back into the compressor.

Sent from my SM-S906U using Tapatalk
 

thewams

Member
13
25
13
Location
Florida
Didn't get to focus on this as often as I was hoping, but happy to report that my first ever refrigeration job appears to be mostly a success. Appreciate all the notes and recommendations here.

There were a few reasons I wanted to avoid a bite valve. One is that the clearance was pretty tight. Another is the stress they can put on the copper over time, especially since the unit will get moved, shaken, vibrated, etc. during transport. Lastly the recovery point on my kit was so mangled and crimped, I wanted to get some whole tubing in there in case the mangling might have created a flow obstruction.

So the fix I opted for was to cut out the old section and replaced with a similarly shaped new piece, and also added an access valve where the factory charging took place to make it possible to charge, and make it easier to service the unit in the future. Picture below, but If you're an HVAC pro, either don't look or squint really hard when you do - it's not pretty, it just works. :LOL:

ax56l_copper_fix.jpg

I used Stay-Brite #8 for the solder and a propane torch. Was surprised to find the lowest setting on the torch worked well - expected to need more heat than that. Still have some more testing to do, but so far the compressor runs and has brought everything down to 4.9C on a warm, humid day/night in COOL mode. Gonna test FREEZE mode and see how it does, but I need to solve for condensation collecting in the bottom of the cooler.

Next up I'm hoping to figure out a lithium conversion. I can't find any information on the voltages or charging logic of the onboard MPPT, so I'm not sure if I can just swap in a 12V LiFePO4 and call it a day. If it's designed for lead acid, I'm guessing the charge logic will try to float when it hits max voltage, which might rule out an easy swap. No way for me to know until I can find more information.

I figure worst case scenario would be keeping them isolated and charging independently as some have done here. Seems like it would be relatively easy to put an Anderson PowerPole connector on the DC power cable leads and then rig up a PowerPole connector to the batteries and just connect them through the DC power port as needed.
 

WWRD99

Well-known member
Steel Soldiers Supporter
1,117
1,715
113
Location
York Pa
Didn't get to focus on this as often as I was hoping, but happy to report that my first ever refrigeration job appears to be mostly a success. Appreciate all the notes and recommendations here.

There were a few reasons I wanted to avoid a bite valve. One is that the clearance was pretty tight. Another is the stress they can put on the copper over time, especially since the unit will get moved, shaken, vibrated, etc. during transport. Lastly the recovery point on my kit was so mangled and crimped, I wanted to get some whole tubing in there in case the mangling might have created a flow obstruction.

So the fix I opted for was to cut out the old section and replaced with a similarly shaped new piece, and also added an access valve where the factory charging took place to make it possible to charge, and make it easier to service the unit in the future. Picture below, but If you're an HVAC pro, either don't look or squint really hard when you do - it's not pretty, it just works.

View attachment 928842

I used Stay-Brite #8 for the solder and a propane torch. Was surprised to find the lowest setting on the torch worked well - expected to need more heat than that. Still have some more testing to do, but so far the compressor runs and has brought everything down to 4.9C on a warm, humid day/night in COOL mode. Gonna test FREEZE mode and see how it does, but I need to solve for condensation collecting in the bottom of the cooler.

Next up I'm hoping to figure out a lithium conversion. I can't find any information on the voltages or charging logic of the onboard MPPT, so I'm not sure if I can just swap in a 12V LiFePO4 and call it a day. If it's designed for lead acid, I'm guessing the charge logic will try to float when it hits max voltage, which might rule out an easy swap. No way for me to know until I can find more information.

I figure worst case scenario would be keeping them isolated and charging independently as some have done here. Seems like it would be relatively easy to put an Anderson PowerPole connector on the DC power cable leads and then rig up a PowerPole connector to the batteries and just connect them through the DC power port as needed.
That repair looks great. You know more than letting on...most people wouldn't try that fix let alone know what or spend the money on staybright. I've done hundreds of both repairs but usually save the stay bright for compressor replacement due to cost. Did you get a good vacuum on that setup too? It'll make a night and day difference on how long the compressor runs saving battery power not compressing air. The lithium battery is something I'd like to do just haven't looked that hard or want to spend the money on it. I'd wonder if you could fool the charging system in it now with a lithium charging setup so it won't try to charge the batteries or change how it cools. The charging block does come out not sure if one could replace it that does charge lithium.

Sent from my SM-S906U using Tapatalk
 

thewams

Member
13
25
13
Location
Florida
That repair looks great. You know more than letting on...most people wouldn't try that fix let alone know what or spend the money on staybright. I've done hundreds of both repairs but usually save the stay bright for compressor replacement due to cost. Did you get a good vacuum on that setup too? It'll make a night and day difference on how long the compressor runs saving battery power not compressing air. The lithium battery is something I'd like to do just haven't looked that hard or want to spend the money on it. I'd wonder if you could fool the charging system in it now with a lithium charging setup so it won't try to charge the batteries or change how it cools. The charging block does come out not sure if one could replace it that does charge lithium.

Sent from my SM-S906U using Tapatalk
Hey thanks bud - I really appreciate it. I love tinkering and it was especially cool (no pun :p ) to get to learn about refrigeration. It's pretty amazing how it works.

It looks like this compressor is a Danfoss BD35, designed for 12V portable fridges. I couldn't figure out a feasible way to tap the low and high ends to get a "professional-grade" assurance on the vacuum. My process was to connect through the newly installed access valve, pull a vacuum for 30m, then let it sit and check it over an hour or so to make sure it held. Ended up being an overnight, but it was still close to 30hg the next day. Since the system had been opened to a humid environment for a long time, I pulled vacuum for another hour, made sure it still held for a while after I turned the pump off, and then proceeded with the charge. It's all a best-guess, but I'm hoping the extra hour was enough to eat up more margin of error for moisture or residual refrigerant that was left behind in the system.

Still kicking around ideas for the lithium conversion, but I'm trying to use what's already there as much as I can. Full isolation should work, but it's kind of a pain to manage that. Another option I thought about was connecting them through the existing circuit, but installing a waterproof cut-off switch for each battery so they can be physically disconnected instead of potentially being damaged by a float charge. Maybe a little voltage display as well to see when they hit max voltage. I don't know yet, but I'm scheming.

Would be helpful to find some in-depth tech specs of the onboard MPPT, but CSAFE has been very unhelpful. They told me they can't provide assistance to any owners who haven't signed an NDA which is just...whatever.
 

WWRD99

Well-known member
Steel Soldiers Supporter
1,117
1,715
113
Location
York Pa
Hey thanks bud - I really appreciate it. I love tinkering and it was especially cool (no pun ) to get to learn about refrigeration. It's pretty amazing how it works.

It looks like this compressor is a Danfoss BD35, designed for 12V portable fridges. I couldn't figure out a feasible way to tap the low and high ends to get a "professional-grade" assurance on the vacuum. My process was to connect through the newly installed access valve, pull a vacuum for 30m, then let it sit and check it over an hour or so to make sure it held. Ended up being an overnight, but it was still close to 30hg the next day. Since the system had been opened to a humid environment for a long time, I pulled vacuum for another hour, made sure it still held for a while after I turned the pump off, and then proceeded with the charge. It's all a best-guess, but I'm hoping the extra hour was enough to eat up more margin of error for moisture or residual refrigerant that was left behind in the system.

Still kicking around ideas for the lithium conversion, but I'm trying to use what's already there as much as I can. Full isolation should work, but it's kind of a pain to manage that. Another option I thought about was connecting them through the existing circuit, but installing a waterproof cut-off switch for each battery so they can be physically disconnected instead of potentially being damaged by a float charge. Maybe a little voltage display as well to see when they hit max voltage. I don't know yet, but I'm scheming.

Would be helpful to find some in-depth tech specs of the onboard MPPT, but CSAFE has been very unhelpful. They told me they can't provide assistance to any owners who haven't signed an NDA which is just...whatever.
That vacuum will work fine. Ac is very easy if you know the basics...I play with the charge and see what the system runs best at, not a certain weight of charge. Compressor temp and temp inside the cooler are things I watch. If you have the original paperwork for these, they have full schematic drawings in them for everything. Shouldn't need tech support really.

Sent from my SM-S906U using Tapatalk
 

WWRD99

Well-known member
Steel Soldiers Supporter
1,117
1,715
113
Location
York Pa
Hey thanks bud - I really appreciate it. I love tinkering and it was especially cool (no pun ) to get to learn about refrigeration. It's pretty amazing how it works.

It looks like this compressor is a Danfoss BD35, designed for 12V portable fridges. I couldn't figure out a feasible way to tap the low and high ends to get a "professional-grade" assurance on the vacuum. My process was to connect through the newly installed access valve, pull a vacuum for 30m, then let it sit and check it over an hour or so to make sure it held. Ended up being an overnight, but it was still close to 30hg the next day. Since the system had been opened to a humid environment for a long time, I pulled vacuum for another hour, made sure it still held for a while after I turned the pump off, and then proceeded with the charge. It's all a best-guess, but I'm hoping the extra hour was enough to eat up more margin of error for moisture or residual refrigerant that was left behind in the system.

Still kicking around ideas for the lithium conversion, but I'm trying to use what's already there as much as I can. Full isolation should work, but it's kind of a pain to manage that. Another option I thought about was connecting them through the existing circuit, but installing a waterproof cut-off switch for each battery so they can be physically disconnected instead of potentially being damaged by a float charge. Maybe a little voltage display as well to see when they hit max voltage. I don't know yet, but I'm scheming.

Would be helpful to find some in-depth tech specs of the onboard MPPT, but CSAFE has been very unhelpful. They told me they can't provide assistance to any owners who haven't signed an NDA which is just...whatever.
If you still have your cover off do you have a led flashing at the bottom of your board? Mine just had the inside fans not turning on and the compressor not kicking on. I get 5 flashes out of it. Not sure where the magnetic pickup for the hood is that let's it know the lid is shut but I think that's what's wrong. I can't find code info for the flash or the codes on the screen.


Sent from my SM-S906U using Tapatalk
 

thewams

Member
13
25
13
Location
Florida
If you still have your cover off do you have a led flashing at the bottom of your board? Mine just had the inside fans not turning on and the compressor not kicking on. I get 5 flashes out of it. Not sure where the magnetic pickup for the hood is that let's it know the lid is shut but I think that's what's wrong. I can't find code info for the flash or the codes on the screen.


Sent from my SM-S906U using Tapatalk
I might be able to have a look sometime today.

I've only been testing that it gets cold at all. Just did a 24 hour test on AC power with no batteries. Came out late in the morning to find the unit beeping and displaying a high temp warning. It had crawled up to 7.1C from 4.9C even though the compressor seemed to be working fine. I think I might've screwed up. I didn't put the shipping lid back on and it's been pretty hot/humid, so maybe the ambient temp was too much for the compressor to fight against.

Also noticed a puddle of water in the bottom of the unit after doing this. Looks like it's all from condensation - fortunately nothing oily looking. But there was enough accumulation that I'm wondering if I need to consider adding a drain plug.
 

joeblack5

Active member
256
244
43
Location
State College PA
Nice job bringing that back to life. I have a couple of bd35f compressors with electronic mounted on the side. I like to put one into a normal large fridge with freezer on the bottom for use in our uni.og 404 camper build.. nice to see that you tackles soldering on the unit.

Good luck
Johan
 

thewams

Member
13
25
13
Location
Florida
If you still have your cover off do you have a led flashing at the bottom of your board? Mine just had the inside fans not turning on and the compressor not kicking on. I get 5 flashes out of it. Not sure where the magnetic pickup for the hood is that let's it know the lid is shut but I think that's what's wrong. I can't find code info for the flash or the codes on the screen.


Sent from my SM-S906U using Tapatalk
Just updating that I haven't spotted this LED light on my control board. I pulled the whole kit inside and I've been doing another 24 hour test to see how it does. So far so good, holding at 4C with no issues. When I hit the 24hr mark, I'm gonna check how condensation is doing and then drop it into freeze mode if all's looking well. I'm starting to think I probably caused the temp creep the other day by leaving off not only the top lid, but also the plastic cover with the storage pockets. I was so focused on checking internals, I didn't even think of the impact I might have created on the airflow by leaving the compartments wide open like that. Time will tell.

A development I'm cautiously optimistic about on the lithium side of things: I found these batteries on Amazon (ERYY Lithium LiFePO4 Battery 12V 25AH: https://www.amazon.com/gp/product/B0CT7VPQ2Z) that have nearly the exact same dimensions as the stock lead-acid batteries, so they actually fit into the battery carriage. Plus an extra 10Ah over stock. They've been fluctuating between $56 and $70, which close enough to stock replacments for me to take the plunge.

Downside is they're about 1mm taller, so I can fit the carriage handle back over the base, but I can't get the screws aligned with the threaded holes. However, these are so light that it would be a problem to just run some zip ties through those holes and call it a day. I'm going to try rigging up a voltmeter/ammeter to see if the control board tries to float charge the batteries after they're at max charge while connected to external power. Hopefuilly it just charges to max voltage and then stops so it's a simple plug 'n play replacment.
 
Top