• Steel Soldiers now has a few new forums, read more about it at: New Munitions Forums!

  • Microsoft MSN, Live, Hotmail, Outlook email users may not be receiving emails. We are working to resolve this issue. Please add support@steelsoldiers.com to your trusted contacts.

Attempting to manufacture my own hard top from scratch.

SirKen

New member
67
0
0
Location
Cocoa Florida
Starting with the area directly on top of the windshield frame. Needs to be flat-bar and needs to be able to cover the opening at the corners of the frame. Also want to be able to put a seal between the flat-bar and the windshield frame to keep some of the rain out. Measured the distance across and folded the flat-bar over at a 90 degree with a 1 inch overlap folded down.
20150328_090243.jpg
20150328_090304.jpg

Next I removed the twist snaps from the soft top side frame (above the windows). I plan on using the frame from my soft top as part of my new hard top. The twist snaps simply unscrew making room for the flat-bar that will run to the back of the new hard top. This, again, will leave room for a seal to be installed between the soft top frame and the new hard top.
20150328_090513.jpg
20150328_090454.jpg

Next is to curve the flat-bar to conform with the curve of the rear of the cab. Made sure to measure from the front windshield frame to the rear of the cab since I plan on welding the side piece to the piece I just installed above the windshield frame. Made 2 of them and let them overlap at the rear of the cab with the intent to cut them and weld together into one piece.

20150328_091510.jpg
20150328_094927.jpg
20150328_100049.jpg

Cut them to fit and tapered the joint to get good penetration for the welder. Good thing I don't do this for a living... pretty it's not. Luckily, once I grind it smooth, no one will know.
20150328_100903.jpg
20150328_102217.jpg

Next was to weld the "U" shaped flat-bar to the flat-bar that goes above the windshield. First I beveled the parts and made sure they lined up with each other... and were turned the correct way. Basically I ended up with a flat-bar band that will make up the perimeter of horizontal part of the hard top roof frame.
20150328_104023.jpg
 

SirKen

New member
67
0
0
Location
Cocoa Florida
20150328_104033.jpg

Now to make the part that will mate to the top of the cab using 1/2 inch round bar. Started with attempting to match the curve of the cab with the round bar using an EMT pipe bender; worked ok. Now I will run a round bar to connect the top flat-bar to the round bar at the bottom.
20150328_110405.jpg
20150328_110416.jpg
20150328_114703.jpg
20150328_121550.jpg

Tack weld these in place then take them down to the ground to finish the welding process. Of course my welding will need some attention from a grinder.
20150328_125159.jpg
20150328_125215.jpg

Now I have a rough frame. Will continue with some bracing along the rear section to connect the bottom frame to the top frame. That will have to be enough for one day. I'll update as I go.
20150328_135431.jpg
20150328_135437.jpg
 
Last edited:

SirKen

New member
67
0
0
Location
Cocoa Florida
Every place a round bar met a flat-bar I tried to make as much welding area as I could, notching things for more surface area.
20150329_113640.jpg

Attaching the half loop that will make the curve section above the driver's head.
20150329_114113.jpg

Taking shape; basic frame to which I will do my best to roll 16 gauge steel sheet around the curves. Wonder if people with access to sheet metal shops take this **** long to make something?
20150329_114744.jpg

Using my own brand of flat-bar bender to try and match the curve of the top/rear curve of the roof (above the driver's head). Close to matching the curve, making sure that my attaching points are straight prior to welding things together.
20150329_115349.jpg
20150329_120605.jpg

Lots more bending in my future and grinding of welds. Taking shape and probably getting heavy enough where I am going to need help setting it on the truck... time to sweet talk the Mrs.
20150329_123117.jpg
 
Last edited:

dmetalmiki

Well-known member
5,523
2,030
113
Location
London England
Brave project. But as you seem to (absalutely) know exactly what you are doing.. My guess is the finished result will be better than "new". Watching ongoing work with great interest.
 

PWM

Member
159
0
16
Location
Saint Maries, Idaho
Looks good, I can't wait to see how this turns out. I have been thinking about doing something similar to my truck and incorporating some roll over protection into the cab.
 

SirKen

New member
67
0
0
Location
Cocoa Florida
In an effort to use the steel I already have on hand, I will be piecing the 16 gauge sheet metal and butt welding the edges for a, hopefully, smooth appearance. First I have to see if I can roll the metal by hand since I don't own a slip roll. Some cold rolled pipe clamped down on the cut to fit sheets and here we go.
20150404_094321.jpg
20150404_094618.jpg

One for each side to form the rear wall behind the driver's head. Then cut a piece to fit in between to two rolled pieces to make the full back wall. I intend for the back wall to slip down beyond the cab at the back to keep rain from coming into the cabin.
20150404_100010.jpg

For those of you with a soft top, you know there is a groove where the soft top slides into along the top of the windshield and to the rear of each door window. My hope is to fit these curved panels into those grooves behind the door windows to keep out rain water. That is why the panels are so long in the pictures, I will put the top on and mark the edges for a perfect fit... hopefully.
20150404_094726.jpg

Used some 1.5" steel pipe for the front edge above the windshield. I am hoping to use it to roll the sheet metal around for a more finished look.
20150404_125229.jpg
20150404_130152.jpg

Need to put some bracing for the top skin to attach to. Needs to be vertical so it's ridged. Used some more flat-bar on edge and shaped to go around the other bracing and round bar.
20150404_140334.jpg
20150404_140344.jpg

More sheet bending by hand to start forming the top of the cab skin. Then I will finish stitching the edges together for a smooth seam.
20150404_113044.jpg
20150404_144601.jpg
 

SirKen

New member
67
0
0
Location
Cocoa Florida
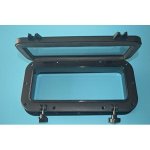
I bought two of these portholes to cut into the rear wall behind the driver's head. They are made with safety glass and open by way of two screw latches. I hope they will look military enough to blend in.
Porthole.jpg
 

SirKen

New member
67
0
0
Location
Cocoa Florida
In my opinion, making the compound curves on either side above the driver's or passenger's head, will be the most difficult... for me, anyway.

Wanted to make it curve similar to a factory top which meant no sharp edges. I started cutting card stock paper into strips and taping them to my known start and finish points. From there I just filled in and did a basket weave of the paper strips to get my general shape. One I had the shape, I went back over the paper with duct tape; both above and below, to reinforce the paper weaving shape.

20150409_125359.jpg
20150409_125845.jpg
20150409_131904.jpg
20150409_132611.jpg

Time to remove the rough form and bring it into the house to reinforce and set the lines where I intend to cut the paper/tape into a pattern that I can lay onto 16 gauge steel and begin to force all the seems together into a steel dome type structure for the corners of the roof.

20150409_150947.jpg
20150409_152113.jpg

Using all the scrap pieces I had lying around, I made each of the paper/tape templates into steel by laying them on top of the steel sheet, outlining with a sharpie, then cut them out individually. Hammering them into a rough shape and stitch weld them along the seam. More shaping, grinding, and hammering to go obviously but nearly half way there without spending any money yet, just using scrap steel around the house.

20150411_103020.jpg
20150411_103033.jpg
 
Last edited:

SirKen

New member
67
0
0
Location
Cocoa Florida
Cut to shape with a straight edge and started the grinding process. I believe this will work out and look close to factory. Certainly cheaper than buying one and then shipping it in my case.
20150411_123840.jpg
20150411_124101.jpg
20150411_124108.jpg
 
Top
AdBlock Detected

We get it, advertisements are annoying!

Sure, ad-blocking software does a great job at blocking ads, but it also blocks useful features of our website like our supporting vendors. Their ads help keep Steel Soldiers going. Please consider disabling your ad blockers for the site. Thanks!

I've Disabled AdBlock
No Thanks