• Steel Soldiers now has a few new forums, read more about it at: New Munitions Forums!

  • Microsoft MSN, Live, Hotmail, Outlook email users may not be receiving emails. We are working to resolve this issue. Please add support@steelsoldiers.com to your trusted contacts.

Battery Voltage cycling after startup 1st green - yellow, then max - green, the max'd

83scrambler

New member
27
5
3
Location
Indianapolis, IN
All,

I am looking at an issue with how my HMMWV is functioning upon startup. The sypmtoms go away after some time, but up to now have not been able to pinpoint a specific chain of events occuring to troubleshoot through... Hoping someone else has on the board.

Issue:
Cycle to run
Wait to start, let GPs cycle
Bump to start
Truck starts

Watching the voltmeter following starting is a pulsing that I understand to be normal as the GPs cycle on and off to aid ignition.

Next is the weird part:
The intial pulsing of the voltmeter goes from green to yellow (still normal), then eventually pegs out at max and pulses between max and green. Once the GP controller has carreid out its task of cycling, the voltmeter pegs out for some amount of the time then finally settles out in the green. This pegging effect could be up to a few minutes in duration, and the smell of battery acid looms. I assume this is cooking the battery plates or something similar. I have not lost any bulbs to the overvoltage and have not yet gotten a voltmeter on the truck to check to see how high the voltage is actually reaching. The situation never re-occurs during running, only startup for a few minutes after running.

I cannot connect this to a specific chain of events like I said originally. At one point I had talked myself into it being something to do with how the cooling circuit works on opening and closing the fan circuit to on and off, but don't think that has anythigto do with the issue I am seeing.

Searched to no avail on the subject, If I missed something, let me know and I will remove this post and track on that thread.

Thanks in advance, JC
 
Last edited:

Coug

Well-known member
Steel Soldiers Supporter
2,975
4,356
113
Location
Olympia/WA
My truck does mostly the same thing, I'm assuming the first part where it is in the yellow is where it's recovering the surface charge on the battery that was depleted by the glow plugs and cranking, and the dips are the glow plugs pulsing. After that comes up a little the voltage regulator is trying to charge during the pulses to the glow plugs, but doesn't respond as quickly, so you see a voltage spike before it cuts down to where it should be.

I don't have it go up into the red once the glow plugs are done pulsing though, so someone else will have to come up with an explanation for that part.

What size generator/regulator and what type of batteries are you using? There might be something related to a specific version of those that's different from mine (mine is some cheap 650CCA batteries I had lying around that I'm using until I finish the titling process, and the 200 amp generator)
 

83scrambler

New member
27
5
3
Location
Indianapolis, IN
Coug,

I believe my generator to be a 60A, I have a 1993 non-serpentine belt system that appears to be stock. Batteries are the highest CCA Exide's (ones that you may find in a standard diesel truck) that I could find, but not the gov't issued version.

where you say red, my gauge is white, and my voltmeter pegs out to the far right (highest voltage) for reference.
 

83scrambler

New member
27
5
3
Location
Indianapolis, IN
So, some pictures to show what I am seeing...

Pic 1 is at start with a cycle back and forth as expected when the GP's are firing. This occurs for the first minute.

IMG_4910[1].jpg IMG_4906[1].jpg IMG_4910[1].jpg IMG_4906[1].jpg IMG_4910[1].jpg

After some time, the voltage starts to increase... this occurs from 1 minute until 1 minute 30 seconds and cycle between the following positions:

IMG_4908[1].jpg IMG_4909[1].jpg IMG_4908[1].jpg IMG_4909[1].jpg IMG_4908[1].jpg

Then after a short while longer... the GP's have completed their cycling off and on and the gauge pegs out at the following. This occurs from 1 minute 30 seconds to 3 minutes. if you drive the vehicle during this time span (think jump in, start it and get underway in the first minute of the truck running) the generator squeals until the truck returns to the "normal" green range on the volt meter in the last picture in this thread. Also during this time, you can definitely smell the battery cooking. I have uncovered the better box to find that the battery caps have popped up a small amount telling me that they are venting hard during this time.

IMG_4912[1].jpg

Then, the system seems to return to "normal" and stays in the green for the remainder of time that the truck is on and running.

IMG_4908[1].jpg

This seems to be in some way tied to the start box because if the truck stays warm between trips (drive the truck, stop turn it off while in a store (1/2 hour or so?) then come back out, start the truck again, the GP's never cycle and the voltage fluctuation never occurs. BUT, if you let the truck sit longer (how much time I don't know) the next time you go to start, the above chain of events takes places all over again.

Thought this would add some clarity for my situation. I still need to get out an monitor the voltage with a meter and will plan to report back with what "pegged" out means in terms of voltage level.


Bad regulator or somethign wrong in the start box perhaps? Generator to blame? any ideas to start tracking on would be greatly apprciated.
 
Last edited:

papakb

Well-known member
2,285
1,185
113
Location
San Jose, Ca
How about a picture of the alternator so we know what we're playing with? It'll make troubleshooting more accurate.

Instead of measuring the voltage on the alternator you can read it on pins E & F on the STE/ICE connector.
 
Last edited:

papakb

Well-known member
2,285
1,185
113
Location
San Jose, Ca
Standard 60 amp Prestolite alternator. The regulator can be easily changed in the truck and typically will run around $60 online. Six screws around the back casting (looks like a sunburst) and it will pop out the back. There is an Oring inside which will cause a little drag on removing it and will need a touch of vaseline when re-installing. This is also a good time to replace the brushes (around $5) and to blow out the carbon dust in the regulator housing. Parts can be purchased directly from Southern Automotive here: https://southernautomotive.com/cata...id/29?osCsid=c2f7cea5c280f942383c2a3ba6f59d40 There are also troubleshooting guides there for the system.

Anytime you work on electricals you want to disconnect the batteries whether it's on the positive, negative, or interconnecting link. Never try to remove the battery terminal cover on the alternator with the batteries connected. The clearance is minimal and it's easy to short things out.
 
Last edited:

83scrambler

New member
27
5
3
Location
Indianapolis, IN
90Jimmy, thanks for the vote of confidence!

Requesting pricing now on the following:

  1. QTY 1 - 2920-01-180-8666 Voltage Regulator
  2. QTY 1 - 5977-00-008-3338 Brush Set, Electrical Contact
 

papakb

Well-known member
2,285
1,185
113
Location
San Jose, Ca
From your description it seems like the regulator is at fault. There's a 50 ohm 50 watt resistor that likes to blow out and the regulator electronics itself fails. The resistor is an easy fix but the electronics is potted. The carbon brushes wear and make a carbon mess inside the housing so whenever your in there take a look at them and blow the housing out and since they're cheap enough it's an easy job to replace them. The whole brush block assembly is available from Southern Automotive if you want to go that route. The regulator is one of the spares you always want to have when running the 60 amp alternator.
 

83scrambler

New member
27
5
3
Location
Indianapolis, IN
Alright, pulled the Generator to be able to remove the rectifier... screws were well seated and not coming out conventionally

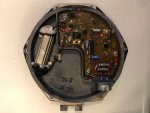
What you see here is my verification that this is indeed a blade style recitifier (need to verify before purchasing a replacement).

Rectifier 1.jpg


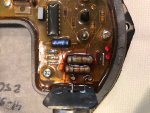
And here you can see a close up of a bad 1kohm resistor, unfortunately as many have stated, the asembly is potted so no chance to replace just the bad part. Hoping this is attributed to bad grounds that have been reolved by the install of a ground harness, but we'll never know. i'll report back on my fluctuating voltage issue when I gt tthe new rectifier installed and the truck back up and running.
Rectifier 2.jpg


If one was to search the following title, they would find the same replacement part that purchased.

2920-01-180-8666 VOLTAGE REGULATOR M998 28V 60A REPLACES AMA2004AS, 35-790
 

TOBASH

Father, Surgeon, Cantankerous Grouch
Steel Soldiers Supporter
Supporting Vendor
3,584
3,494
113
Location
Brooklyn, NY
Potted does not mean irreparable.

You can even leave the wires, remove the bad resistor from the top, and solder from the front to the wires. Then test for function and keep the unit as an emergency spare.
 

83scrambler

New member
27
5
3
Location
Indianapolis, IN
Alright! One problem solved... one problem induced.
The regulator resolved the charging issue, thanks for all the support to get back and forth!
On to the next issue, pictures are worth 1,000 words, and in this case expletives.

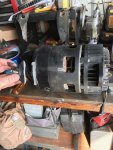
HMMWV Generator Broken Bottom Mount.jpg

That's right, I replaced the regulator and brushes, set the generator back in its saddle and start getting things tightened down and I here a distinct "CLINK". paying little mind to the sound and continuing the job if tightening things down... i find that something isn't feeling right. Much to my dismay, the mount towards the nose of the truck is loose in my hand, yes, like the whole thing.

So now, I have a generator that operates correctly, and has a broken tab that cannot be used.

Curious about what I missed. Because the generator case is cast aluminum, its wasn't going to put up with any misalignment, it flipped me the bird and told me I missed some kind of spacer or something.

Is there a washer or spacer I missed when reinstalling the generator? That's the only thing I can think of.

And now, I'm either in need to weld the mount back together (welding cast aluminum can be painful) all the while not damaging the alternator by welding on the case, OR buying a used one to replace the whole shoot'n match.

Thoughts/Ideas?

Recall, this thing is back to working order with the new parts... really like the idea of reattaching the mount as opposed to throwing it out and replacing with a different one.
 
Last edited:

Jericho

Well-known member
1,180
69
48
Location
Landaff NH
Common, ive changed many over the years, regulator, never found one for 60 bucks, but some times you get the bear, sometimes the bear gets you,. You can try screwing the adjustment screw in and out . Sometimes gives a little short term relief , have four alts sitting now needing regulators , Have just done the conversion to Delco civvie alts, cheaper and more reliable
 

83scrambler

New member
27
5
3
Location
Indianapolis, IN
Just a quick follow up here:

I was able to "fix" the generator ear that I broke during my regulator replacement activity. I built a jig to ensure alignment of the ears front to back with a piece of all thread, washer and nuts. Adjusted the nuts to clamp down on the good ear and again to grasp on the bad ear in place. I milled down a flat surface on the broken ear then drilled and tapped the ear casting into the case on both sides of the ear and tapped both the ear and case side. I then ran the screws in (socket cap head bolts, 10-28 x 1"). Once together and the with clamp out of the way, I ground a 'V' channel around where the ear met the case to give an area to fill with JB weld. I ground all around to get to raw casting and roughed the surface and then laid down a healthy amount of JB weld to the channel and allowed to setup over 48 hours. Following all the prep, and implementation, I went to the truck and got very precise with the "washering" to ensure I was not on a path to repeat the broken ear situation again.

Installation from here went great, with no singificant outlay of funds.

Assuming most will judge the use of JB weld, my thoughts one the subject are the following:
1. Preparation is key, COMPLETE
2. Welding the casting takes skill outside my baileywick, and yields marginal results at time due to porosity
3. Application is critical, arguably when in place and moutned with propoer spacing this is a non-load bearing relationship between ear and case as the belt hold constant pressure mating surface to mating surface, further building confidence inthe fix.

If anyone would like more information, please ask and I'll be happy to accomodate.
 

TOBASH

Father, Surgeon, Cantankerous Grouch
Steel Soldiers Supporter
Supporting Vendor
3,584
3,494
113
Location
Brooklyn, NY
Just a quick follow up here:

I was able to "fix" the generator ear that I broke during my regulator replacement activity. I built a jig to ensure alignment of the ears front to back with a piece of all thread, washer and nuts. Adjusted the nuts to clamp down on the good ear and again to grasp on the bad ear in place. I milled down a flat surface on the broken ear then drilled and tapped the ear casting into the case on both sides of the ear and tapped both the ear and case side. I then ran the screws in (socket cap head bolts, 10-28 x 1"). Once together and the with clamp out of the way, I ground a 'V' channel around where the ear met the case to give an area to fill with JB weld. I ground all around to get to raw casting and roughed the surface and then laid down a healthy amount of JB weld to the channel and allowed to setup over 48 hours. Following all the prep, and implementation, I went to the truck and got very precise with the "washering" to ensure I was not on a path to repeat the broken ear situation again.

Installation from here went great, with no singificant outlay of funds.

Assuming most will judge the use of JB weld, my thoughts one the subject are the following:
1. Preparation is key, COMPLETE
2. Welding the casting takes skill outside my baileywick, and yields marginal results at time due to porosity
3. Application is critical, arguably when in place and moutned with propoer spacing this is a non-load bearing relationship between ear and case as the belt hold constant pressure mating surface to mating surface, further building confidence inthe fix.

If anyone would like more information, please ask and I'll be happy to accomodate.
Overall- I think the repair sounds robust.

I'm not sure JB weld is a great idea given the heat and forces that go through that area.

I'm not sure what the outer shell casing is made of, but seems like probably Aluminum.

Welding requires patience. You need to pre-heat if it is steel. Then you need a high Nickel wire in a MIG, or TIG. If Aluminum, you need to TIG, and that is "fiddly". You would need to prepare both sides by grinding and then have at it with multiple spot welds followed by multiple short sections of true welding. I would also weld in gussets to take additional stresses.

You could always buy a dead alternator and cannibalize the part you need.

Best,

T
 

Retiredwarhorses

Well-known member
Steel Soldiers Supporter
4,400
4,182
113
Location
Brentwood, Calif
Sorry, I don’t see this holding, I’ve seen mounting tabs break from regular usage.
especially if the rear block support is not added, that’s why it was added to the exhaust stud.
The problem is going to be when it gives on the freeway, it’s going to be quite a mess under the hood.
 
Top
AdBlock Detected

We get it, advertisements are annoying!

Sure, ad-blocking software does a great job at blocking ads, but it also blocks useful features of our website like our supporting vendors. Their ads help keep Steel Soldiers going. Please consider disabling your ad blockers for the site. Thanks!

I've Disabled AdBlock
No Thanks