• Steel Soldiers now has a few new forums, read more about it at: New Munitions Forums!

  • Microsoft MSN, Live, Hotmail, Outlook email users may not be receiving emails. We are working to resolve this issue. Please add support@steelsoldiers.com to your trusted contacts.

Bonedoc's M35A2 modification thread

bonedoc

New member
502
1
0
Location
Bangor, PA
The other job I got done was removing my compressor and compressor mount and installing new gaskets, especially for the mount. About 2 years ago, I pulled the compressor and replaced a leaky base gasket. I could kick myself because I should of pulled the mount then and replaced that gasket as well. Fast forward almost 2 years and the mount is still seeping...lol. Since the first time though I had acquired a brand new compressor as a spare. One thing I always questioned was the fact that my compressor always seemed to lose some oil out of the air intake area. I had read many times in threads people reporting that their compressor was working but starting to pressurize the crankcase and that oil blowby out of the intake was potentially a sign of the compressor on its way out.
Either way, I decided it was time to replace the mount gasket and figured I'll just put on the new compressor and new belts for alternator and compressor while I was there. I can tell you this, though I never confirmed if my compressor was pressurizing my crankcase, My motor runs much better, seems to be much quieter, not to mention the compressor....it is so much quieter than the one I had on. I never realized how loud my old compressor was!!
 

Attachments

277
4
18
Location
Belton, SC
Last week I took the hose info from Parttarget.com for the smaller hose to a local hose shop to have one made up.. They didn't have the same diameter hose, and guessed at the fitting size. I guess no one carries that smaller diameter hose (which has a higher temp and psi rating.) Oddly enough, the parttarget specs don't specify the exact fitting.
Fittings ended up too large, I took it back and they swapped them for me.

I haven't had a chance to install the newest version. The war department issued orders diverting all manpower to the construction of a portable mini chicken coop.
Pic of the one with the too large fittings:

ipline.jpg

I guess I should replace the other hose too.. Did you have to take anything off to do it, or was it all accessible from the bottom?

Oh, and do you happen to have specs for the braided hose and fittings that you had made up for the compressor?
 

bonedoc

New member
502
1
0
Location
Bangor, PA
Last week I took the hose info from Parttarget.com for the smaller hose to a local hose shop to have one made up.. They didn't have the same diameter hose, and guessed at the fitting size. I guess no one carries that smaller diameter hose (which has a higher temp and psi rating.) Oddly enough, the parttarget specs don't specify the exact fitting.
Fittings ended up too large, I took it back and they swapped them for me.

I haven't had a chance to install the newest version. The war department issued orders diverting all manpower to the construction of a portable mini chicken coop.
Pic of the one with the too large fittings:

View attachment 625877

I guess I should replace the other hose too.. Did you have to take anything off to do it, or was it all accessible from the bottom?

Oh, and do you happen to have specs for the braided hose and fittings that you had made up for the compressor?

I was able to replace the oil lines without removing anything. It did take much longer than you would think because of the tight fit but is doable.

The braided hose that comes off the compressor is the main line that feeds the air tanks. I believe it is 1/2" high temp hose with stainless wrap. I had made up by my local hydraulic shop. I just brought them the end of the original copper line I removed from compressor then had them make me a length about 6 feet long. It ends with a compression fitting end that attaches to the DOT airline that travels the remainder of the way to the tanks. I wanted the stainless wrap for any lines that were close to the heat of the engine.
Now the other stainless wrapped line by my injection pump is the fuel line from my primary filter. That I have listed in the thread here with measurements. It allows you to run the fuel line on top of the crossmember by radiator out of harm's way.
 

rustystud

Well-known member
9,284
2,996
113
Location
Woodinville, Washington
Was a good weekend and got to spend some time working on the truck. Replaced the oil lines for the injection pump. Worked out really well, given the tight space and big hands. Took about an hour which was primarily because of the tight space. Big thanks to Gimpyrobb for the oil line set. They worked perfectly.
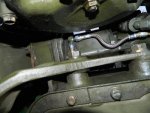
I went with some PTFE stainless steel hose just like the air lines and fuel hoses. The ends are just standard AN fittings.
 

rustystud

Well-known member
9,284
2,996
113
Location
Woodinville, Washington
002.jpg008.jpg

I also had to replace the engine oil fitting. When I went to replace the hose the old brass fitting snapped off flush with the engine block ! So I replaced it with a stainless steel fitting. Now with the PTFE stainless steel hose and stainless steel fitting I shouldn't have to deal with these hoses for the rest of my life.
 

bonedoc

New member
502
1
0
Location
Bangor, PA
View attachment 625923View attachment 625924

I also had to replace the engine oil fitting. When I went to replace the hose the old brass fitting snapped off flush with the engine block ! So I replaced it with a stainless steel fitting. Now with the PTFE stainless steel hose and stainless steel fitting I shouldn't have to deal with these hoses for the rest of my life.
Agreed, If I wasn't able to get them from Chris I would of taken them to my local hydraulic shop and had them made up. I would of done the same thing. The good thing is that these rubber are new production and will likely have a very long life...if not the rest of mine or my truck's life as well.
 

rustystud

Well-known member
9,284
2,996
113
Location
Woodinville, Washington
I'll bet that was a royal pain to get out!

Sent from my LG-V410 using Tapatalk
I was sweating buckets I can tell you and praying up a storm when I was doing this !
Thankfully I was able to get an easy-out in there and twist it out. I did NOT want to have to remove the injection pump just to replace a broken fitting !
 
277
4
18
Location
Belton, SC
Agreed, If I wasn't able to get them from Chris I would of taken them to my local hydraulic shop and had them made up. I would of done the same thing. The good thing is that these rubber are new production and will likely have a very long life...if not the rest of mine or my truck's life as well.
I'm gonna get mine from him. Wish I'd just done that in the first place.
 

bonedoc

New member
502
1
0
Location
Bangor, PA
Wow, has been quite a while since I posted here. Have been pretty busy. Memorial day weekend of 2016 we sold our home and we moved at the end of August of 2016 to a much needed larger home with more land and space. Plus my oldest graduated high school and started college at Virginia Tech via the ROTC scholarship. So as I'm sure most of you can imagine things have been pretty busy so other than just driving it I haven't done much to my truck.

I purchased 2 sets of 4, 8 total, new XZLs mounted on 5 ton and MRAP rims a little over a year ago but never had the opportunity to swap them over on my truck. With the obvious mild winter and apparent early spring...hahahah. I figured I'd start the process. My truck has A3 rims on it with internal beadlocks. I have 8 rims total. I had 2 not on the truck as spares so I started with them. At the Sussex MTA show of 2016 I purchased from Ken Kublo all new valvestems and O-rings for all the wheels and a new front axle boot to replace one that had a tear in it. My A3 rims had the old stem that is used with the CTIS system.

The first step was breaking down all the new tires. I have an Ingersoll Rand cordless 1/2" drive impact gun that had no problems removing any of the lugnuts or wheel clamps bolts.
Taking the tires apart and removing the rims wasn't bad. Removing the runflats was interesting...and messy but once I had the 'system' figured out it went smoothly. Not hard, just tedious.
I used an engine hoist and chain to help break down the new tire/wheel combos and to remove the runflats. Other had suggested strapping the tire to a tree, chaining the runflat and pulling it out but I wanted a removal system with a bit less 'kinetic' energy. Didn't want anyone to get hurt. Found that the easiest way was to lay the tire down, put the engine hoist on top of it and chain the runflat to the hoist. Start pulling it out till it flexes and stretches the tire good. Then take a sawzall and cut the runflat several inches from the chain. The tension on the runflat allows it to cut like butter. Then once you are through it you can pull out the runflat like a big curly fry out of the tire. Goes pretty simple. Hardest part handling them is how messy and heavy they are to handle. Unfortunately I have no pics of the runflat removal as I wasn't handling my camera because of how messy my hands were.
Got the first 2 combos broken down and assembled my first 2 on A3 rims. Then broke down the other six before removing tires, 2 at a time, from the truck to swap them over. Also figured it would be a good time to replace my torn from axle boot on the passenger side.
 

Attachments

Another Ahab

Well-known member
18,003
4,565
113
Location
Alexandria, VA
Wow, has been quite a while since I posted here. Have been pretty busy. Memorial day weekend of 2016 we sold our home and we moved at the end of August of 2016 to a much needed larger home with more land and space. Plus my oldest graduated high school and started college at Virginia Tech via the ROTC scholarship. So as I'm sure most of you can imagine things have been pretty busy so other than just driving it I haven't done much to my truck.
Congratulations on the scholarship!
It's a long haul down-and-back on I-81, but you just know that rig of yours would be a hit at any VT tailgate. :naner::beer:
 

bonedoc

New member
502
1
0
Location
Bangor, PA
Here are pics of the truck all done. Finished the last 2 tires this past weekend...just in time with the biggest snow storm in year coming...lol. Have 8 total. 6 on truck and 2 spares.

If anyone is looking I have 7 Goodyear MVTs, 395/85/20 and 3 steel MRAP wheels for sale.
 

Attachments

bonedoc

New member
502
1
0
Location
Bangor, PA
Looking good! So which style boots did you go with? And how much tread are on those 395's you pulled off?

Sent from my SM-G900V using Tapatalk

Hey Mike!! How are you? Good here....about to get flipping buried in snow...lol!!

I just went with a zipper style boot. Since I have lock outs and haven't driven the truck in the rain, snow, mud, etc the hub area was clean with no contamination or evidence of gear oil. Didn't feel I needed to pull it all apart. The zipper went on nice and easy. Sealed the zipper with silicone. Should do fine for the use the truck sees and will stop it from dropping grease on the inside of the tire.

The next things are going to be big. Ordered clutch kit, rear main seal, oil pan gasket, transfer case input and output seals, and some other minor stuff. Going to pull trans and oil pan. Have a new trans an oil pan to install. rear main seal, u-joints for jack shaft, new parking brake shoes, parking brake cable, and some other odds and ends. Should take care of 90% or so of seeps.

Then I'm going to pull the torque rods and replace all the ends. They are still good but are definitely cracked and dry rotting. To me it isn't an emergency but will be good for peace of mind.
 
Top
AdBlock Detected

We get it, advertisements are annoying!

Sure, ad-blocking software does a great job at blocking ads, but it also blocks useful features of our website like our supporting vendors. Their ads help keep Steel Soldiers going. Please consider disabling your ad blockers for the site. Thanks!

I've Disabled AdBlock
No Thanks