bushhawg, I am finishing the 5" lift of my M1028 now, and I plan to fabricate a longer actuator rod for the rear brake proportioning valve. I will probably build the thing this weekend and will post photos then.
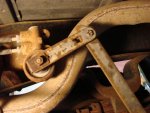
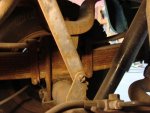
The photos here show the rod and valve in their stock, unaltered position. I have since removed the rod from the valve. I had to grind off the rivet at the bottom to get the rod off, then once I had it on my bench I used a thin cut-off wheel to remove the top rivet from the arm. After I removed the arm from the valve, I discovered that the valve simply spins round and round with no stop, however there is a space in the circle which you can feel is easier to turn. Before removal I used a Majic Marker and marked a vertical line on the rotating part of the valve so I would know where it was after the rod and arm were removed. After removal I discovered that the marker line was exactly in the middle of an "easy spot" in the rotation of the valve. In the stock position, this "easy spot" starts at 4:30 and ends at 7:30. Once you rotate the valve by hand a few times you will understand and recognize this space inthe rotation that fels easier. My marker line was exactly vertical in the middle of this easy spot.
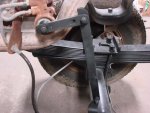
I am raising my M1028 5", so I am fabricating a new connector rod exactly 5" longer than stock. I bought a piece of stee from the hardware store and plan to cut it to length and drill a 3/8" hole on each end, then connect it to the valve arm and axle bracket with two bolts, nylon washers, and locking nuts. I will leave the locking nuts slightly loose to allow for movement.
The arm attaches to the valve with a nylon insert, so at any time you can change the orietation of the valve by simply removing the nut and arm, then rotating the valve one way or the other, and then reinstalling the arm and nut. Just remember to clean the rotating part of the valve and apply a vertical mark on it before you disassemble. If you have already removed the arm, its no big deal, just rotate the valve several times until you learn to recognize the easy spot, then orientate it so the arm attaches exactly half way through this arc.
After I get my truck finished I plan to take it to a brake shop which has the floor sensors to measure the precise braking power of each wheel. I will then be able to adjust the valve properly to provide the correct amount of braking force to the rear wheels with no load. Then as a load is placed into the bed, the actuator rod will be in the proper position to rotate the valve counter-clockwise and increase the braking force.
Hope this helps. More photos coming this weekend.