• Steel Soldiers now has a few new forums, read more about it at: New Munitions Forums!

  • Microsoft MSN, Live, Hotmail, Outlook email users may not be receiving emails. We are working to resolve this issue. Please add support@steelsoldiers.com to your trusted contacts.

Bullet proof windshield

country

Well-known member
Supporting Vendor
1,397
393
83
Location
Feasterville, Pennsylvania
Haha. Thats funny. They quoted me over $400 to ship one of those to TN.
BTW, i can remove the delaminated layer from the knock outs if anyone needs that service. It will end up withglass on the inside and very clear visibility. I am not selling anything. Just saying.

These things are crazy heavy :)
 

escuderj

New member
17
5
3
Location
Oregon
Haha. Thats funny. They quoted me over $400 to ship one of those to TN.
BTW, i can remove the delaminated layer from the knock outs if anyone needs that service. It will end up withglass on the inside and very clear visibility. I am not selling anything. Just saying.
I'm guessing that it would change the ballistic capabilities right?
 

Action

Well-known member
3,576
1,558
113
Location
East Tennessee
I'm guessing that it would change the ballistic capabilities right?
I think there is a video online comparing with and without the inside poly. It would likely take multiple shots in the same spot to get thru all the glass layers. The poly should stop glass from coming in. But if you cant see through the window from delamination, what would you do? Throw it away?
 
Last edited:

Action

Well-known member
3,576
1,558
113
Location
East Tennessee
I think there is a video online comparing with and without the inside poly. It would likely take multiple shots in the same spot to get thru all the glass layers. The poly should stop glass from coming in. But is you cant see through the window from delamination, what would you do? Throw it away?
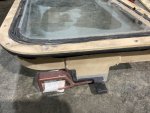
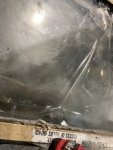
Here is the first window i did as a test. They come out nicer now.
.
.1644116867329.jpeg
 

chucky

Well-known member
Steel Soldiers Supporter
6,622
18,965
113
Location
TN .
How long is this new glass going to last out in the sun every day before it turns white and you cant see thru it ?
 

Action

Well-known member
3,576
1,558
113
Location
East Tennessee
How long is this new glass going to last out in the sun every day before it turns white and you cant see thru it ?
What new glass ? Mine? The one installed in the above pic was so nasty, I could not see to drive. It is still the old window. I just removed the interior 1/4” poly layer.
I found a place that can relaminate these windows but they only do very large wuantities at one time and for military only.
 

chucky

Well-known member
Steel Soldiers Supporter
6,622
18,965
113
Location
TN .
What new glass ? Mine? The one installed in the above pic was so nasty, I could not see to drive. It is still the old window. I just removed the interior 1/4” poly layer.
I found a place that can relaminate these windows but they only do very large wuantities at one time and for military only.
No the glass they were selling out of philly ! Most folks ive seen around here cover the glass up if the vehicle stays outside all the time i was curious how long it held up without covering it up ?
 

Action

Well-known member
3,576
1,558
113
Location
East Tennessee
No the glass they were selling out of philly ! Most folks ive seen around here cover the glass up if the vehicle stays outside all the time i was curious how long it held up without covering it up ?
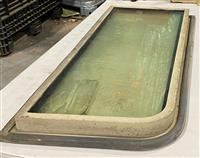
Ah, yeah, That is Eastern Surplus. I think all the knockouts they sell are already delaminating. It is harder to see because they take pics with a white background under the windows.
I also would cover up or try to park indoors, and even open up door windows to let the heat out of the cab, if I had new windshields installed.
 

Coug

Well-known member
Steel Soldiers Supporter
2,975
4,356
113
Location
Olympia/WA
The glass portion doesn't discolor.


A lot of traditional "bulletproof glass" is actually layered polycarbonate that will degrade over time. The bulletproof glass for these is actually glass, not polycarbonate, so the only layer that degrades is the plastic inner "anti-spawl" plastic that's just to keep glass fragments from entering the vehicle and flying into people's faces, not actually part of the armor capabilities of the windshield.
 

phemer

Member
22
37
13
Location
Scottsdale, AZ
Haha. Thats funny. They quoted me over $400 to ship one of those to TN.
BTW, i can remove the delaminated layer from the knock outs if anyone needs that service. It will end up withglass on the inside and very clear visibility. I am not selling anything. Just saying.
Hey Action,
Pricing out what a 'ballistic' windshield project would cost me. Delamination appears to be an issue w/ most grey market items - which leads me to your comment. How would one remove lamination? I have a guy here in town who can apply 'ballistic' lamination, which would be a necessary punch-list item if I went this route. What's the process like?
 

Action

Well-known member
3,576
1,558
113
Location
East Tennessee
Hey Action,
Pricing out what a 'ballistic' windshield project would cost me. Delamination appears to be an issue w/ most grey market items - which leads me to your comment. How would one remove lamination? I have a guy here in town who can apply 'ballistic' lamination, which would be a necessary punch-list item if I went this route. What's the process like?
With how much trial and error I went thru to figure it all out, i will keep that to myself. I offer the service, not instruction on how to do it. And you may want a couple extra windshields to ruin til it gets figured out.
 

skaz76

New member
8
10
3
Location
Pittsburgh Pa
A little bit of incite on this.

Short story is, I managed to break my at the time brand new standard windshield. I met a local guy that by chance happened to have 3 Ibis Tek windshields taking up room in his garage. They were fogged fairly bad...un drivable. Me being me, $200 and they were in my truck.

I spent a lot of time searching to see what I could do with them. Didn't have any luck, so here's what I did. I will say, take your time, don't rush.

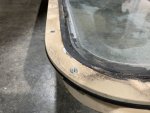
These windows are multiple layers of glass with film in between each layer of glass, There are 2 layers of lexan with film on the inside. Be mindful of the heating elements , they are on the outer most 2 layers of glass but the wires extend to the interior on the side.

tools:

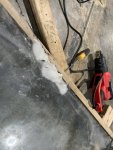
oscillating tool ( a better one that has a good cut...Fien, Bosch ect...) Use only a steel tooth blade....not carbide it will chip the glass
Painters 5 in 1
pliers
small screw driver
Heat Gun
razor knife
Black RVT

1st Make sure windows are tight in the frames ( if not remove the exterior bolts ( must be on a flat surface) and run a bead of RVT and reset them.

2nd set speed to medium ( in my case 3) you want to cut steady but not fast.

3rd start cutting in a corner,depth is about 3/16'' . You will see a white saw dust. move the blade slowly and gently until you see the blade start to gum up. (this is the first layer of film. continue around entire window until you have cut all the way around to that depth. ( I cut out around the wire area)

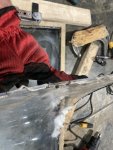
4th Use the heat gun to soften the Lexan. Do not over heat! What I noticed is that the small bubbles in the film start to move, that's hot enough. Use the 5 in 1 to gently the sheet off, reheating every couple of inches. Make sure you do not remove the material that is still in the frame! If you see it starting to pull,cut again.

5th use the razor knife to cut around the perimeter again to make sure the film is completely cut. Again, do not pull from inside the frame.

6th repeat steps 3-5 to remove 2nd layer

At this point your fingers are cramped and you will most likely have blood and burns on you hands.....but you have nice windshields now! Take your time, some sections come off fairly essay others take for ever. Use the pliers to pull the film as you heat it and work it all slow.

Last step is to toughly clean the debris and lay a sealing bead with the RVT on the inside. I used a fairly large glazing bead. I used RVT as I don't know what the existing sealant is and RVT will not harm most sealants. I guessed here and got lucky it guess..

I did all 3 windshields with no issues. Takes forever, but at about $100 a window worth it all day. (windows+materials)

Now remember you no longer have spal shields on your widows anymore, so if you plan on taking rounds make sure you have eye protection.

Good Luck
 

Gamble

Well-known member
405
347
63
Location
Los Angeles, CA
A little bit of incite on this.

Short story is, I managed to break my at the time brand new standard windshield. I met a local guy that by chance happened to have 3 Ibis Tek windshields taking up room in his garage. They were fogged fairly bad...un drivable. Me being me, $200 and they were in my truck.

I spent a lot of time searching to see what I could do with them. Didn't have any luck, so here's what I did. I will say, take your time, don't rush.

These windows are multiple layers of glass with film in between each layer of glass, There are 2 layers of lexan with film on the inside. Be mindful of the heating elements , they are on the outer most 2 layers of glass but the wires extend to the interior on the side.

tools:

oscillating tool ( a better one that has a good cut...Fien, Bosch ect...) Use only a steel tooth blade....not carbide it will chip the glass
Painters 5 in 1
pliers
small screw driver
Heat Gun
razor knife
Black RVT

1st Make sure windows are tight in the frames ( if not remove the exterior bolts ( must be on a flat surface) and run a bead of RVT and reset them.

2nd set speed to medium ( in my case 3) you want to cut steady but not fast.

3rd start cutting in a corner,depth is about 3/16'' . You will see a white saw dust. move the blade slowly and gently until you see the blade start to gum up. (this is the first layer of film. continue around entire window until you have cut all the way around to that depth. ( I cut out around the wire area)

4th Use the heat gun to soften the Lexan. Do not over heat! What I noticed is that the small bubbles in the film start to move, that's hot enough. Use the 5 in 1 to gently the sheet off, reheating every couple of inches. Make sure you do not remove the material that is still in the frame! If you see it starting to pull,cut again.

5th use the razor knife to cut around the perimeter again to make sure the film is completely cut. Again, do not pull from inside the frame.

6th repeat steps 3-5 to remove 2nd layer

At this point your fingers are cramped and you will most likely have blood and burns on you hands.....but you have nice windshields now! Take your time, some sections come off fairly essay others take for ever. Use the pliers to pull the film as you heat it and work it all slow.

Last step is to toughly clean the debris and lay a sealing bead with the RVT on the inside. I used a fairly large glazing bead. I used RVT as I don't know what the existing sealant is and RVT will not harm most sealants. I guessed here and got lucky it guess..

I did all 3 windshields with no issues. Takes forever, but at about $100 a window worth it all day. (windows+materials)

Now remember you no longer have spal shields on your widows anymore, so if you plan on taking rounds make sure you have eye protection.

Good Luck
Does the IbisTek glass look like what was posted by Eastern Surplus or is that the Std armor windshield?
 

skaz76

New member
8
10
3
Location
Pittsburgh Pa
Does the IbisTek glass look like what was posted by Eastern Surplus or is that the Std armor windshield?
IBISTEK IS A KNOCK OUT WINDOW. STEEL ARMOR RETAINER AND THE RED LATCHES ON THE INSIDE. THEY ARE THICK, I BELIEVE THE STANDARD AMG "BULLET PROOF" WINDSHIELDS ARE ONLY 1 INCH OR SO. I DIDNT SEE WHAT EASTERN HAD, THEY HAVE HAD BOTH IN THE PAST.
 

jake20

Well-known member
433
846
93
Location
Illinois
A little bit of incite on this.

Short story is, I managed to break my at the time brand new standard windshield. I met a local guy that by chance happened to have 3 Ibis Tek windshields taking up room in his garage. They were fogged fairly bad...un drivable. Me being me, $200 and they were in my truck.

I spent a lot of time searching to see what I could do with them. Didn't have any luck, so here's what I did. I will say, take your time, don't rush.

These windows are multiple layers of glass with film in between each layer of glass, There are 2 layers of lexan with film on the inside. Be mindful of the heating elements , they are on the outer most 2 layers of glass but the wires extend to the interior on the side.

tools:

oscillating tool ( a better one that has a good cut...Fien, Bosch ect...) Use only a steel tooth blade....not carbide it will chip the glass
Painters 5 in 1
pliers
small screw driver
Heat Gun
razor knife
Black RVT

1st Make sure windows are tight in the frames ( if not remove the exterior bolts ( must be on a flat surface) and run a bead of RVT and reset them.

2nd set speed to medium ( in my case 3) you want to cut steady but not fast.

3rd start cutting in a corner,depth is about 3/16'' . You will see a white saw dust. move the blade slowly and gently until you see the blade start to gum up. (this is the first layer of film. continue around entire window until you have cut all the way around to that depth. ( I cut out around the wire area)

4th Use the heat gun to soften the Lexan. Do not over heat! What I noticed is that the small bubbles in the film start to move, that's hot enough. Use the 5 in 1 to gently the sheet off, reheating every couple of inches. Make sure you do not remove the material that is still in the frame! If you see it starting to pull,cut again.

5th use the razor knife to cut around the perimeter again to make sure the film is completely cut. Again, do not pull from inside the frame.

6th repeat steps 3-5 to remove 2nd layer

At this point your fingers are cramped and you will most likely have blood and burns on you hands.....but you have nice windshields now! Take your time, some sections come off fairly essay others take for ever. Use the pliers to pull the film as you heat it and work it all slow.

Last step is to toughly clean the debris and lay a sealing bead with the RVT on the inside. I used a fairly large glazing bead. I used RVT as I don't know what the existing sealant is and RVT will not harm most sealants. I guessed here and got lucky it guess..

I did all 3 windshields with no issues. Takes forever, but at about $100 a window worth it all day. (windows+materials)

Now remember you no longer have spal shields on your widows anymore, so if you plan on taking rounds make sure you have eye protection.

Good Luck
Figured I’d give this a go out of curiosity, used a dremel tool with cutoff discs. Not the most efficient but enough to see what you were getting at. Not really a clean job or anything as I plan on chucking this glass anyway, it has several cracks in it.

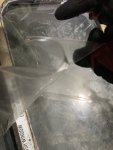
Definitely a painstaking process but if you don’t care for the anti spall, I’d say go for it. Windshield looks much cleaner and I still haven’t removed the thin flexible layer under the second sheet of polycarb. That last layer attached to the glass is well-stuck.

How have you guys gone about completely removing the glass from the frames? I was thinking of heating the existing RTV around it while pressing it out, after removing the front bezel of course.
 

Attachments

Veesandskis

New member
18
18
3
Location
Minnesota
I don’t mean to revive an old thread like this.. But I have a set of these windshields but mine have de-Ice. I’m looking to install them in my freshly acquired M1114. They look like they install exactly as a standard glass windshield. Do I need any different retainers other than the standard ones? I can’t seem to find any info on this. My windhsield frame looks like a normal frame just with the brackets up top to mount a hard top. Any help is greatly appreciated
 

jake20

Well-known member
433
846
93
Location
Illinois
Yours looks like the non-knockout style. It fits in a standard windshield frame, though I don’t know how warm and fuzzy I feel about using the standard thin retainers that go around the front for non armored windows. The standard size windshield gasket also fits around the metal lip around it.

just make sure that your 110lbs of windshield doesn’t fly forward when you slam on the brakes lol
 
Top
AdBlock Detected

We get it, advertisements are annoying!

Sure, ad-blocking software does a great job at blocking ads, but it also blocks useful features of our website like our supporting vendors. Their ads help keep Steel Soldiers going. Please consider disabling your ad blockers for the site. Thanks!

I've Disabled AdBlock
No Thanks