- 414
- 892
- 93
- Location
- Daytona, FL
and of course that "clump" of airlines totally obstructs the view as well as any working room from below..
Steel Soldiers now has a few new forums, read more about it at: New Munitions Forums!

and of course that "clump" of airlines totally obstructs the view as well as any working room from below..
.and of course that "clump" of airlines totally obstructs the view as well as any working room from below..
how did you attack the bottom bushing components?.... I can't even fit my hand in there !.
Agreed. I replaced mine and the easy way to get access to the top is to remove the grille. That helps a lot...
.how did you attack the bottom bushing components?.... I can't even fit my hand in there !
It took a 6ft cheater pipe to get the passenger side off mine but the bumper being on helped i put the extention thru the round hole beside the big square hole in the bumper kept the ext straight.
Went out there a bit ago - and when I came back - I discovered @Third From Texas 's post about removing the bumper. I did the same. Reason was that mine on my M1089 was bent all to heck and I removed and replaced the old warped thing I had. Made it even better to access.
The grille on my truck was "fuzzy" with "fiberglass hair" all over it. Being cheap, I used some rattle can bed liner on it - and dang it looks good! Been about nine months and it still looks as good as the day it was done.
A handful of cleverly used extensions, universal joints, etc.how did you attack the bottom bushing components?.... I can't even fit my hand in there !


Wow, that's quite an adventure.Well.. that was fun.. NOT.… started with passenger side because consensus agrees that it’s the easier of the 2…
- plenty oh PB Blaster for a week
- raised cab to get the bolt as perpendicular to the ground granting the most access to the 30mm nut
-M18 w/30mm 6Pt impact socket…. Nada..
-3/4 air impact - nada.. started the round the captive bolt head on top though
-30mm mega wrench with 3 foot cheater…nada…(great cardio work out though)
torch it until cherry red…. repeat the 3 above steps…..nada..
something about the definition of insanity keeps playing in my head at this point..
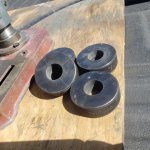
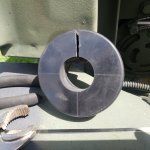
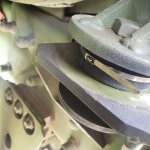
since all 4 OEM cab bushings are MIA , as a stop gap I used 3 hockey pucks with a 30mm center hole…. I then cut the puck , splayed it open and shoved it around the 30mm sleeve/bolt for both the upper and lower passenger side and upper only on the god awful drivers side, place a SS “zip tie” around the puck for IDGAF at this point . Thus far it seems to “work” for an unholy cob job…
my intent is to cut the sleeve/bolt mid point, after “securing “ the cab so it won’t shift, remove the pieces/parts, and since I dont have the means to raise the cab to remove the intact bolts, I’ll use new M20 1.5 x110mm bolts/ nuts and insert the bolt from the bottom with the nut on top now being “captive”…. In theory this should be less of a PITA…. Of course the drivers side will be the death of me…View attachment 862296View attachment 862298View attachment 862300
Great thinking outside the box and maybe use a stainless hose clamp around it just because its wider ! And i wasnt kidding on the looong cheater pipe i just knew the 3/4 ratched head was going to explode but she finally poped the nut loose !Well.. that was fun.. NOT.… started with passenger side because consensus agrees that it’s the easier of the 2…
- plenty oh PB Blaster for a week
- raised cab to get the bolt as perpendicular to the ground granting the most access to the 30mm nut
-M18 w/30mm 6Pt impact socket…. Nada..
-3/4 air impact - nada.. started the round the captive bolt head on top though
-30mm mega wrench with 3 foot cheater…nada…(great cardio work out though)
torch it until cherry red…. repeat the 3 above steps…..nada..
something about the definition of insanity keeps playing in my head at this point..
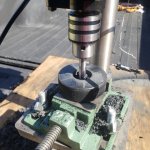
since all 4 OEM cab bushings are MIA , as a stop gap I used 3 hockey pucks with a 30mm center hole…. I then cut the puck , splayed it open using a piston ring spreader and shoved it around the 30mm sleeve/bolt for both the upper and lower passenger side and upper only on the god awful drivers side, place a SS “zip tie” around the puck for IDGAF at this point . Thus far it seems to “work” for an unholy cob job…
my intent is to cut the sleeve/bolt mid point, after “securing “ the cab so it won’t shift, remove the pieces/parts, and since I dont have the means to raise the cab to remove the intact bolts, I’ll use new M20 1.5 x110mm bolts/ nuts and insert the bolt from the bottom with the nut on top now being “captive”…. In theory this should be less of a PITA…. Of course the drivers side will be the death of me…View attachment 862296View attachment 862298View attachment 862300View attachment 862307
Wow, that's quite an adventure.
When I had mine apart, I did take measurements of the sleeve, if you need to make a new one. Mine was pretty rusty and nasty, but it should be close enough to figure something out.
If I remember, the bolt is almost impossible to find new, for some reason. Maybe it's a high grade bolt, or has a special thread, but I couldn't find an exact replacement anywhere (e.g. McMaster, Fastenal, specialty bolt manufactures, etc.). I think I even looked for the next closest size, but wasn't able to use it because it was only partially threaded and wouldn't have tightened up far enough. Ugh. If you find a source, please share.
I totally agree theres nothing like that red stuff and they make it here in NashvilleAlso, I know everyone has their own pet penetrating oil, but I have gotten the best results from Kroil. It tends to do very well in any "torture test" videos/articles out there too. I put it in a tiny needle dropper bottle, and try to get it inside anything I can (e.g. washer gaps, nuts, exposed threads, etc.).
Applicator Bottle with 25ga Stainless Steel Needle - 6 Pack: Hair Color Applicator Bottles: Amazon.com: Industrial & Scientific
Applicator Bottle with 25ga Stainless Steel Needle - 6 Pack: Hair Color Applicator Bottles: Amazon.com: Industrial & Scientificsmile.amazon.com
We get it, advertisements are annoying!
Sure, ad-blocking software does a great job at blocking ads, but it also blocks useful features of our website like our supporting vendors. Their ads help keep Steel Soldiers going. Please consider disabling your ad blockers for the site. Thanks!

