Most important question to ask:
1) Powered Turret or Non-Powered?
Non-powered is cheaper and easier to assemble, more plentiful part.
Powered have at least two systems plus the MRAP stuff, some stuff is interchangeable, most isn't without drilling new holes then using stainless threaded inserts.
2) Are you replicating some specific set up or time period?
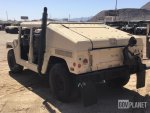
A0-A2 you have the cat-eared sheet metal turret weapons station
Fully round turret weapons station introduced during A2 production, perhaps around Serial # 180,000, about the same time the pioneer tool tray bracket under rear crossmember was eliminated and adoption of the MaxxPro Multi-Purpose Axe Tool Kit. Same fully round turret weapons station used on the cargo trucks, artillery ammo tractors etc in the Light Weapons Station kit (replaced the M66 Gun Ring Kit on M35 etc). Full round station used on M1114, M1151 earlier on depicted in the 2001 -24P-1 Parts tech manual.
Next came the milled plate turret weapons stations used on M1114, M1151, M1165
3) Turret Supports, A0, A1, A2 into M11XX used 5 point weapons support, (two arms to windshield frame, two arms to B Pillar, one to C Pillar crossbar)
6 point weapons support introduced during M11XX production (two arms to windshield frame, two arms to B Pillar, two to C Pillar crossbar)
A different 6 point weapons support was used in the Light Weapons Station Kit for HMMWV without metal roof, windshield brackets, B Pillar arms, C Pillar arms and the entire C Pillar are totally different from the above turret kits.
Introduction of the armored metal plate roof eliminated need for the weapons support on some truck models.
4) Several different turret bearings
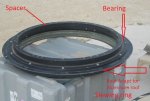
Early A0, A1, into A2, "silver" colored aluminum lightweight bearing
A2 production brought an improved black anodized aluminum turret bearing
M11XX, OGPK, etc mandated a heavier bearing, the approx. 3in thick "heavy bearing" painted black, has some through holes, have some threaded insert holes for bolting direct to, and, the inner wall has at least 2 different hole arrangements for M1114 and M1151, for bolting on the different electric motor brackets, the different traverse locks, the different electric motor, chain driven traversing sprocket brackets
Then there is a gold colored heavy bearing.
5) Hatches
A0-A2 used side-opening 2 piece hatches
M11XX started with a 2 piece rear hinged hatch
OGPK brought about a 3 piece rear hinged hatch and a 3 piece hinged removable hatch, perhaps as a replacement for the 2 piece rear hinged hatches when the OGPK are retrofitted.
6) Weapons Mount, aka Chickens Foot, a pintle adapter drops into the hole in the Weapons Mount, locked in with threaded bolt or quick release pin, a UPA Universal Pintle Adapter drops into that, then your Mk64, Mk93, M23 with large M3 pintle drops into the UPA.
A0, A1 into A2, used a stamped 3 toed weapons mount
A2 round weapons station used the "Swiss Cheese" welded construction with lightening holes
M11XX milled plate weapons station use milled/water jet cut thick flat aluminum plate weapons mount
7) Electric Drive Motors: At least 2 different electric motor types, both have a short power cable with Amphenol connector on end
Earlier M1114 drive motor has a "flapper" lever switch on the non geared end, to engage/disengage the internal gearing. This motor uses a milled bracket to bolt to the inner face of the turret bearing. This motor has a thicker drive gear that meshes with the geared tooth ring bolted to underside of the turret weapons support.
Later M1114 Drive Motor, looks similar to the M1151, has a bent round stock lever on the geared end to engage/disengage the internal gearing. This motor uses a welded mount to bolt to the inner face of the turret bearing and holds a bearing with separate drive sprocket connected to the motor by a "bicycle" chain.
M1151 Drive Motor, motor itself looks similar may even be the same as the later M1114, has the bend round stock lever on the geared end to engage/disengage the internal gearing. This motor uses a welded mount, different from the M1114 bracket, with different slot spacing, to mount to the bearing, and holds a bearing assy with separate drive sprocket connected to the motor by a "bicycle" chain.

BPMTU, the brains of the electrohydraulic drive system, Battery Powered Motorized Traversing Unit, has a red emergency stop button, connects to power, the joystick and motor assy. At least two different BPMTU models, may or may not be compatible.
9) Joystick box allows the gunner to traverse the turret left or right, has magnetic base to stick to whatever steel part is most convenient for gunner, like the TOW outlet cover.
Then you have bolt on pads, traverse lock assemblies, brackets for hanging the gunner strap, sling or seat.
This is a simplified abbreviated description of the major components, some of the above I may have crossed a part with a different model truck, the M1114, M1151, M1165 stuff starts to get real complicated.
You can adapt the later heavy bearing, geared tooth ring, and power drive systems to the earlier A0 to A2 turret kits with some drilling, alteration, and use of helicoil inserts here and there. But it is easier if you start with components from one system or the other instead of how I started out with two half kits from two different systems that didn't combine to form one drop in powered kit.


