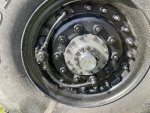
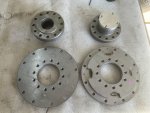
Copy of instructions for Eco Hub M1078 ECO HUB INSTALLATION
Start by draining apx. 2 gallons of gear lube from rear differential.
Drain gear lube from outer reduction assembly.
Remove nut plug from center of outer reduction
Use 3/8 bolt to pull axle only enough to remove snap ring.
Remove 12. 3/8 bolts holding gear reduction to the inner hub.
Remove outer reduction. ( Tap outer housing to break seal.)
Remove all reduction gears. DO NOT REMOVE SHIMS
CLEAN all gasket surfaces to bare metal.
CLEAN cross pin locations to bare metal, red 3m pads work great.
CLEAN bolt holes, no oil or silicone can be in the holes! Use small 45 pick to remove
Trapped silicone. Use air pressure. CLEAN! Break Clean
CLEAN all gasket surfaces of new parts and bolt holes. Brake Clean, compressed air
CLEAN bolts, cross pin plugs, washers etc. Break Clean
Special Note. The new silicone and blue lock tight require absolutely dry oil free
Surfaces ! CLEAN!
Assembly: gasket maker silicone: permatex 82194 ultra grey.
Lock tight. Blue or red. Red is very hard to remove sometimes
Torque specs: 3/8” bolts 30 ft lbs. 10mm bolts 45 ft lbs.
INSTALLATION:
Remove cap screw from split lock collar,clean bolt and inside threads .
Apply blue lock tight to cap screw. Tighten 1/2 to 3/4 turn.
Slide split collar into splines of axle tube, align with axle nut pins. Tighten cap screw
Apply thin layer of silicone sealer to cross shaft plug ( rounded section)
Place all 4 plugs into inner hub locations
Apply thin layer of silicone on flat surface of cross shaft plugs, extending out 1/4” to
Inner hub gasket surface.
Prepare 3/8 bolts and flat washers brake clean/ apply lock tight 12
Apply thin layer of silicone on inner gasket surface of adapter plate.
Use two or three 3/8 bolts to align adapter plate to inner hub.
Push straight in and snug bolts. Install remaining bolts/washers. Snug then torque.
Silicone will squeeze out from between the two surfaces. Let it cure. Then remove
The excess with a razor blade.
Outer drive hub: Prep 12 metric bolts and washers. brake clean/ lock tight
Apply thin layer of silicone to the gasket surface of the drive hub.
Align spline of axle with outer hub, use a bolt or two to align the drive hub
to the adapter plate. Push straight in, snug bolts. NOTE: ( sometimes it’s easier
to jack up the tire your working on to align hub to adapter, you may need to release park break, block wheels as needed)
Install remaining bolts washers. Snug then torque.
Axle snap ring: A small amount of metal needs to be ground from the snap ring
to make it fit into the outer drive hub. Just remove metal from above the holes
of the snap ring. Don’t open the holes. Install snap ring and push axle into place.
Install aluminium dust cap. Use thin layer of silicone on gasket surface.
Snug then tighten. Blue lock tight is optional. Don’t tighten crazy tight
there is very little stress on this part.
FRONT HUB INSTALLATION:
Same procedure as rear, however no snap ring on axle and don’t drain any fluid from front differential.
Helpful hint: use a piece of thin sheet metal 6”x 10” formed to fit between the inner hub and wheel assembly. This will redirect the drained gear lube away from the tire
and wheel so it’s less mess. and easier to catch in drain pan.
Currently recommend one full quart of gear lube in each hub after 20 hours cure time.
Then refill the rear differential to full.
Do a transmission relearn appropriate for your truck. Drive a few hours very easy.
Allow it to learn the new shift strategy. It will keep learning for quite some time.
Enjoy your new truck! Questions: pm or call


