• Steel Soldiers now has a few new forums, read more about it at: New Munitions Forums!

  • Microsoft MSN, Live, Hotmail, Outlook email users may not be receiving emails. We are working to resolve this issue. Please add support@steelsoldiers.com to your trusted contacts.

Gen 2 air conditioning install with C7 A1R - notes and pictures thus far.

GeneralDisorder

Well-known member
Steel Soldiers Supporter
2,035
5,224
113
Location
Portland, OR
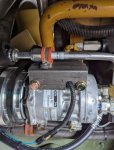
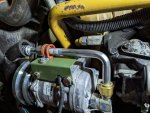
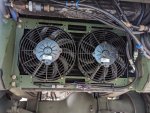
The hoses are a wrestling match to get installed. Pulling the grill, pulling the skid plate, and partially raising the cab are necessary. Today I got all the hoses and wiring routed, and fully tested the wiring for 24v to the compressor clutch, and 24v to each fan connector - and the fording switch does interrupt the fan operation as designed. Tomorrow will be mounting the drier (had to make a bracket and the paint is curing on that at the moment) and make a reinforcing bracket for the hard line off the top of the compressor.

Note that I ran the hoses where they are SUPPOSED to go - under the cab hinge along with the wiring and air line bundle. Not the way I keep seeing it done on videos, etc where guys run them all over the place where they are not supposed to locate due to potential pinch points and compound bending action when the cab lifts, etc. Running them in this manner where they were intended to be located is a commitment to be sure - I spent about 5-6 hours getting them in place.

PXL_20230401_003840944.jpg
PXL_20230401_001510808.jpg
 
Last edited:

ramdough

Well-known member
1,554
1,729
113
Location
Austin, Texas
The hoses are a wrestling match to get installed. Pulling the grill, pulling the skid plate, and partially raising the cab are necessary. Today I got all the hoses and wiring routed, and fully tested the wiring for 24v to the compressor clutch, and 24v to each fan connector - and the fording switch does interrupt the fan operation as designed. Tomorrow will be mounting the drier (had to make a bracket and the paint is curing on that at the moment) and make a reinforcing bracket for the hard line off the top of the compressor.

Note that I ran the hoses where they are SUPPOSED to go - under the cab hinge along with the wiring and air line bundle. Not the way I keep seeing it done on videos, etc where guys run them all over the place where they are not supposed to locate due to potential pinch points and compound bending action when the cab lifts, etc. Running them in this manner where they were intended to be located is a commitment to be sure - I spent about 5-6 hours getting them in place.

View attachment 894331
View attachment 894332
Do you mind showing all of the routing (to the drier, etc?

I appreciate all of the details. This is a summer project for me and need to get this planned out. I have everything but the condenser from Tom, but plan on an aftermarket one I bought a long time ago.


Sent from my iPhone using Tapatalk
 

GeneralDisorder

Well-known member
Steel Soldiers Supporter
2,035
5,224
113
Location
Portland, OR
Do you mind showing all of the routing (to the drier, etc?

I appreciate all of the details. This is a summer project for me and need to get this planned out. I have everything but the condenser from Tom, but plan on an aftermarket one I bought a long time ago.


Sent from my iPhone using Tapatalk
I'm not so sure about an aftermarket condenser - these units are REALLY big. About 4" thick. The aftermarket one's I've seen used are clearly undersized as they lower the system charge by .5 to .75 lbs. They may be more efficient but their fin density is really high and the location for the condenser is low and going to ingest a lot of dirt and dust. The stock unit is very large and the fins aren't as dense so it won't clog as easily.

Personally I hate reinventing stuff like this - the system was engineered and tested and they chose this size and style for a reason. I wouldn't be so quick to swap it out.

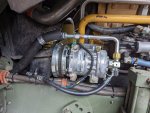
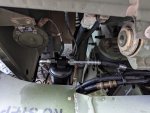
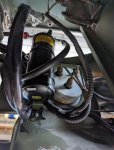
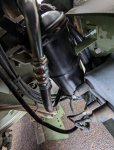
Here's some pics of the drier and the mounting bracket I made (it's a copy of the stock one) - I'm going to swap out the zip ties for some toggle bolt clamps when I get a chance.

PXL_20230401_170236153.jpg
PXL_20230401_170309520.jpg
PXL_20230401_170410856.jpg
 

GeneralDisorder

Well-known member
Steel Soldiers Supporter
2,035
5,224
113
Location
Portland, OR
1.5 years after ordering the initial batch of parts my AC is now functional!

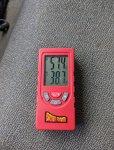
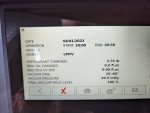
Vacuum and leak check passed with 100%. No loss of vacuum was detected. It took my machine 58 minutes (at a very non-optimal ambient temp of ~50 degrees) to charge 3.75 lbs of R134. The results I think speak for themselves - 38 degree vent temp.

PXL_20230401_204348615.jpg

PXL_20230401_200348392.jpg
 

GeneralDisorder

Well-known member
Steel Soldiers Supporter
2,035
5,224
113
Location
Portland, OR
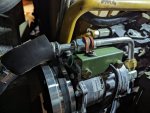
Engine vibration, and the proximity of this hose to the pulley - it needs a bracket here for sure. Made one up. Pulled it back off for paint after this trial fit. It also keeps the compressor clutch wire managed away from moving parts.

PXL_20230402_204315743.jpg
 

GeneralDisorder

Well-known member
Steel Soldiers Supporter
2,035
5,224
113
Location
Portland, OR
Anyone on the fence on cab AC - DO IT!!

I figured it would be the case, but I can confirm absolutely that the AC makes the defrost about 1000% better. No more fogged windows! Imagine totally clear windows even in the wettest conditions. Fogged windows are a huge annoying problem on these trucks IMO. You already have poor visibility on the passenger side and you can't reach over to wipe the windows so it can be considered a safety issue if you have no co-driver.
 

coachgeo

Well-known member
5,147
3,462
113
Location
North of Cincy OH
how close to windshield do you think a smaller AC would need to be to get that same de-humidifying the air... to have an effect on keeping windshield fog down?
 

GeneralDisorder

Well-known member
Steel Soldiers Supporter
2,035
5,224
113
Location
Portland, OR
Well - the win with the factory unit is that the AC occurs before the heater core. So you first cool the air and drop it's dewpoint so the water falls out of it as condensation and is collected and allowed to drain from the unit. Then the SAME air is sent through the heater and heated so you have hot AND dry air. This is what does the magic and then is able to pull the moisture off the surfaces of the inside of the windows. An AC unit that just pumps dry cold air into the cabin (such as from the back wall of the cab) is going to be uncomfortably cold as it directs freezing air directly on you and then has to mix with the hot air from the defrost and be sucked back into the heater and be expelled before it can absorb any quantity of moisture off the windows.

It's not just the windshield - the side windows are also defogged because of the dry hot air from the factory unit. Which is really tough in these cabs since there is no ducting to direct defrost air against the door and rear windows.

I would expect anything that divorces the AC from the heater core significantly would perform much more poorly in terms of defrost capability.

Most people only consider the AC efficiency and capacity in terms of it's hot weather performance but if you are in a wet environment in the 50's or below the AC also can have a dramatic impact on the defrost and that is why all passenger cars run the AC anytime you select defrost.

This video was coming home from work (6 mile drive) and was probably about 50 degrees and solid rain all day. Plus wet dogs in the cab.

 
Last edited:

ramdough

Well-known member
1,554
1,729
113
Location
Austin, Texas
I have not hooked up my Freon lines yet.

Did you notice that the air blows hot even when set to cold?

Are my hoses backwards maybe, or do I need to add a ball valve for summer use?


Sent from my iPhone using Tapatalk
 

GeneralDisorder

Well-known member
Steel Soldiers Supporter
2,035
5,224
113
Location
Portland, OR
I have not hooked up my Freon lines yet.

Did you notice that the air blows hot even when set to cold?

Are my hoses backwards maybe, or do I need to add a ball valve for summer use?


Sent from my iPhone using Tapatalk
I have not noticed that, no. It takes a bit of time for the ducting and such to cool down if you switch from heat to cold. With the engine not running and the fan not blowing can you hear the actuators for the temperature, fresh/recirc, and vent/defrost-heat control knobs? You should be able to hear each of them move if you have the gen 2 cab AC unit that uses stepper motor actuators......

I don't believe that having the hoses backwards for the heat would result in any noticeable issues.
 

Guruman

Not so new member
Steel Soldiers Supporter
I have not noticed that, no. It takes a bit of time for the ducting and such to cool down if you switch from heat to cold. With the engine not running and the fan not blowing can you hear the actuators for the temperature, fresh/recirc, and vent/defrost-heat control knobs? You should be able to hear each of them move if you have the gen 2 cab AC unit that uses stepper motor actuators......

I don't believe that having the hoses backwards for the heat would result in any noticeable issues.
I know my gen 2 unit coolant lines were labeled input/output. Maybe it matters? I was careful to get it right, just in case.
 

ramdough

Well-known member
1,554
1,729
113
Location
Austin, Texas
I know my gen 2 unit coolant lines were labeled input/output. Maybe it matters? I was careful to get it right, just in case.
Mine were labeled but the truck side was not. I left a marker zip tie to remind me, but the heat all of the time made me question myself.


Sent from my iPhone using Tapatalk
 

GeneralDisorder

Well-known member
Steel Soldiers Supporter
2,035
5,224
113
Location
Portland, OR
Had a chance to try out the system today with temps spontaneously soaring to 90 degrees out of nowhere. Performance was excellent - within about 15 minutes of starting my drive the interior surfaces of the (non insulated) cab were cool to the touch and temps were quite comfortable.

No one wants to be driving in a sweat lodge all day on their vacation. This is so worth it. Do it. Do it now.
 

ramdough

Well-known member
1,554
1,729
113
Location
Austin, Texas
Had a chance to try out the system today with temps spontaneously soaring to 90 degrees out of nowhere. Performance was excellent - within about 15 minutes of starting my drive the interior surfaces of the (non insulated) cab were cool to the touch and temps were quite comfortable.

No one wants to be driving in a sweat lodge all day on their vacation. This is so worth it. Do it. Do it now.
I ended up getting the condenser because of you!!!!!

Now I have the complete Waterloo kit.

How many feet or which hose did you use? I need to start routing hoses next weekend.

Did you pay to have the hoses crimped or did you buy a crimper?


Sent from my iPhone using Tapatalk
 

GeneralDisorder

Well-known member
Steel Soldiers Supporter
2,035
5,224
113
Location
Portland, OR
I actually got the correct Red-Dot hoses for mine but that also required that I change to a different dryer and also to a different trinary switch and had to track down an obscure adapter to get that all to work together because the Red Dot dryer has different ports and the stock Red Dot / military wiring does not use a trinary switch but instead uses separate high pressure and fan switches that don't match the trinary switch I wanted to use.....

I did crimp my own hoses for my 24v mini-split system in my habitat though - this crimper works great:


My plan for hose was to just take the fittings to a local place that does a lot of AC work and have them match up hose for the fittings. From what I have seen the hose is labeled with both metric and standard sizes - apparently it's close enough. All the AC fittings are SAE I believe so the fittings are likely for SAE hoses but like I said the hose seems to be both SAE and metric since the dimensions are so close - 8mm or 5/16, 13mm or 1/2, etc.
 

m-35tom

Well-known member
Supporting Vendor
3,021
222
63
Location
eldersburg maryland
I'm told by a MotorPool veteran of 20 years that "soft cab" trucks were basically never equipped with AC. He couldn't recall ever seeing one in fact. The A1P2 armored cab trucks all have it and in fact AC malfunction is a deadline. The AC only has to drop the ambient temp by 20 degrees F to be considered operational though (generally they work much better than this spec).

So far I've got the cab evap unit installed, the condenser core installed, and the compressor installed. Currently working on hoses and routing the last of the wiring.

The cab unit required that I make a template and drill 4 holes - two for the AC fittings and two for the rear most evap drain tubes:

View attachment 868396
View attachment 868397
View attachment 868398

Fitment was excellent though and basically fits like it was designed to be there:


View attachment 868399
View attachment 868400

Notes:

1. You will need a helper. With the cab lowered you can access the front four bolts from the grill area (remove the grill), but someone needs to be on the inside to push the unit forward against the foam and so forth to get the bolts started.

2. The wiring in the back needs to be carefully zip tied away from the wiper linkage.

3. The brake controls will move up and back and all the lines to the controls will need to be replaced and extended by about 3.5-4" for push-connect fitting trucks. If you have the older ferrule connections then measure carefully. I was able to make the lines and route them through the maze of hoses and wiring on the bench - be careful to avoid the electric flapper actuators, sharp hose clamps, etc. On the C7 controls the exhaust vent is not routed to the bottom of the cab but instead has a sintered brass filter/muffler installed directly on the controls - this might be a useful mod for those with older trucks.

4. The floor HVAC hoses.... The driver's side can use the supplied adapter that twists into the box, but the passenger side required the use of the old adapter from the original heater box. Bending the tabs a bit and then crushing it slightly oval was all that it required. Reason being the proximity of the Transmission Control Module won't allow the longer adapters supplied with the new HVAC cab unit.

The condenser install was really straightforward. Had to drill two holes in the skid plate mounting brackets but otherwise it bolted right up with no modifications.

Onto the compressor:

Ran into an issue with the bolt hole alignment on my reproduction compressor mounts:

View attachment 868401

It appears the bolt holes were never going to line up - in the first place the lower/rear plate hits the compressor mounting boss long before the bolt holes line up anyway. And no the lower/rear plate can't go behind the front/upper plate - it's all wrong if you try that. So........

View attachment 868402
View attachment 868403
View attachment 868404
View attachment 868406

Moved the holes and bolted it all up. Notes:

1. The air compressor coolant line had to be re-routed. Also added a cushioned loop clamp at the bottom of the timing gear case to push it up so it will not rub against the compressor bracket or other objects. It's tight.

2. The coolant tube from the fill tank is in the way of the AC belt tensioner. This required removing the cushion loop clamps from the transmission cooler, shoving the tube farther into the connecting hose on the engine side, and pushing it back behind the oil fill pipe. Note that this blocks the upper AC bracket/air compressor mounting bolt so that needs to be secured first.

3. The wiring harness must move forward of the air compressor coolant hose so it's between the oil fill pipe and the coolant hose. The cushion clamp got moved up one bolt hole position on the timing case.

It's all worked out so far. Just a LOT of modification for the compressor fitment. The rest is hose routing and some wiring hook ups. Should be relatively easy from here.
the lower bracket does go behind the upper, never had a fit issue.
 

GeneralDisorder

Well-known member
Steel Soldiers Supporter
2,035
5,224
113
Location
Portland, OR
the lower bracket does go behind the upper, never had a fit issue.
It was WAY at the wrong angle when I tried that. Have you tried these on a C7 before? Could just be my truck. Works great how I remade it. 🤷‍♂️

Perhaps it's the newer style transmission cooler bracket attached to the same engine mount.....
 
Last edited:
Top