• Steel Soldiers now has a few new forums, read more about it at: New Munitions Forums!

  • Microsoft MSN, Live, Hotmail, Outlook email users may not be receiving emails. We are working to resolve this issue. Please add support@steelsoldiers.com to your trusted contacts.

Humvee upgrades Since Purchase - before & after

bdhummerman

Member
10
51
13
Location
swfl
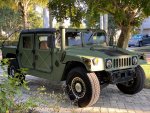
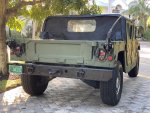
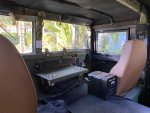
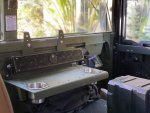
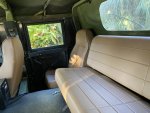
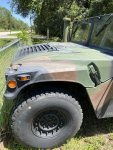
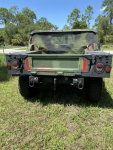
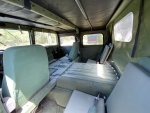
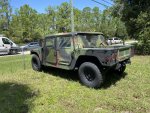
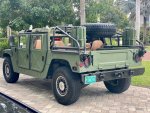
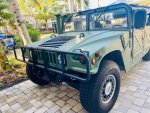
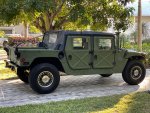
Got my 2001 M1123 in September and have been slowly getting it how I want it. Some before and after pics.
Longtime h1 owner.

west Kentucky x doors not cheap and kind of a pain to install with no hinges mounted but very slick doors. I debated others but the look of windows drive me crazy.

used boom mat in places I have on h1’s to insulate - critical spot add it to dog house and under windshield frame - dramatic noise reduction for 20 minutes of work.

h1 alpha wheels and tires dramatic difference in ride

if you have 200amp generator check your bolts in the bracket - had them shear off on train tracks - turns out wrong spec threads and size were in all of them - that sucked to fix

grounding kit not a big deal to install, did throttle cable after it broke was worse job

Midwest military tan seats and jump seat very slick - driver sucked beyond believe had to use steel flat bar to extend existing base width.

military whip antennas to cover up existing holes. All new led lights and buckets. My headlights had been all kinds of cockeyed

used my old civy h1 bumper painted and mounted that very much is a sucky job.

touched up camo before finally going all green with rapco rattle cans and used canvas paint on top to go black.

new yellow top batteries, step down converter, fuse block, wet sounds soundbar and subwoofer. New gauges still going to do gps Speedo.

anyway some before and after.

BarryC1E87F96-8EB1-4487-9C2B-EC8AF2DF72E8.jpegAB181947-DD8F-4700-8D6E-20658E5AA6B7.jpeg45F32418-BB68-4F00-A3CF-41A1DF4D2C80.jpeg9FFD6BBD-3264-41A7-8190-DC514E747803.jpeg9C4CA4C3-9ADD-462E-B65E-5472AD4B2B83.jpegAFD9A238-8CA6-44B5-AE76-0EABFB852D84.jpeg3AB99C0A-EA43-4AA8-9202-E752D4302F30.jpegB44426C6-86F9-482B-99A1-66DDCCC2E9AA.jpegBC02F80C-A7EC-4B5F-B564-4C5A33325F41.jpegBBFB0213-738B-44F0-8D7B-663707A36C8A.jpeg
 

TOBASH

Father, Surgeon, Cantankerous Grouch
Steel Soldiers Supporter
Supporting Vendor
3,584
3,494
113
Location
Brooklyn, NY
Your truck looks beautiful BUT without a roll cage or hard top I think you should reconsider that center seat.

With those rims she looks like a true HUMMerWV/H1998.

What tires are you running on the 17 inch rims?
 

bdhummerman

Member
10
51
13
Location
swfl
True on the wheels however they did offer them on the Humvee C series which was photographed in am general literature sporting those wheels. - tires are Goodyear GSA

jumpseat I disagree especially for kids - roughly same height as adult passengers with added side buffer of center location. Even the civy h1 bars had warnings all over that it wasn’t structural in rollover and they had factory jumpseat option. Pretty squatted and wide vehicle for my round town driving.
 

bdhummerman

Member
10
51
13
Location
swfl
Nice work. Any chance you have pictures of the boom mat install?
I did not grab any but its pretty simple - I put it right on top of engine side of doghouse to double up factory insulation. The other critical area is the span from driver to passenger right under windshield where ducting goes across, probably 6 to 8 inch wide piece. I had extra so i did the hood cut outs and the transmission tunnel, but the back of the doghouse and that windshield area is the critical portion.
 

branbell

New member
16
15
3
Location
Myrtle Beach, SC
Hey, I also bought the seats from midwest military and have done the rear seats with no problems after buying their seat plates.

How did you do the front seats? any pics?

They seem to be a bit more work and just looking for some guidance.
 

bdhummerman

Member
10
51
13
Location
swfl
The midwest military seats - for the rears I bought their brackets and painted and mounted them easy, for the front passenger I basically eyeballed it - I put a paint marker on the the four mounting points and set it down on battery cover where i wanted it roughly to figure holes and played with it. I mounted the seat at an angle to get it the most rearward - has to be at slight angle due to rub on seatbelt retractor which when straight pushes seat very forward. The drivers was ridiculous since I have a modern style base - seat is just too wide for it (to drill 4 easy holes and mount in 10 minutes) and access is nearly impossible - I ended up getting flat steel bar to extend the width of the base, the steel bar I mounted to the base, and mounted seat to bars ended up working perfect and is mounted as firm as original seat - MME appeared to do no research whatsoever at this issue - its a a non specific seat that does not fit and good luck essentially to the customer. I do love the seats they are more comfortable than the stock H1 seats I used for 25+ years.

Since original post I have added brushguard, rear tire rack (doubles as roll bar), GPS speedo (that intermittent stock mechanical speedo function was driving me crazy) - like everything else mounting guard was overly difficult - the brushguard utilizes non of the existing holes on winch plate so requires a decent bit to drill through winch plate. The more weight I add the better the vehicle drives - the tire rack changed the ride of the truck and dramatically changed the "tightness" of it. The jerry cans I got online and are very nice balance out the rack great.

IMG_1534.jpg

IMG_1654.jpg
 
  • Like
Reactions: OBX

branbell

New member
16
15
3
Location
Myrtle Beach, SC
The midwest military seats - for the rears I bought their brackets and painted and mounted them easy, for the front passenger I basically eyeballed it - I put a paint marker on the the four mounting points and set it down on battery cover where i wanted it roughly to figure holes and played with it. I mounted the seat at an angle to get it the most rearward - has to be at slight angle due to rub on seatbelt retractor which when straight pushes seat very forward. The drivers was ridiculous since I have a modern style base - seat is just too wide for it (to drill 4 easy holes and mount in 10 minutes) and access is nearly impossible - I ended up getting flat steel bar to extend the width of the base, the steel bar I mounted to the base, and mounted seat to bars ended up working perfect and is mounted as firm as original seat - MME appeared to do no research whatsoever at this issue - its a a non specific seat that does not fit and good luck essentially to the customer. I do love the seats they are more comfortable than the stock H1 seats I used for 25+ years.

Since original post I have added brushguard, rear tire rack (doubles as roll bar), GPS speedo (that intermittent stock mechanical speedo function was driving me crazy) - like everything else mounting guard was overly difficult - the brushguard utilizes non of the existing holes on winch plate so requires a decent bit to drill through winch plate. The more weight I add the better the vehicle drives - the tire rack changed the ride of the truck and dramatically changed the "tightness" of it. The jerry cans I got online and are very nice balance out the rack great.

View attachment 863918

View attachment 863919
Thanks for the info. After looking at the drivers seat I figured some work was going to be put into it and came up with the same idea you did. Do you remember what thickness you went with on the flat steel bar?

I really like that rear rack - which company did you get it through?
 

bdhummerman

Member
10
51
13
Location
swfl
the rack is rubberduck4x4 - he makes a humvee specific version. Bar I cannot recall exact have to look - stout but manageable for the space.
 

visualg

Member
36
42
18
Location
Boca Raton, FL
Got my 2001 M1123 in September and have been slowly getting it how I want it. Some before and after pics.
Longtime h1 owner.

west Kentucky x doors not cheap and kind of a pain to install with no hinges mounted but very slick doors. I debated others but the look of windows drive me crazy.

used boom mat in places I have on h1’s to insulate - critical spot add it to dog house and under windshield frame - dramatic noise reduction for 20 minutes of work.

h1 alpha wheels and tires dramatic difference in ride

if you have 200amp generator check your bolts in the bracket - had them shear off on train tracks - turns out wrong spec threads and size were in all of them - that sucked to fix

grounding kit not a big deal to install, did throttle cable after it broke was worse job

Midwest military tan seats and jump seat very slick - driver sucked beyond believe had to use steel flat bar to extend existing base width.

military whip antennas to cover up existing holes. All new led lights and buckets. My headlights had been all kinds of cockeyed

used my old civy h1 bumper painted and mounted that very much is a sucky job.

touched up camo before finally going all green with rapco rattle cans and used canvas paint on top to go black.

new yellow top batteries, step down converter, fuse block, wet sounds soundbar and subwoofer. New gauges still going to do gps Speedo.

anyway some before and after.

BarryView attachment 857431View attachment 857432View attachment 857433View attachment 857434View attachment 857435View attachment 857436View attachment 857437View attachment 857438View attachment 857439View attachment 857440
Where did you source the LED lights from? Any issues installing them?
 

Gamble

Well-known member
405
347
63
Location
Los Angeles, CA
I am interested in the seat installation. I was thinking about Jeep seats or Corbeaus. I want a head rest for relaxation and protection if rear ended.
 

DHumvee

Member
42
50
18
Location
Northwest Florida
I did not grab any but its pretty simple - I put it right on top of engine side of doghouse to double up factory insulation. The other critical area is the span from driver to passenger right under windshield where ducting goes across, probably 6 to 8 inch wide piece. I had extra so i did the hood cut outs and the transmission tunnel, but the back of the doghouse and that windshield area is the critical portion.
Are you saying you put the new insulation on top of the dog house insulation?
 
Top
AdBlock Detected

We get it, advertisements are annoying!

Sure, ad-blocking software does a great job at blocking ads, but it also blocks useful features of our website like our supporting vendors. Their ads help keep Steel Soldiers going. Please consider disabling your ad blockers for the site. Thanks!

I've Disabled AdBlock
No Thanks