• Steel Soldiers now has a few new forums, read more about it at: New Munitions Forums!

  • Microsoft MSN, Live, Hotmail, Outlook email users may not be receiving emails. We are working to resolve this issue. Please add support@steelsoldiers.com to your trusted contacts.

I'm not seeing where I am wrong...Info Please!

76shovel

Member
69
10
8
Location
Bunnell/FL
I have an 803a and doing a motor swap. For the life of me I can't find in the manuals anywhere on how to remove the gen set from the engine adapter plate.
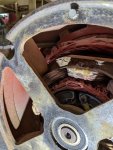
I have through studs from the rear of the gen set to the adapter plate and fastens securely there and have bolts on the flywheel but not accessible through the vent louvers of the housing or cooling fins of the flywheel
Can anyone offer some advice or point me to the right manual
I have some pics of the bolt head and a pic of one of the through studs...surely this thing don't have to come apart to separate them

Thanks for any help
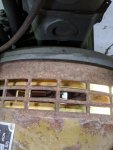

IMG_20200423_115023.jpgIMG_20200423_114931.jpg
 

fosgittr

New member
23
14
3
Location
Midland, MI
You need to pull the large plate in your bottom picture with the rotor bearing in the center off. Once this is removed, the stator can be slid off carefully away from the adaptor plate and away from around the rotor. The rotor will remain bolted to the flywheel. Once you have the stator removed, you will find that the rotor is bolted to the flywheel, which you will need to then remove. Make sure you fully support the rotor before you attempt to unbolt it from the flywheel. After the rotor is removed, the flywheel is bolted to the crankshaft with 5 more bolts.
 

fosgittr

New member
23
14
3
Location
Midland, MI
So it does need to come apart...thank you!
Yup, you have to take the whole thing apart. I would recommend getting a multimeter and checking to make sure all the windings and diodes are properly functional before you put it all back together. Unless of course you know the generator was working before you needed to do the engine swap. Nothing would be worse than putting it all back together and finding out the generator was blown!
 

Guyfang

Moderator
Staff member
Moderator
16,671
23,836
113
Location
Burgkunstadt, Germany
Yup, you have to take the whole thing apart. I would recommend getting a multimeter and checking to make sure all the windings and diodes are properly functional before you put it all back together. Unless of course you know the generator was working before you needed to do the engine swap. Nothing would be worse than putting it all back together and finding out the generator was blown!
It never hurts to inspect and check.
 

76shovel

Member
69
10
8
Location
Bunnell/FL
All the TM's you need to do any kind of work are in the TM forum- Look at TM9-6115-642-24. Its all there.
I have that one but didn't see it in there...I will go back and look again...I have 5 different TM's for this thing for different aspects. I figured I overlooked it in 1 of them...thank you
 

Guyfang

Moderator
Staff member
Moderator
16,671
23,836
113
Location
Burgkunstadt, Germany
Start on PDF reader page #185 in the TM9-6115-642-24. After doing it 1-2 times. I did it close, but not the same way its in the TM. There are shortcuts and you will see them when you are in the middle of it, or when you are done. I always found it easier to just pull the engine and main gen as one piece. It also gave me a chance to inspect, check and fix lots of little things, as well as giving it a real good cleaning.
 

jamawieb

Well-known member
1,437
556
113
Location
Ripley/TN
Fastest way is to take the radiator and entire back of the genset loose and pull it as one unit. Then remove the fuel tank so you don't damage. Then remove the bolts on the motor holding it to the frame, take the 4 nuts off the genhead from the lug side and finally use a bearing puller on the rotor bearing as your supporting the engine with a lift. It will separate and you will have the engine and rotor together as one, then just remove the bolts holding the rotor to the engine and swap the flywheel to the new motor(if you need the flywheel)
 

76shovel

Member
69
10
8
Location
Bunnell/FL
Fastest way is to take the radiator and entire back of the genset loose and pull it as one unit. Then remove the fuel tank so you don't damage. Then remove the bolts on the motor holding it to the frame, take the 4 nuts off the genhead from the lug side and finally use a bearing puller on the rotor bearing as your supporting the engine with a lift. It will separate and you will have the engine and rotor together as one, then just remove the bolts holding the rotor to the engine and swap the flywheel to the new motor(if you need the flywheel)
I did almost that...lol... but the engine and gen head is still attached. As for the flywheel I need to confirm both are the same. It appears to be different. My donor engine is from a 400hz unit with only 53hrs.

My original engine says 590hrs and I thought low pressure don't seem right. Won't hurt to tear it down and do some bearing wear checks...never hurts to have a spare engine much less a complete parts unit minus the 400hz stuff
 

Ray70

Well-known member
2,562
5,796
113
Location
West greenwich/RI
With just 590 hours I'm surprised your oil pressure is that low. Normally I would expect to see 28 psi or higher. Did you happen to verify pressure with a good mechanical gage?
If you end up tearing the motor down to inspect it, take a look at the oil pressure relief valve. You may be loosing pressure through a weak or leaking or stuck partially open relief valve and not worn bearings.
I would have done a little more investigation before yanking the motor out it's easy to check the rod bearings and oil pump relief with the motor in place, only thing you can't check easily are the mains.
 

76shovel

Member
69
10
8
Location
Bunnell/FL
With just 590 hours I'm surprised your oil pressure is that low. Normally I would expect to see 28 psi or higher. Did you happen to verify pressure with a good mechanical gage?
If you end up tearing the motor down to inspect it, take a look at the oil pressure relief valve. You may be loosing pressure through a weak or leaking or stuck partially open relief valve and not worn bearings.
I would have done a little more investigation before yanking the motor out it's easy to check the rod bearings and oil pump relief with the motor in place, only thing you can't check easily are the mains.
Your right...I should had checked more into it. I did fail to mention the pressure drops over an hour of run time.it starts out at good pressure but gradually drops. I agree the swap may be excessive for a simple fix but really it isn't that bad of a job and I get to be more expirenced with my unit. I have about 2hrs tearing it down. Plus I get to clean and inspect other parts that isn't easily accesible
 

Guyfang

Moderator
Staff member
Moderator
16,671
23,836
113
Location
Burgkunstadt, Germany
I did almost that...lol... but the engine and gen head is still attached. As for the flywheel I need to confirm both are the same. It appears to be different. (instead of guessing, open the parts TM. That's the reason the UOC is there. It tells you what parts fit what version of gen set. No, the flywheels are not interchangeable. If you do not understand how the UOC works, say something. I will explain it.) My donor engine is from a 400hz unit with only 53hrs.

My original engine says 590hrs and I thought low pressure don't seem right. Won't hurt to tear it down and do some bearing wear checks...never hurts to have a spare engine much less a complete parts unit minus the 400hz stuff
Open to see what I wrote.
 

76shovel

Member
69
10
8
Location
Bunnell/FL
Open to see what I wrote.
I can't lie...I do struggle with them...but to be honest I haven't opened them up for a while, least until I started this swap...I will say my skills understanding how it works could definitely improve. It's all on the front of them. I just need to familiarize myself with them again.
 

Guyfang

Moderator
Staff member
Moderator
16,671
23,836
113
Location
Burgkunstadt, Germany
I wrote this a while back. And it uses a different part, not a flywheel, but describes the procedure. It was from the 802A books, so the UOC is different then a 803A. So when you drag out the 803A parts TM, in your case the TM9-6115-642-24P, keep that in mind. It never hurts to open the parts TM's and just leaf through them. Get a feel for what is where.


The UOC, usable on code, is meant to clue you in, when there are two different parts, that go in the same place. For instance, the hertz meter. The MEP-802A, the 60 hertz gen set, has a different frequency meter then a MEP-812A, 400 hertz gen set. When you look at the exploded picture, you see the meter, and an Item number. When you look at the detailed explanation, you will see the same Item number, with the same, or almost the same explanation, but different part number and NSN. How to tell the difference? The UOC. Where is the explanation for the UOC? In the front of the manual. Normally under Special Information, Usable On Code heading. Normally there will be a 3 letter code, next to the types of different models. EMH is the code for the 60 hertz model. ENY is the code for the 400 hertz model. Normally, the Item Description and UOC are in column 5. Sometimes it will even say, 60 hertz, or 400 hertz, along with the UOC. But not always. And all parts manuals can show this info just a little bit different. That's why I have used the word "normally" so often here. But if you read the intro to the TM's, you should have no problem with it. It gets interesting when you use a truck manual for instance. Call up a 5 ton parts manual. Look at the cover. You will see about 500 different models of trucks, on the cover. That's why it's important to look at the truck data plate, get the NSN from the data plate, to compare it to the list of models on the cover. There is a world of difference between a W/W, (with winch) and WOW, (without winch). 99% of the parts are the same. It's that 1% that will screw you up every time. So, after this long winded explanation, does it make sense?
 

76shovel

Member
69
10
8
Location
Bunnell/FL
I wrote this a while back. And it uses a different part, not a flywheel, but describes the procedure. It was from the 802A books, so the UOC is different then a 803A. So when you drag out the 803A parts TM, in your case the TM9-6115-642-24P, keep that in mind. It never hurts to open the parts TM's and just leaf through them. Get a feel for what is where.


The UOC, usable on code, is meant to clue you in, when there are two different parts, that go in the same place. For instance, the hertz meter. The MEP-802A, the 60 hertz gen set, has a different frequency meter then a MEP-812A, 400 hertz gen set. When you look at the exploded picture, you see the meter, and an Item number. When you look at the detailed explanation, you will see the same Item number, with the same, or almost the same explanation, but different part number and NSN. How to tell the difference? The UOC. Where is the explanation for the UOC? In the front of the manual. Normally under Special Information, Usable On Code heading. Normally there will be a 3 letter code, next to the types of different models. EMH is the code for the 60 hertz model. ENY is the code for the 400 hertz model. Normally, the Item Description and UOC are in column 5. Sometimes it will even say, 60 hertz, or 400 hertz, along with the UOC. But not always. And all parts manuals can show this info just a little bit different. That's why I have used the word "normally" so often here. But if you read the intro to the TM's, you should have no problem with it. It gets interesting when you use a truck manual for instance. Call up a 5 ton parts manual. Look at the cover. You will see about 500 different models of trucks, on the cover. That's why it's important to look at the truck data plate, get the NSN from the data plate, to compare it to the list of models on the cover. There is a world of difference between a W/W, (with winch) and WOW, (without winch). 99% of the parts are the same. It's that 1% that will screw you up every time. So, after this long winded explanation, does it make sense?
Very much so...thank you for the time you took to clarify this for me.

Just seems like alot of manuals to be looking through for this genset. I use parts books in conjunction with the service manuals when working on motorcycles. Same concept just alot more applications I guess with these units
 

Light in the Dark

Well-known member
Steel Soldiers Supporter
3,806
5,866
113
Location
MA
Top