• Steel Soldiers now has a few new forums, read more about it at: New Munitions Forums!

  • Microsoft MSN, Live, Hotmail, Outlook email users may not be receiving emails. We are working to resolve this issue. Please add support@steelsoldiers.com to your trusted contacts.

Indianapolis HMMWV Project

83scrambler

New member
27
5
3
Location
Indianapolis, IN
Short intro as to get started

My name is Justin, based in Indianapolis, formally only into jeeps (CJ-8 Scrambler, YJ Rock Crawler along with several others over the years). Engineer by discipline (Electrical), but Mechanical at heart. I've been looking forward to expanding horizons into the HMMWV world for the past several years, and just recently pulled the trigger.

Days old Indianapolis based M1038 HMMWV owner, I finally got one!

Looks to be a '91 M1038 with some interesting features. 6.5l NA 3L80 like the majority. Not a leak to be found (yet), we'll see what happens once I get it running regularly.

View attachment 754469View attachment 754470View attachment 754471View attachment 754472

Acquired through the standard ironplanet channel, the unit won't start under its own power but was started on ether and a slave vehicle in the lot where the lot pictures were taken. Somewhat worried about the ether reference in the ad after reading on this site about how there is nothing good about either and these motors. Upon trying to start it at the Ritchie Brothers pick up lot on Newnan, GA last weekend, I found that the wait light would come on for about 3 seconds then cycle off. It would turn over just fine (hooked up to a slave) but never think about running on its own even after several attempts, more troubleshooting to do there.

HMMWV 9.JPG

I'll go through the glows to check resistance and ensure good batteries are in it, then look at the controller if needs be (hoping not!). Where is the ESS Controller located anyways?

Due to the issues getting it started, the lot guy fired up a front-end loader outfit with forks and dropped the HMMWV on the trailer for me.
GPZM0805.jpg


The top, doors and seats all need to be gone through and replaced, certainly not looking forward to those expenses. And at this point, I have not yet chosen a direction of keeping it true to the MV intent or sneaking in a few creature comforts where possible. I, like every one else, would like to make some doors on my own, we'll see what comes in future posts.

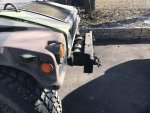
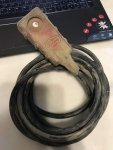
Back to what I found as interesting, it's the winch that is installed in it. Its a 12k Lb electric Ramsey winch, that came with two controllers tucked away under the passenger side seat. I don't dig how far out it sits in front of the hood, but hey, it'll run regardless of the engine running which can have its benefits. I also see almost no mention of this type winch anywhere on the forum. I think I would like to eventually fit a brush guard on the front end so the winch will have to be worked around at that time.
View attachment 754474IMG_3207.jpgIMG_3204.jpg

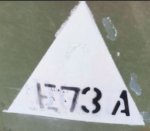
It would be interesting to know where the HMMWV spent its life, not sure if there are ways to tell through the markings or not. All I can see is the white triangle pictured here:
HMMWV 6.JPG

Looking forward to getting to know the community, clearly a ton of knowledge here, kudos to the contributors!

If you happen to be in Indy and want to get together and jam about HMMWV's don't be shy, I'm game any time!
 
Last edited:

Bulldogger

Well-known member
Steel Soldiers Supporter
1,330
586
113
Location
Quantico VA
Welcome and congratulations! Looks like a good start. Most likely culprit for no start, if it's been sitting a while, is bad fuel and old fuel filter. Drain and refill tank and put a new filter in and see if that helps

If you have no leaks on a Hmmwv, the first suspicion is that it's out of fluids, kinda like an old Harley!

Do the lube order and open and inspect your hubs while your tending to her, and have fun .

Bulldogger
 

Retiredwarhorses

Well-known member
Steel Soldiers Supporter
4,400
4,182
113
Location
Brentwood, Calif
I suggest you get mentally prepared to fork out a few dollars on this truck, or all of these trucks for that matter.
you no start could be as simple as bad GP’s to a bad engine....but more commonly is a bad EESS, GP’s or a bad injector pump. Either way, it will take time...and time is money.
 

tobyS

Well-known member
4,832
833
113
Location
IN
Welcome from the north. Hope you have a warm shop...wees gonna get cold.
 

TOBASH

Father, Surgeon, Cantankerous Grouch
Steel Soldiers Supporter
Supporting Vendor
3,584
3,494
113
Location
Brooklyn, NY
Welcome.

If you wanna keep enjoying HMMWV's DON'T USE ETHER!!! Bad for the engines. Like real bad.

Change out yer fuel and enjoy. Perhaps buy a set of new glow plugs while yer at it.

[EDIT - You asked about where is the PCB... PCB is under dash to left of steering column, directly under and more or less behind the ignition switch.]

Welcome.

T
 
Last edited:

therooster2001

Active member
824
44
28
Location
Colorado
Welcome. The top, soft doors and the seats probably aren't that bad of an expense. Hard doors is another story. Focus on getting it running. Congrats!
 

Wire Fox

Well-known member
1,252
161
63
Location
Indianapolis, Indiana
Welcome aboard! I'm in Indy and I have jackton of specialty tools and some worthwhile spare parts in storage. Every tool needed to tear down the engine, hubs, TC, and transmission. I'm lacking several of the tools needed to calibrate timing, but that can be done with some standard shop tools if you have them. I'd be happy to come join you some evening or weekend and we can go over your HMMWV together. Though, I _won't_ be driving mine to meet you, unless you happen to be on the east side, as I've got some transmission issues to sort out before this thing goes joy riding again.

Sent from my Nokia 6.1 using Tapatalk
 

83scrambler

New member
27
5
3
Location
Indianapolis, IN
Alright, getting back around to it... spent some time over the past couple weeks attempting to restore the original batteries, and then by extension digging into the EESS and glow plugs... The details:

Batteries:
Original plan was to find a way to restore the batts in an attempt to get the thing started without outlaying a sum.

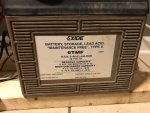
Original Batt Label.jpg

My process:
- Drain battery, neutralize what came out with baking soda and water until slightly basic and dispose of responsibly
- Sounds nastier than it really is, just prepare your work area, have a flushing water source near-by, chemical resistance gloves, safety glasses, old clothes and baking soda for neutralization as needed
- Flush with distilled water and baking soda to clean the battery as well as possible
- have a catch can for this... plastic. And a plan for how to dispose of the fluid in an environmentally responsible way (will not be providing advice on this subject... seek your own path)
- Re-introduce new sulfuric acid
- Acid can be purchased many places, and as it turns out, ACE Hardware in 6qt containers
- Fill as directed on the labeling on the battery
- Charge
- I suggest measuring the battery voltage just after you refill with new acid, mine was 11.37V, and well within range to be slow charged at 2A up into the 12.5 range before introducing the NOCO Genius G7200 charger on the standard 12v setting

The battery came back and held a charge, although I am not sure I can 100% trust it. I saw this because when I went to have it load tested at the local parts store, their tester wouldn't fire up with a repeated bad connection error. for this reason I purchased new flooded lead acid 24 series Exides from home depot for 100 each and will get the ball rolling with these while I either learn to trust the original batts or turn them in for cores and walk away. I report back with my findings over time. I am not working on the other original battery for now, and may start in on it with time and if there is merit.

EESS:
Located the EESS, thanks TOBASH. I have a Yellow Label Nartron box for reference

Glow Plugs:
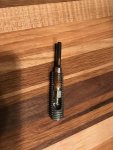
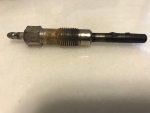
with the new 24 series Exides i went back to town on attempting to start. Recall that I have about a 3 second wait light, and upon a handful of attempted starts, definitely get white smoke of diesel smelling bliss which tells me I'm getting fuel... a good thing. Measuring the glow plugs while they are sitting in the truck... i started second guessing myself. so I started in on pulling them to measure outside the truck. Every one that I have encountered (all driver side and the aft most passenger) are measure very high resistance in the Mega Ohms range... one clearly "blew out" at some point and was visibly damaged, the others are all swollen... some to the point of requiring a removal tool or otherwise.

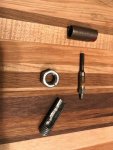
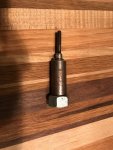
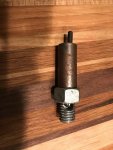
So I got on the mill and made a glow plug puller after seeing what people are charging for them, its crude, but works. If anyone would like to know more about the tool and how it was made, I am happy to share, I have ideas as to how to refine.. this was quick and dirty as you will see from the tooling marks.

GP tool.JPG GP tool 3.JPG GP tool 2.JPG GP Tool 1.JPG


On the Glow plug stem, you can see some build-up... this is actually welded steel particulate that blew off the stem during an over heat cycle, i have a handful like this coming out of the engine.

For reference the markings on these plugs are:

19207-123338771
MFR-3HCM3

And on the 10mm hex portion the number: 422
GP Condition.jpg

I sourced some new glow plugs from SECO in a 8 count set, once they arrive, I'll feedback further on my testing to get this thing started.
 
Last edited:

Milcommoguy

Well-known member
Supporting Vendor
1,710
2,265
113
Location
Rosamond, CA
I am sure I will take some heat for this... Why all the fuss with an August 2011, seven year old battery? I just look at old batteries and get acid holes burnt in my clothes. LOL. I could take three lemons, some rusty nails, couple pieces of wire and get 12 volts on a meter. Not to sure it would start much. Go new, less chance of a accident.

Yep, glow plugs out to lunch. After you replace plugs... I would be real sure to watch with a voltmeter (or a known good 24-28 volt test light) tapped into one of the glow plug leads to ground that they cycle AND turn off.

Fingers crossed on the box thing.

Nice work on the quicky tool. I have been lucky with Vice Grips, small pry bar, penetrating oil, twist and turn. Add patience or luck I guess.

White smoke is good, vroom is better,

CAMO
 

TOBASH

Father, Surgeon, Cantankerous Grouch
Steel Soldiers Supporter
Supporting Vendor
3,584
3,494
113
Location
Brooklyn, NY
I am sure I will take some heat for this... Why all the fuss with an August 2011, seven year old battery? I just look at old batteries and get acid holes burnt in my clothes. LOL. I could take three lemons, some rusty nails, couple pieces of wire and get 12 volts on a meter. Not to sure it would start much. Go new, less chance of a accident.

Yep, glow plugs out to lunch. After you replace plugs... I would be real sure to watch with a voltmeter (or a known good 24-28 volt test light) tapped into one of the glow plug leads to ground that they cycle AND turn off.

Fingers crossed on the box thing.

Nice work on the quicky tool. I have been lucky with Vice Grips, small pry bar, penetrating oil, twist and turn. Add patience or luck I guess.

White smoke is good, vroom is better,

CAMO
Agree with Milcommoguy re.7 year old battery, BUT I'm super impressed with your battery restoration!

There are threads talking about buying 2 generic 24F batteries that will fit well and do the trick. There are 2 flavors and you need to buy a top that fits (meaning there are 2 shapes to the top of the batteries and you need the Northern / Winter battery type.

Search batteries and there are many threads.

Glad I could help with the PCB.

In reading posts from Retired War Horses (RWH), he advocates the "smart" boxes. He must have good reason reasons, but I'm not sure what they are. My PCB has a Yellow label like yours and it works great (for the time being). I also have another identical one in reserve.

Best,

T
 
Last edited:

Jbulach

Well-known member
Steel Soldiers Supporter
2,664
2,202
113
Location
Sunman Indiana
...- Re-introduce new sulfuric acid
- Acid can be purchased many places, and as it turns out, ACE Hardware in 6qt containers
- Fill as directed on the labeling on the battery...
Ummm, not to beat your battery thing to death, but... you didn’t fill you battery with straight acid, did you?
 

83scrambler

New member
27
5
3
Location
Indianapolis, IN
Regarding the subject of battery restoration, it was an interesting project, gave it a whirl, not yet sure about how it worked out, chalk it up to a learning experience. Thanks for the opinions.

I have a set of model 24 flooded Exide batteries that I'm playing with now.

Next up with be going through all the fluids.

What is the general opinion with Fuel? Drain the tank? Run whats in it and chase it with new? Preference is not to take a diesel bath if I can keep from it.
 

TOBASH

Father, Surgeon, Cantankerous Grouch
Steel Soldiers Supporter
Supporting Vendor
3,584
3,494
113
Location
Brooklyn, NY
What is the general opinion with Fuel? Drain the tank? Run whats in it and chase it with new? Preference is not to take a diesel bath if I can keep from it.
Drain that tank baby. Get rid of that crud.
 

83scrambler

New member
27
5
3
Location
Indianapolis, IN
Alright alright alright... I keep getting older, and the glow plugs keep burning out...

So I smoked my new set of GPs, and found that the controller is never shutting them down. From what I am reading in other threads, its points to a controller with contol issues! Strongly considering doing something like a momentary switch to address the GP operation as opposed to a new box. More to come on that later.

Found a leaking Injection Pump, pulled the intake, rebuilt the pump, reinstalled and was off and running. If you want to screw with your HMMWV buddies some time, do what I accidently did and swap the two wires going into the top of the injection pump... you can start the truck normally, and cannot shut it down as the fuel never shuts off. Took some head scratching, a few choice words, and viola swapped the wires and it works as normal. Looks as if there was either a rebuild or motor preplacement in 2012 on this unit as there are several makrings on parts indicating so.
2019.03.10 - Intake - Injection Pump.jpg 2019.03.10 - Intake bolt torque - locker - telon sealant.jpg

Inspected hubs, drained and refilled, existing fluid looked good, seals good, didn't see a reason to go further/deeper.

Changed oil... wow what a finding here... This thing had 4 quarts in it, yes 4. So thats been addressed, no leaks, and exhaust looks normal so not expecting it the be a burning issue. Perhaps the government shut down has the military rationing oil? Who knows!

Yet to install the grounding harness as I have a few things to get lined up before building it, shooting for this coming weekend.

Interesting issue encountered:
Upon the maiden voyage (country cruise) while leaving the shop, I noticed an inside rear tire barking upon a hard turn on the slippery concrete floor, and again pulling out of the gravel drive. This shouldn't be the case right? The differential should act OPEN unless brake pressure is applied... right? I am thinking that I could have a rear brake dragging and causing effectively the same condition that riding the brake does when forcing a lock up. Following the 5 mile country cruise, I felt the diff cover and it was warm to the touch but not hot as I would expect. So, I'm going to drain the diffs, inspect the gears, reseal, and replace the fluid, then pull the wheels off and disconnect the driveline and see if I can figure out which wheel may be causing the issue. All along I'll hope that the Gov't picked my HMMWV out of the bunch and dropped a full detroit in the rear and walk away smiling (will not be the case).

The top is roasted, and so are the doors, I like many I am going to be looking for the most cost effective method to procuring the full set up, a 4 man rag top and perhaps doors.

Anyone know where to get the the little through hole locks that hold the top onto the frame? Several have popped off and will need to be replaced.
 

Milcommoguy

Well-known member
Supporting Vendor
1,710
2,265
113
Location
Rosamond, CA
That would mess with most mechanics once.

Something fishy here.

With them swapped and block temperature below 85 degrees +/- , it should have started and shut down normally. As soon as the block went above 85, it should have shut down and end of story... till it cools back down.

If you look at the connections on the IP, you will see molded ribs on both connectors and they go together. (back side of IP at an angle) That's to the cold advance solenoid. Controlled by, the you guessed it the cold advance switch. (right rear head area) The not ribbed one (sticking straight up) is the fuel control solenoid. When energized 24 Volts allows fuel to flow.

The picture of the IP shown, the connectors are not property seated in all the way. Maybe a little silicone slippery would get them together, last longer too.

Trying to help AND I still smell something. Going to check the TM. CAMO


.
 
Last edited:

therooster2001

Active member
824
44
28
Location
Colorado
Get the grounding harness done before messing with the EESS. Bad stuff can happen there without it. And make sure you're disconnecting the battery before working on the glow plug system. Maybe coincide with a battery disconnect switch. Do all of this before replacing that box. It's a necessity as well as a theft deterrent.

Get with Breton Industries on the doors and the top. Very reasonable, and new stock, not NOS.

Keep plugging at it, sounds like it's in good hands...
 

83scrambler

New member
27
5
3
Location
Indianapolis, IN
Anyone know where to get the the little through hole locks that hold the top onto the frame? Several have popped off and will need to be replaced.
Found another thread... like minds think alike.. or are plagued with the same issues:
https://www.steelsoldiers.com/showthread.php?138624-Soft-top-turnbutton-fasteners/page2

And the direct link to where to source for $0.68 a piece (have to buy 100 at a time):
https://www.dotfasteners.com/products/military-and-tactical/?p=2
 

83scrambler

New member
27
5
3
Location
Indianapolis, IN
OK, next!

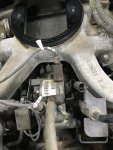
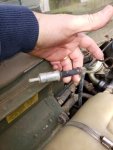
This is located just behind the air cleaner, there is a cushion clamp that it should be sitting in but is too loose to grab on to secure it. Looks like a Fuel Tank Vent but can't be sure. Can someone identify it for me?

The other obvious issue is that its not connected to anything, and for the life of me I do not see another nipple for another line to connect it to, any insight would be greatly appreciated.

2019.03.13 - Fuel Tank Vent.jpg
 
Top
AdBlock Detected

We get it, advertisements are annoying!

Sure, ad-blocking software does a great job at blocking ads, but it also blocks useful features of our website like our supporting vendors. Their ads help keep Steel Soldiers going. Please consider disabling your ad blockers for the site. Thanks!

I've Disabled AdBlock
No Thanks