• Steel Soldiers now has a few new forums, read more about it at: New Munitions Forums!

  • Microsoft MSN, Live, Hotmail, Outlook email users may not be receiving emails. We are working to resolve this issue. Please add support@steelsoldiers.com to your trusted contacts.

Kinda got carried away..... M1028 rebuild

Sharecropper

Well-known member
Steel Soldiers Supporter
1,836
987
113
Location
Paris KY
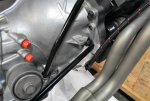
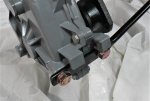
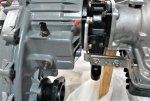
Made a little more progress today. Got the GM14020856 brace rod installed between the NP241 and the P400 engine block. Also installed the bracket for the new transfer case cable shifter from JB Custom Fabrication https://jb-custom-fabrication.myshopify.com/collections/cable-shifters-cable-shifter-components . The cable shifter will replace the OEM shifter and linkage which would be difficult to access after the new gauge cluster has been installed. The new cable shifter lever and boot will be installed in the flat floor space to the right of the drivers seat for easy operation without having to reach across the transmission tunnel. Already worked through the engineering and confirmed that everything will fit without any issues.

DSC_0791 (2).JPGDSC_0792 (2).JPGDSC_0793 (2).JPGDSC_0794 (2).JPGDSC_0795 (2).JPGDSC_0796 (2).JPGDSC_0797 (2).JPG
 

Sharecropper

Well-known member
Steel Soldiers Supporter
1,836
987
113
Location
Paris KY
OK I got the new JB Fabrications cable shifter temporarily installed to make sure everything worked the way I wanted it to. I fabricated a temporary wooden platform and attached it to the NP241 so that the shifter handle is positioned in the approximate location that it will be after the P400 engine/700R4 transmission/NP241 transfer case is installed in the truck. I decided to abandon the OEM transfer case shifter linkage because the new gauge cluster will make it almost impossible to operate the lever under the cluster. Because I have already removed the OEM bench seat and replaced it with a pair of military buckets, I wanted to be able to operate the transfer case without reaching and without taking eyes off the road. There is a flat space on the cab floor just to the right of the drivers seat which the cable shifter will fit into perfectly. The new shifter handle will come up just an inch or so away from the seat and be instantly accessible with the right hand without looking. I had originally ordered the cable shifter from JB Fabrications with a 48" cable, however this proved to be slightly shorter than I wanted, so I returned the 48" cable and exchanged it for a 60" cable which was the perfect length.

I also decided it was time to learn how to upload YouTube videos. Here is my first -

 
Last edited:

Sharecropper

Well-known member
Steel Soldiers Supporter
1,836
987
113
Location
Paris KY
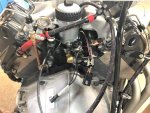
I've been asked about how I plan to hook up all the gauges, pre-oiler, fuel filter, TV cable, etc on the rear of my engine. So I thought I would simply take a photo and then label the things for everyone to see. The photo is un-labeled; click on the PDF to download/see the labeling.

P400 Rear View.jpg
 

Attachments

Sharecropper

Well-known member
Steel Soldiers Supporter
1,836
987
113
Location
Paris KY
After 5 years in the process, the P400 / 700R4 / NP241 is complete and ready to go in the truck. I have decided to wait until a little cooler weather to start the swap-process because my shop/warehouse has no windows and it's like working in an oven during the summertime, even with the overhead door open and fans running. In addition the fella that has offered to help cannot start until early fall. So we will see what happens.

Meanwhile, I have also finished fabrication of the new gauge panel. The next step will be to fabricate/install the mounting tabs to the dash, and then media blast it and paint it 383 green. After the new engine has been bolted in place, I will then install all the gauges and route the lines.

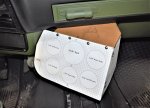
The new gauge panel has been quite the adventure. I have come full-circle on the type of gauges, from HMMWV-type to cheap store-bought units. One day while I was simply sitting in my driver's seat, trying to envision which gauges to use and where to mount them, I concluded that I wanted the largest gauges available and also wanted them to be pointed directly at my face while driving. I did not like having to twist my neck to try to look at small gauges mounted under the dash, nor did I want to take my eyes off the road for no longer than necessary while looking at them. I realized that there was a space in my immediate vision which had nothing "going-on" in it, and the space I ultimately decided on would cover the OEM ashtray. I also wanted to monitor more than just oil pressure and water temperature, and also wanted to utilize a new larger 3500 rpm HMMWV tach. My P400 already had the HMMWV tack driver in place (because I no longer needed the 6.2 vacuum pump), so it seemed stupid not to utilize a HMMWV tach. So I began to mentally design how I would want the gauges to be arranged, and exactly how and where they would be mounted.

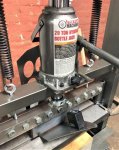
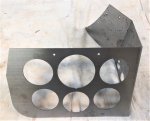
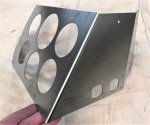
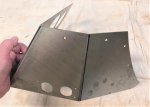
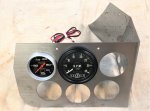
The first step was to create some trial-and-error sizing and shapes out of cardboard, to test my theory. After concluding that I wanted to use a HMMWV tach, I found and purchased a new one on Ebay. I then settled on new 2-5/8" AutoMeter liquid-filled mechanical Pro-Comp instruments, and finalized my selection to oil pressure and water temperature of course, but also engine oil temperature, transmission oil temperature, and fuel pressure. I purchased all these from Summit or Jegs. All gauges are thermocouple-driven without electric sending units for real-time, accurate readings. I completed the cardboard size, shape, and template to success, and then moved on to actual metal fabrication. I folded out the cardboard template to be flat, then drew the flat plane in AutoCad. I sent this out to EmachineShop and had them water-jet the shape in 1/8" aluminum to make sure it would fit the dash correctly. It did, so then I ordered the same shape again in 0.0625 (1/16") 1008/1018 cold-rolled steel. It arrived today, and I bent the piece on my finger press to the shape to fit the dash. The next step will be to install nut-certs in the dash and fabricate small angle brackets to hold the panel in place. Here are a few photos so far -


DSC_0751 (2).JPG IMG_3858.jpg IMG_3859.jpg IMG_3861.jpg IMG_3867.jpg IMG_3868.jpg IMG_3869.jpg IMG_3871.jpg
 
Last edited:

ballencd

Active member
195
78
28
Location
Columbus, NC
After 5 years in the process, the P400 / 700R4 / NP241 is complete and ready to go in the truck. I have decided to wait until a little cooler weather to start the swap-process because my shop/warehouse has no windows and it's like working in an oven during the summertime, even with the overhead door open and fans running. In addition the fella that has offered to help cannot start until early fall. So we will see what happens.

Meanwhile, I have also finished fabrication of the new gauge panel. The next step will be to fabricate/install the mounting tabs to the dash, and then media blast it and paint it 383 green. After the new engine has been bolted in place, I will then install all the gauges and route the lines.

The new gauge panel has been quite the adventure. I have come full-circle on the type of gauges, from HMMWV-type to cheap store-bought units. One day while I was simply sitting in my driver's seat, trying to envision which gauges to use and where to mount them, I concluded that I wanted the largest gauges available and also wanted them to be pointed directly at my face while driving. I did not like having to twist my neck to try to look at small gauges mounted under the dash, nor did I want to take my eyes off the road for no longer than necessary while looking at them. I realized that there was a space in my immediate vision which had nothing "going-on" in it, and the space I ultimately decided on would cover the OEM ashtray. I also wanted to monitor more than just oil pressure and water temperature, and also wanted to utilize a new larger 3500 rpm HMMWV tach. My P400 already had the HMMWV tack driver in place (because I no longer needed the 6.2 vacuum pump), so it seemed stupid not to utilize a HMMWV tach. So I began to mentally design how I would want the gauges to be arranged, and exactly how and where they would be mounted.

The first step was to create some trial-and-error sizing and shapes out of cardboard, to test my theory. After concluding that I wanted to use a HMMWV tach, I found and purchased a new one on Ebay. I then settled on new 2-5/8" AutoMeter liquid-filled mechanical Pro-Comp instruments, and finalized my selection to oil pressure and water temperature of course, but also engine oil temperature, transmission oil temperature, and fuel pressure. I purchased all these from Summit or Jegs. All gauges are thermocouple-driven without electric sending units for real-time, accurate readings. I completed the cardboard size, shape, and template to success, and then moved on to actual metal fabrication. I folded out the cardboard template to be flat, then drew the flat plane in AutoCad. I sent this out to EmachineShop and had them water-jet the shape in 1/8" aluminum to make sure it would fit the dash correctly. It did, so then I ordered the same shape again in 0.0625 (1/16") 1008/1018 cold-rolled steel. It arrived today, and I bent the piece on my finger press to the shape to fit the dash. The next step will be to install nut-certs in the dash and fabricate small angle brackets to hold the panel in place. Here are a few photos so far -


View attachment 806910 View attachment 806911 View attachment 806912 View attachment 806913 View attachment 806914 View attachment 806915 View attachment 806916 View attachment 806917
What's the reason you test fit with Aluminum but went with steel for new gauge panel? Inquiring minds want to know. Looking really good! What have you done with your old engine?
 

Sharecropper

Well-known member
Steel Soldiers Supporter
1,836
987
113
Location
Paris KY
What's the reason you test fit with Aluminum but went with steel for new gauge panel? Inquiring minds want to know. Looking really good! What have you done with your old engine?
I didn’t feel the aluminum would be strong enough to support the combined weight of all the gauges and thermocouples. Plus the aluminum doesn’t crease very well when forming in the press. I may be hanging more stuff off the panel in the future such as cb radio, back up camera screen, etc. just wanted it to be as strong as possible to avoid any issues in the future.
I haven’t made any plans for my 6.2, TH400 and NP208. The driveline is as clean as new with only 15,000 miles, mostly driven around base in AZ. Several guys have asked about it. If I could find a good low-rust M1009 with engine trouble or missing, I would probably install my driveline in it for a daily driver. Not sure what I will do yet. I need to finish my M1028 before getting sidetracked in another project.
 

OldIronsides

New member
8
4
3
Location
Richmond, Virginia
My windows are SUPER HARD to roll up after I replaced my window channel felt, manual regulators, and vent assemblies. Did you have same experience?

Mine is coming along well, other than air condition freezing up in this 100+ heat. I'm trying to figure that out.


Sharecropper

Well-known member
Steel Soldiers Supporter
1,836
987
113
Location
Paris KY
My windows are SUPER HARD to roll up after I replaced my window channel felt, manual regulators, and vent assemblies. Did you have same experience?

Mine is coming along well, other than air condition freezing up in this 100+ heat. I'm trying to figure that out.

Yeah my windows were hard to operate after I rebuilt them. I used some dry lithium lubricant in the channels and that seemed to help. Can’t remember exactly what I used, heck it’s been years. They seem to be better now after up and down numerous times.
Your A/C freezing up is due to an improper level of refrigerant. Get a shop to check that.
 

Sharecropper

Well-known member
Steel Soldiers Supporter
1,836
987
113
Location
Paris KY
When are these pipes going to roar to life... :driver:
Hopefully soon. I've had 6 surgeries and 2 heart attacks since I started this project. Things seem to be settling down, so maybe this fall I can pull the front clip off and get the show on the road. Rest assured, I will keep my rebuild thread active as soon as the fireworks start.
 

Mad Texan

Well-known member
Steel Soldiers Supporter
657
1,150
93
Location
Chester County, PA
Hopefully soon. I've had 6 surgeries and 2 heart attacks since I started this project. Things seem to be settling down, so maybe this fall I can pull the front clip off and get the show on the road. Rest assured, I will keep my rebuild thread active as soon as the fireworks start.
Stay well and we all look forward to updates!!! (y)
 
Top
AdBlock Detected

We get it, advertisements are annoying!

Sure, ad-blocking software does a great job at blocking ads, but it also blocks useful features of our website like our supporting vendors. Their ads help keep Steel Soldiers going. Please consider disabling your ad blockers for the site. Thanks!

I've Disabled AdBlock
No Thanks