• Steel Soldiers now has a few new forums, read more about it at: New Munitions Forums!

  • Microsoft MSN, Live, Hotmail, Outlook email users may not be receiving emails. We are working to resolve this issue. Please add support@steelsoldiers.com to your trusted contacts.

Looking for V100 chassis pics

Paweł

Active member
48
141
33
Location
Poland
Hello Buck!
Thanks a lot for the references, they are a big help! The drawing doesn't really show it, but on the photos the parts 13 and 22 look like a wedge - this is how I'm going to model it.

And I have the rear suspension done:


1:35 M706 Commando by Pawel


1:35 M706 Commando by Pawel


The resin wheels are from a company called MMK, the axle is my 3D print with a hole through for a reinforcement made out of brass wire to keep the axle from bending under load when it gets hot, and the shock absorbers are scratchbuilt.


And here's how the subassembly fits into the chassis:


1:35 M706 Commando by Pawel


Now more fun to come - the front suspension and the steering system!


Thanks for looking and have a nice day!


Paweł
 

Buck Wampum

Active member
Steel Soldiers Supporter
64
131
33
Location
SE PA
Hello Buck!
Thanks a lot for the references, they are a big help! The drawing doesn't really show it, but on the photos the parts 13 and 22 look like a wedge - this is how I'm going to model it.

And I have the rear suspension done:


1:35 M706 Commando by Pawel


1:35 M706 Commando by Pawel


The resin wheels are from a company called MMK, the axle is my 3D print with a hole through for a reinforcement made out of brass wire to keep the axle from bending under load when it gets hot, and the shock absorbers are scratchbuilt.


And here's how the subassembly fits into the chassis:


1:35 M706 Commando by Pawel


Now more fun to come - the front suspension and the steering system!


Thanks for looking and have a nice day!


Paweł
Parts 13 and 22 are not wedges, they are a spacer. There are flat on top and bottom, there is no wedge profile. Part 13 has a hole in the center that engages with a pin on the bottom of the leaf spring. The raised surfaces of parts, 13 and 22 engage with the axle to prevent it from shifting back-and-forth under load.
 

Paweł

Active member
48
141
33
Location
Poland
Hello Buck!
Thanks a lot for the explanation. This photo tricked me, the part under the spring looks mighty "wedgy" here:

And this is the way I have to model it on my model, otherwise the axle would be canted, because of the way the front springs are made.

Thanks again for your great help and have a nice day

Paweł
 

Attachments

Paweł

Active member
48
141
33
Location
Poland
Hello!

Currently I'm havin' fun with the front suspension. I've assembled most of it:


1:35 M706 Commando by Pawel

The axle is my 3D design, reworked kit springs and scratchbuilt shock absorbers. I still have to cut off the wires that mount the shocks to the body and install the portion of the drive shaft.


1:35 M706 Commando by Pawel

I've also scratchbuilt the power steering cylinder and I also have the drag link built, but it is not on the photo yet. The wheels will be shown "steered" to one side for a cooler look. I'm not sure about the sheet metal cover of the cylinder.

I hope to show you the photos of ready built underside soon. Thanks for looking and for your great help, have a nice day

Paweł
 

Paweł

Active member
48
141
33
Location
Poland
Hello Rory, thanks again!
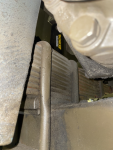
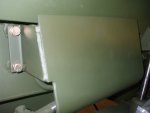
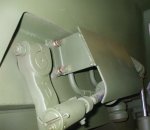
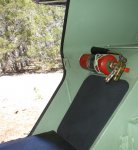
Can you tell me something more about the cover of the power steering cylinder? I've seen a piece of sheet metal on some vehicles, but it's in a tight spot, so no really good shots of that parts and I don't know if it was installed on all vehicles.
Thanks in advance, have a nice day
Paweł
 

Paweł

Active member
48
141
33
Location
Poland
Hello Rory!
Thanks a lot for your fast response and for the photos! I'll try to build that cover now. Have a nice day!
Paweł
 

Paweł

Active member
48
141
33
Location
Poland
Hello everybody!

And I have my chassis almost done. Thanks to Rory I knew how to build that sheet metal cover for the power steering cylinder:

1:35 M706 Commando by Pawel

Having that, I was able to put the machine on its wheels - only temporarily now:

1:35 M706 Commando by Pawel

The rims on the front wheels were a little cracked, so I repaired them with copper wire. Looking up the chassis would look like that:

1:35 M706 Commando by Pawel

I plan to add some shading and weathering later, for now I'm building the details on the top. I'm working on a better grille over the exhaust on the "duck bill". I'm trying to draw something up in 3D.

Thanks for looking and have a nice day!

Paweł
 

Paweł

Active member
48
141
33
Location
Poland
Hello!

As you suggested I designed a new rear grille and recently I got it delivered from the 3D printer:

top01.jpg

After fitting it here’s how it looks like:
top02.jpg
On the same picture you can see the “rear gunners hatch” which is way off in the kit. The cover is too big and the opening is too small - something like that deserves a kind of trophy, doesn’t it? I’m using MMK’s door kit, but the radiomans hatch from the kit has wrong shape, so I decided to convert the kit part here. I also had to move and enlarge the opening in the kit roof and I lined the edges with 0,5mm copper wire. It is still going to get photoetched locking handles.
One more photo:
top03.jpg
I think I made the exhaust scoops a little too shallow, but I'm going to leave it this way. Here you can also see the rear light brackets made from styrene sheet.
On the next photo are the side lower door stops that I made of copper wire. The kit parts have wrong dimensions anyway:
hull02.jpg
Out of wire I have also fabricated the front light guards:
top04.jpg
As you can see, I like wire a lot
🙂


Thanks for reading and for your comments, have a nice day

Paweł
 

M813rc

Well-known member
Steel Soldiers Supporter
4,206
3,188
113
Location
Near Austin, Texas
That new grill does look much better than the kit item. The exhaust scoops may be a tiny bit shallow, but they look fine.

I really admire the quality of your work!

Cheers
 

Paweł

Active member
48
141
33
Location
Poland
Hello Rory!
Thanks again for your kind words, they mean a lot to me!

And recently I've been working on all those doors - and there are many of them! I have ordered a MMK set that has only V-100 doors - they are a separate set for a reason! And it's a nice little set and not so expensive. Here's a link to the MMK page:

www.mmk.cz/en/models/category/detailni-a-konverzni-sady

And here's how my doors turned out:

1:35 M706 Commando by Pawel

Now I want to paint them on the inside and temporarily install them closed to paint the camouflage on the vehicle. Then I'll permanently install them as open.

Thanks for looking and have a nice day

Paweł
 

M813rc

Well-known member
Steel Soldiers Supporter
4,206
3,188
113
Location
Near Austin, Texas
Those look very good.

I'm sure you have noticed that the doors have the exterior colour painted on the inside.

The openings have a thin black rubber seal around the edges to help with water-tightness.

Cheers

Door seal.jpg
 

Paweł

Active member
48
141
33
Location
Poland
Hello Rory!
Thanks a lot for pointing out the details, I'll keep them in mind.
Here’s another update…
I got the doors painted on the insides now:
1:35 M706 Commando by Pawel

I made some new weld lines in the back:
1:35 M706 Commando by Pawel

And in the front I thought about how to best attach the mesh to the light guards and I decided to solder them on:
1:35 M706 Commando by Pawel

I’ve also added some welds around the lifting eyes in front, too. The winch compartment cover is also temporarily secured for now. The white shim in the drivers vision port should install the transparent part there in the right position and without the gap below. I’ve also intalled the top armor and the fixed weapons mounts, made from the kit-supplied PE - a little simplified, but nice:
1:35 M706 Commando by Pawel

Now the plan is to temporarily fix all the doors in closed positions and paint on the 3 colour camo on that.
Thanks for looking and have a nice day
Paweł
 

M813rc

Well-known member
Steel Soldiers Supporter
4,206
3,188
113
Location
Near Austin, Texas
That is looking very good, Pawel!

I think we talked about this before -
the kit has a seam running along the curve of the nose side plate, this should be completely smooth. There is a small weld line at the rear of that plate, which it looks like you have added to your model. These are indicated by the blue arrows on the attached pictures.

The kit features the slight overhang (perhaps 4-5mm on the real vehicle) along the nose and around the roof. I've seen other modelers sand that smooth, but it is supposed to be there! (Yellow arrows)

Cheers

Hull sides.jpg
 

Paweł

Active member
48
141
33
Location
Poland
Hello Rory!
Thanks a lot for the heads up. I have sanded the front fenders smooth. Funny enough, now that I look on the photos there still seems to be a slight step there... I don't really see it on the model when I look at it - I\ll have to work on that some more. As for the front I have also sanded the plate smooth, but now I scribed a groove on the top and the sides to have at least something there. And I started painting the camo...

For masking I used "patafix" rolls filled with masking tape. This is how it looked like after painting and masking the first colour (sand brown) and painting the second colour (green):

1:35 M706 Commando by Pawel


1:35 M706 Commando by Pawel


And here's the thrilling moment - masks removed!

1:35 M706 Commando by Pawel


1:35 M706 Commando by Pawel


The OG came out pretty gloss - I'm going to knock that shine down with clear after applying the "effects". I also want to paint the doors' edges black to simulate the gaskets there. Interestingly, I tried to look up the instructions for all the kits of the V100 and they all don't seem to match the photos as far as the camo pattern go. My scheme is also a little "what if" on the rear deck - hard to find references on this area...

Well, now I want to apply the decals and do some weathering. Thanks for looking and have a nice day

Paweł
 

M813rc

Well-known member
Steel Soldiers Supporter
4,206
3,188
113
Location
Near Austin, Texas
That's beautiful! Those little brass gun mounts are quite amazing!

If you examine the photos, you'll see the pattern differs from vehicle to vehicle, so no worries if your pattern isn't an exact match. I don't know if there was actually an "official" pattern.

Cheers
 

Paweł

Active member
48
141
33
Location
Poland
Hello everybody!

Rory - thanks a lot for your comment! From what I heard the camo was factory-painted, and the photos show a certain regularity, of course with a variation. Sometimes the partition between green and OD is hard to spot and I think the colours might have faded, been repainted or just didn't photograph well - or all of the above. So I'm not going bananas here, but I wanted to get as close to the real pattern as I can get. Like I said, I think I'm closer than all the kits out there.

And I'm working on the weathering... I applied the decals, some Gunze gloss on top of that and then there goes some oil dot:

1:35 M706 Commando by Pawel

That was before and after it looks something like this:

1:35 M706 Commando by Pawel

1:35 M706 Commando by Pawel

And the chassis looks like this:

1:35 M706 Commando by Pawel

I'm going to take it out on that finish a little more and then I' apply some clear flat, because now the finish is obnoxiously glossy...

Thanks for looking and have a nice day

Paweł
 
Top
AdBlock Detected

We get it, advertisements are annoying!

Sure, ad-blocking software does a great job at blocking ads, but it also blocks useful features of our website like our supporting vendors. Their ads help keep Steel Soldiers going. Please consider disabling your ad blockers for the site. Thanks!

I've Disabled AdBlock
No Thanks