• Steel Soldiers now has a few new forums, read more about it at: New Munitions Forums!

  • Microsoft MSN, Live, Hotmail, Outlook email users may not be receiving emails. We are working to resolve this issue. Please add support@steelsoldiers.com to your trusted contacts.

M1078 to M1079 Conversion and Build

GeneralDisorder

Well-known member
Steel Soldiers Supporter
2,019
5,187
113
Location
Portland, OR
I haven't decided if I am going to remove the plates on the walls or not. I kind of like having them there as rails for bungee cords and straps, and a small measure of protection for the blackout shades when they are down. You make a good point though about reusing the bolt holes for mounting other stuff.
Sadly mine has the small windows (2 on each side) and so the wall plates were mounted flush to the wall like the floor and provided no such advantage for me. So they gone. Along with that ridiculously oversized breaker panel and next I'm removing the shore power connection box. At most I will need an extension cord and that's not going to require a 14x14x6 box. LoL. I haven't decided if I will delete the fluorescent lighting enclosures entirely - need to do more research on alternative T8 LED bulbs and if I can find some that operate on DC to make some use of some of them.
 

Oxyacetylene

Active member
Steel Soldiers Supporter
518
179
43
Location
Stoneville, NC
Sadly mine has the small windows (2 on each side) and so the wall plates were mounted flush to the wall like the floor and provided no such advantage for me. So they gone. Along with that ridiculously oversized breaker panel and next I'm removing the shore power connection box. At most I will need an extension cord and that's not going to require a 14x14x6 box. LoL. I haven't decided if I will delete the fluorescent lighting enclosures entirely - need to do more research on alternative T8 LED bulbs and if I can find some that operate on DC to make some use of some of them.
I am also planning to remove the breaker panel. I doubt I will ever have 3 phase power to hook up to it anyway. Plus the panel is quite corroded on mine. I am however putting a smaller panel back that I just ordered. It's a generator panel, made with two main breakers and an interlock. This allows you to switch back and forth easily between mains and generator, or in my case between external power and inverter power. I doubt I will need 6 receptacles inside so I may drop that to 4 or less and reuse the other receptacle boxes for DC power outlets. The field phone wiring is also getting removed. My plan is to keep the power inlet box and possibly swap the connectors to a standard RV twist lock style, and add in DC out connector, and maybe a couple of coax connectors. I have not decided if I am going to keep the military power inlet connectors and make adapters, or just swap them out. I have been trying not to alter the exterior look too much, but we'll see.
 

coachgeo

Well-known member
5,140
3,458
113
Location
North of Cincy OH
I am also planning to remove the breaker panel. I doubt I will ever have 3 phase power to hook up to it anyway. Plus the panel is quite corroded on mine. I am however putting a smaller panel back that I just ordered. It's a generator panel, made with two main breakers and an interlock. This allows you to switch back and forth easily between mains and generator, or in my case between external power and inverter power. I doubt I will need 6 receptacles inside so I may drop that to 4 or less and reuse the other receptacle boxes for DC power outlets. The field phone wiring is also getting removed. My plan is to keep the power inlet box and possibly swap the connectors to a standard RV twist lock style, and add in DC out connector, and maybe a couple of coax connectors. I have not decided if I am going to keep the military power inlet connectors and make adapters, or just swap them out. I have been trying not to alter the exterior look too much, but we'll see.
if you plan to try to camp in RV campground.... just note that most of them are 220 plug in these days. That's cause the RV industry "split the 220" inside the camper into two different 110v legs. One has lighter load stuff on it plus the AC and the other has the heavier loads. Or if it has two AC's then RV manufacture does the split (light loads + AC) x2

Something like that at least.
 

Oxyacetylene

Active member
Steel Soldiers Supporter
518
179
43
Location
Stoneville, NC
if you plan to try to camp in RV campground.... just note that most of them are 220 plug in these days. That's cause the RV industry "split the 220" inside the camper into two different 110v legs. One has lighter load stuff on it plus the AC and the other has the heavier loads. Or if it has two AC's then RV manufacture does the split (light loads + AC) x2

Something like that at least.
Good to know! What is the plug type for that? I've never RV'd so I am not familiar with the common hookups. Would that be the 50 amp plug? If I make mine all 120v then I could theoretically just make an adapter cable to use one hot leg and the nuetral of the 220v RV hookup. I'll think on it a bit. I could maybe wire the panel as 220v and be able to adapt it for use on a 30amp 120v RV hookup. I need to check the diagram for the panel that I just ordered.
 

coachgeo

Well-known member
5,140
3,458
113
Location
North of Cincy OH
Good to know! What is the plug type for that? I've never RV'd so I am not familiar with the common hookups. Would that be the 50 amp plug? If I make mine all 120v then I could theoretically just make an adapter cable to use one hot leg and the nuetral of the 220v RV hookup. I'll think on it a bit. I could maybe wire the panel as 220v and be able to adapt it for use on a 30amp 120v RV hookup. I need to check the diagram for the panel that I just ordered.
more complicated...

see https://justdownsize.com/is-a-50-amp-rv-plug-220-or-110-volts/ (updated)

BUTTT...
will they even let you into the campground??. and that is a HUGE thing that is getting more common from what have heard. Even some state parks now wont let you in to their camp sites at all if your not in a rig manufactured by major RV manufacture.

.... aka... a lot of the will tell you "bye bye" because- "we don't allow self built campers/vans of any kind at all" "the camper is not certified" .
>> suspect it is an insurance/fear of lawyers thing...
>>they got no way of knowing if the rig is built to any RV camper build code.... if it was not.... their insurance company will likely then not cover the damages your rig caused by fire or frying their electrical system... oorrr??? to any nearby rigs...... soooo.... the campground just won't risk it. And say "bye bye" "turn around" and be a real dick about it. (some also folk have complained about)
 
Last edited:

chucky

Well-known member
Steel Soldiers Supporter
6,622
18,961
113
Location
TN .
The ac/heat unit your using draws 20 amps on some settings so if it were me i would get 40 or 50 ft of 8/3 s.o. cable for a shore chord and use a 220 plug male head with nothing on one hot leg so you have 1 hot 1 nut 1 ground and you can plug up to a normal 50 amp 4 lug receptical and only get 110 volt to your truck and make an adapter to plug your 50 amp male plug to a 30 amp or 20 or 15 110 male plug so no matter what they are offering where ever you can plug up to anything they have and just get 110 . And to protect your panel have 2 seperate female box recepticals . One is the other end of your shore chord and the other is your generator receptical and your panel has a male end coming from main breaker out of box to a male plug so you can only plug to one source and not get 2 sources coming into your panel at one time .
 

Oxyacetylene

Active member
Steel Soldiers Supporter
518
179
43
Location
Stoneville, NC
The ac/heat unit your using draws 20 amps on some settings so if it were me i would get 40 or 50 ft of 8/3 s.o. cable for a shore chord and use a 220 plug male head with nothing on one hot leg so you have 1 hot 1 nut 1 ground and you can plug up to a normal 50 amp 4 lug receptical and only get 110 volt to your truck and make an adapter to plug your 50 amp male plug to a 30 amp or 20 or 15 110 male plug so no matter what they are offering where ever you can plug up to anything they have and just get 110 . And to protect your panel have 2 seperate female box recepticals . One is the other end of your shore chord and the other is your generator receptical and your panel has a male end coming from main breaker out of box to a male plug so you can only plug to one source and not get 2 sources coming into your panel at one time .
Yeah that's what I was thinking of doing. The breaker panel is set up with a manual interlock also so that only one input can be active at a time.
 

coachgeo

Well-known member
5,140
3,458
113
Location
North of Cincy OH
Campgrounds normally have
1) 115 vac receptacle, like used at home.
2) 30 amp 115 v receptacle like TT-30R
3) 50 amp 115 v receptacle like 14-50R
ahhhhh.... thanks for making me look closer at this again........ it is 220 butttt; NOT 220, in manner was understanding it to be. According to article below the 50amp setup (4prong plug) is running two 120volt-legs...... So the split IS in the Park's junction box? or inside the cord ...... anyway.... once it gets into the camper wiring its stays separate the whole time... Usually lol

aka- the number 3) above is 120v on two legs of the 50amp park receptacle . The 50amp 4 prong cord that comes with the camper (larger one's). Runs each leg separated into two different circuits inside the larger rig's. Makes since.... RV folk were always describing it to me as half the rig was 110v.... and the other half was a different 110v ...


see


and to complicate it more.... sometimes they do re-combine the two legs.. for 220/240v INSIDE the camper

 
Last edited:

Bill Nutting

Well-known member
Steel Soldiers Supporter
573
1,284
93
Location
Chesterfield, Mi.
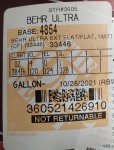
I've cleaned the outside quite a bit and started painting. I'm using the Behr exterior paint, 33446 paint code. So far I've only used brushes and a roller, but at some point after it warms up this spring I plan to spray it.
View attachment 857914
Your truck is looking great. Could you post a picture of the paint code label on the lid of the can? I have had some trouble getting a close color match when I use the standard paint number.
Thanks…
 

Oxyacetylene

Active member
Steel Soldiers Supporter
518
179
43
Location
Stoneville, NC
Your truck is looking great. Could you post a picture of the paint code label on the lid of the can? I have had some trouble getting a close color match when I use the standard paint number.
Thanks…
Sure thing:
IMG_20220206_101052__01.jpg

I don't know how close of a match it is because I don't have anything to compare it to, but I like the color. The CARC on mine was already faded out when I bought it 8 years ago.
 

Bill Nutting

Well-known member
Steel Soldiers Supporter
573
1,284
93
Location
Chesterfield, Mi.
Sure thing:
View attachment 858132

I don't know how close of a match it is because I don't have anything to compare it to, but I like the color. The CARC on mine was already faded out when I bought it 8 years ago.
Thank you! My trucks CARC is faded as well. When I tried to get a paint mixed at HD, it came out too dark. I compared it to some new vehicles in 2019 while on the convoy. We stopped at a National Guard base in Wyoming where they had some new sand colored vehicles. The color in your picture looks right on. A lot of people ask me why I don’t paint it green. I use this truck mostly in the summer and it stays much cooler than the green trucks.
 

ramdough

Well-known member
1,554
1,729
113
Location
Austin, Texas
ahhhhh.... thanks for making me look closer at this again........ it is 220 butttt; NOT 220, in manner was understanding it to be. According to article below the 50amp setup (4prong plug) is running two 120volt-legs...... So the split IS in the Park's junction box? or inside the cord ...... anyway.... once it gets into the camper wiring its stays separate the whole time... Usually lol

aka- the number 3) above is 120v on two legs of the 50amp park receptacle . The 50amp 4 prong cord that comes with the camper (larger one's). Runs each leg separated into two different circuits inside the larger rig's. Makes since.... RV folk were always describing it to me as half the rig was 110v.... and the other half was a different 110v ...


see


and to complicate it more.... sometimes they do re-combine the two legs.. for 220/240v INSIDE the camper

The 50 amp circuit is like a dryer plug. There are two legs of 120v usually referred to as L1 and L2, a neutral, and an earth ground.

L1 and L2 are 180 degrees out of phase so when one leg is at a peak, the other leg is at a valley. If you measure voltage between the Legs and your neutral, you get 120v. If you measure between L1 and L2, you get 240v (peak of one leg to valley of the other leg).

So, in an RV that uses the 50A plug, they keep the L1 and L2 separated unless they have a 240v appliance (which I don’t think happens that often).

This is similar to you house breaker panel as well.

Hope that helps.


Sent from my iPhone using Tapatalk
 

Oxyacetylene

Active member
Steel Soldiers Supporter
518
179
43
Location
Stoneville, NC
I've been steadily working on the enclosure and the truck here and there. I have installed a diesel parking heater and it works great! I'll post pics later once I finish up the wiring for it. I have also installed a driver's side antenna mount and just need to paint that. For the 120v electrical, I have installed the new panel and custom fitted power inlet and outlet into the existing connector shells on the outside of the enclosure. This way I keep the original look, but can easily hook up to a campground or my generator.

Here's how I mounted the inlet and outlet for external power.
Unscrew the retainer rings from the back of the factory connectors (left hand threads) and pull out the factory connectors. You are left with this:
EmptyHousings.jpg
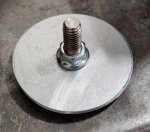
The basic idea is to cut aluminum discs to fit the upper shoulder, then be able to screw the retaining ring back down to hold it tight. I rough cut out a circle and drilled hole in the center, used a bolt, chucked it in the drill, spun against the belt sander while it was running until I sanded it down just enough to fit.
SandingDiscs.jpg
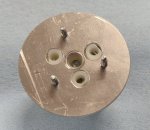
I used a standard 30 amp twist lock plug to create the inlet. The front portion of the connector mounts against the disc, and I cut down the back shell so that it would screw up against the other side of the disc. So the disc is sandwiched in the center.
Connector_Step1.jpgConnector_Step2.jpgConnector_Step3.jpgConnector_Step4.jpgConnector_Step5.jpg

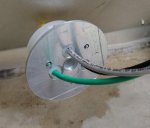
And the finished result:
ConnectorsMountedInside.jpg ConnectorsMountedOutside.jpg

So now I have a standard RV power cord with a twist lock on one end for power in, and a separate dedicated 20 amp breaker for the power back out. That way I can hook up stuff outside of the enclosure. My long term goal is to have a large 120v inverter mounted inside, and that way I can toggle the two main breakers in the panel between external/shore power and internal/inverter power.
 

INFChief

Well-known member
722
1,348
93
Location
New York
I've been steadily working on the enclosure and the truck here and there. I have installed a diesel parking heater and it works great! I'll post pics later once I finish up the wiring for it. I have also installed a driver's side antenna mount and just need to paint that. For the 120v electrical, I have installed the new panel and custom fitted power inlet and outlet into the existing connector shells on the outside of the enclosure. This way I keep the original look, but can easily hook up to a campground or my generator.

Here's how I mounted the inlet and outlet for external power.
Unscrew the retainer rings from the back of the factory connectors (left hand threads) and pull out the factory connectors. You are left with this:
View attachment 863765
The basic idea is to cut aluminum discs to fit the upper shoulder, then be able to screw the retaining ring back down to hold it tight. I rough cut out a circle and drilled hole in the center, used a bolt, chucked it in the drill, spun against the belt sander while it was running until I sanded it down just enough to fit.
View attachment 863788
I used a standard 30 amp twist lock plug to create the inlet. The front portion of the connector mounts against the disc, and I cut down the back shell so that it would screw up against the other side of the disc. So the disc is sandwiched in the center.
View attachment 863789View attachment 863790View attachment 863791View attachment 863792View attachment 863793

And the finished result:
View attachment 863794 View attachment 863795

So now I have a standard RV power cord with a twist lock on one end for power in, and a separate dedicated 20 amp breaker for the power back out. That way I can hook up stuff outside of the enclosure. My long term goal is to have a large 120v inverter mounted inside, and that way I can toggle the two main breakers in the panel between external/shore power and internal/inverter power.
Pretty slick! I like trying to keep things looking as original as possible too.
 

Third From Texas

Well-known member
2,766
6,498
113
Location
Corpus Christi Texas
Sadly mine has the small windows (2 on each side) and so the wall plates were mounted flush to the wall like the floor and provided no such advantage for me. So they gone. Along with that ridiculously oversized breaker panel and next I'm removing the shore power connection box. At most I will need an extension cord and that's not going to require a 14x14x6 box. LoL. I haven't decided if I will delete the fluorescent lighting enclosures entirely - need to do more research on alternative T8 LED bulbs and if I can find some that operate on DC to make some use of some of them.

Yeah, I covet the big windows. But I'd only want the four (the 5th one would interfere with my shower). I may come back later and do larger windows on one side. I keep reminding myself that I don't spend that much time in the hab when I camping (cooking and sleeping is about it). So improving the view has limited return on investment. ;)

The very first thing I did was gut the monolith 208 breaker box and rebuild it for standard 120/240 only. I planed on tearing it out and replacing it with a lunchbox-sized panel, but the way my design ended up I don't gain all that much usable space with the delete, so I'm pondering leaving it as is (another thing I can swap out later if I really need). I set up a 50a shore power connect but after lugging 100lbs of 50a RV cable around I'm going to sell my cable and step down to a shorter 30a (I'll never need 50a in the actual hab).

I converted the lighting to AC LED bulbs and used that configuration for two years while I camped and tested various floorplans. Was a super easy conversion (just deleted the ballast and followed the instructions). But I've already deleted one side now and the other is coming down as soon as I build my overhead cabinets (which will hose the new lighting system. The fixtures are glued on pretty good and as a result tearing them out cracked the housings in a few places but I'm re-tasking the fixtures for garage lighting. :)
 

Oxyacetylene

Active member
Steel Soldiers Supporter
518
179
43
Location
Stoneville, NC
Yeah, I covet the big windows. But I'd only want the four (the 5th one would interfere with my shower). I may come back later and do larger windows on one side. I keep reminding myself that I don't spend that much time in the hab when I camping (cooking and sleeping is about it). So improving the view has limited return on investment. ;)

The very first thing I did was gut the monolith 208 breaker box and rebuild it for standard 120/240 only. I planed on tearing it out and replacing it with a lunchbox-sized panel, but the way my design ended up I don't gain all that much usable space with the delete, so I'm pondering leaving it as is (another thing I can swap out later if I really need). I set up a 50a shore power connect but after lugging 100lbs of 50a RV cable around I'm going to sell my cable and step down to a shorter 30a (I'll never need 50a in the actual hab).

I converted the lighting to AC LED bulbs and used that configuration for two years while I camped and tested various floorplans. Was a super easy conversion (just deleted the ballast and followed the instructions). But I've already deleted one side now and the other is coming down as soon as I build my overhead cabinets (which will hose the new lighting system. The fixtures are glued on pretty good and as a result tearing them out cracked the housings in a few places but I'm re-tasking the fixtures for garage lighting. :)
Nice! I removed the 208 panel entirely, partly because it was so corroded. The small panel that I used is a Square D generator panel. Mine is wired now as 30 amp 120v. I rewired the receptacles inside onto just two circuits (left and right) instead of three circcuits (fronts, middles, rears) like they were. Sometime soon I hope to start working on a 12v panel to bring those things together. The lights on the ceiling have been removed and I am waiting on LED strip lights to arrive. I plan to put one strip down each side like the original lights were positioned. I'm anxious to get the LED strip lights and see how they work. The ones that I ordered are RGB, but also have separate dedicated neutral white LED's.
 

chucky

Well-known member
Steel Soldiers Supporter
6,622
18,961
113
Location
TN .
Yeah, I covet the big windows. But I'd only want the four (the 5th one would interfere with my shower). I may come back later and do larger windows on one side. I keep reminding myself that I don't spend that much time in the hab when I camping (cooking and sleeping is about it). So improving the view has limited return on investment. ;)

The very first thing I did was gut the monolith 208 breaker box and rebuild it for standard 120/240 only. I planed on tearing it out and replacing it with a lunchbox-sized panel, but the way my design ended up I don't gain all that much usable space with the delete, so I'm pondering leaving it as is (another thing I can swap out later if I really need). I set up a 50a shore power connect but after lugging 100lbs of 50a RV cable around I'm going to sell my cable and step down to a shorter 30a (I'll never need 50a in the actual hab).

I converted the lighting to AC LED bulbs and used that configuration for two years while I camped and tested various floorplans. Was a super easy conversion (just deleted the ballast and followed the instructions). But I've already deleted one side now and the other is coming down as soon as I build my overhead cabinets (which will hose the new lighting system. The fixtures are glued on pretty good and as a result tearing them out cracked the housings in a few places but I'm re-tasking the fixtures for garage lighting. :)
I assume your using S,O, cable because you said it was heavy ! How long is your shore chord ? If its long like 50 ft or over it might pay you to keep it the longer it gets you need heavier wire cause you will loose some amps in a long run . We would use 6/4 on 80 ft shore chord in S.o. but you just needing 110 in your panel you could use 6/3 . If you were staying below a 50 ft run use 8/3 so
 

Third From Texas

Well-known member
2,766
6,498
113
Location
Corpus Christi Texas
I assume your using S,O, cable because you said it was heavy ! How long is your shore chord ? If its long like 50 ft or over it might pay you to keep it the longer it gets you need heavier wire cause you will loose some amps in a long run . We would use 6/4 on 80 ft shore chord in S.o. but you just needing 110 in your panel you could use 6/3 . If you were staying below a 50 ft run use 8/3 so
Yeah, it's a 50-footer 6/3 8/1 I think. I only use it to land the spare genset on the trailer (my diesel genset is off the truck but will be hardwired). I'm only pulling 120v to the hab. It's just overkill and way too heavy and bulky to lug around/stow. I can easily drop to a 30" 30a cord for my needs.

I can always get closer to an outlet if I need. My truck can crawl/plow thru most anything at a campsite of friend's yard...

;)
 
Top
AdBlock Detected

We get it, advertisements are annoying!

Sure, ad-blocking software does a great job at blocking ads, but it also blocks useful features of our website like our supporting vendors. Their ads help keep Steel Soldiers going. Please consider disabling your ad blockers for the site. Thanks!

I've Disabled AdBlock
No Thanks