• Steel Soldiers now has a few new forums, read more about it at: New Munitions Forums!

  • Microsoft MSN, Live, Hotmail, Outlook email users may not be receiving emails. We are working to resolve this issue. Please add support@steelsoldiers.com to your trusted contacts.

M1078A1 cab and chassis electrical upgrades including AC

hike

—realizing each day
Steel Soldiers Supporter
540
854
93
Location
Texas Hill Country
Naw you need CAT ET to perform the injection pressure tests, etc. The generic scan tools and software generally don't understand the HEUI system and special tests you can run.
I have been wanting to add CAT ET to the mix and learn more about all the bits and pieces in that diagnostic kit you and @Lostchain suggested we pickup—
 

Ronmar

Well-known member
3,933
7,623
113
Location
Port angeles wa
3116 is a mechanical injection pump with the lift pump on the back of the head. 3126b and C7 have HEUI injection pumps with the lift pump driven off the back of the HEUI pump so the lines are going to be totally different length, etc. Not sure about fitting sizes but there's also a difference in engine displacement, and fuel pressure since the HEUI engines don't operate with high pressure fuel from an injection pump - they use high pressure oil instead.

So I wouldn't assume any of that is correct for an electronic engine. Measure everything before you order part numbers off a random internet spreadsheet.
The 3116 lift pump is in the governor like the HEUI. from what I have observed I think they use the same basic lift fuel lines. One ~6' from tank to primer/primary water separator and filter. A second ~2' line from primary filter to governor/HEUI lift pump inlet port, all JIC6 female fittings. Where they differ is that the HEUI engines have the pressure regulator at the rear of the head and return from there, so perhaps ~5-6' return hose to tank(also JIC6 female)?. The 3116 has the fuel pressure regulator at the front, so the return line runs from there back past the primary filter to the tank, ~6-7'
 

ckouba

Well-known member
Steel Soldiers Supporter
624
1,779
93
Location
Oregon
I have been wanting to add CAT ET to the mix and learn more about all the bits and pieces in that diagnostic kit you and @Lostchain suggested we pickup—
I did pick up my own kit of stuff and a laptop to run it. They both ride in the cab, easily accessible. While I have only used the DPG interface and one cable from the whole box (there's a TON of stuff in the kit), it has way more than paid for itself (I think it was $500 for the kit and $300 for the laptop). The ability to plug in and check things out in the back country was invaluable. Think of it as an investment of one trip to a CAT shop, paid for in advance, allowing you to resolve basic issues extremely easily and have informed conversations with motor techs when dealing with complex ones.
 
Last edited:

hike

—realizing each day
Steel Soldiers Supporter
540
854
93
Location
Texas Hill Country
I did pick up my own kit of stuff and a laptop to run it. They both ride in the cab, easily accessible. While I have only used the DPG interface and one cable from the whole box (there's a TON of stuff in the kit), it has way more than paid for itself (I think it was $500 for the kit and $300 for the laptop). The ability to plug in and check things out in the back country was in valuable. Think of it as an investment of one trip to a CAT shop, paid for in advance, allowing you to resolve basic issues extremely easily and have informed conversations with motor techs when dealing with complex ones.
So, you have CAT ET software?
 

coachgeo

Well-known member
5,155
3,471
113
Location
North of Cincy OH
3116 is a mechanical injection pump with the lift pump on the back of the head. 3126b and C7 have HEUI injection pumps with the lift pump driven off the back of the HEUI pump so the lines are going to be totally different length, etc. Not sure about fitting sizes but there's also a difference in engine displacement, and fuel pressure since the HEUI engines don't operate with high pressure fuel from an injection pump - they use high pressure oil instead.

So I wouldn't assume any of that is correct for an electronic engine. Measure everything before you order part numbers off a random internet spreadsheet.
Much of this sheet is done by @simp5782, though others help with it now too and it is continually updated based on reports from here in SS. There is no hose lengths on the spread sheet only part numbers for bulk to cut to length.... Fitting and hose are for converting to more modern Push Lock and NOT for direct OEM replacement.

Doing some searching appears OEM is: end of a hose using JIC6 at hose side- and at fitting into engine part's side is NPTF thread. If that is correct then would not the push lock part numbers shown logically work? (and heck of a lot easier for citizen owned FMTV users to work with)?

@Ronmar above points out it appears to him 3116/3126/C7 are same (JIC6) Hopefully one more person; also in a "bit of know" will throw their knowledge in the hat. That will assist in getting the sheet updated.

PS- Looks like the fuel solenoid info got updated already.
 
Last edited:

Ronmar

Well-known member
3,933
7,623
113
Location
Port angeles wa
Yea the pics I have seen and the few I have had my hands on have JIC6 fittings on the primary filter and on the outlet port on the pressure reg at the back of the cylinder head. Don’t recall if I have ever had my hands on the lift pump inlet port and don’t recall seeing a pic of it, but I suspect it is also JIC6
 

hike

—realizing each day
Steel Soldiers Supporter
540
854
93
Location
Texas Hill Country
This morning we took her for another run. 46ºF morning looking for the IAH to cycle on and off after startup. Then to merge up to speed on the interstate. Remember we have EcoHubs and have yet to reprogram the speedometer.

video of start up and merging on to interstate updated link to correct video

Changing the fuel filters seems to have been our fuel issue, for now—
 
Last edited:

MatthewWBailey

Well-known member
Steel Soldiers Supporter
907
1,671
93
Location
Mesa Colorado
This morning we took her for another run. 46ºF morning looking for the IAH to cycle on and off after startup. Then to merge up to speed on the interstate. Remember we have EcoHubs and have yet to reprogram the speedometer.

video of start up and merging on to interstate updated link to correct video

Changing the fuel filters seems to have been our fuel issue, for now—
How many miles on the odo? Couldn't read but it looks like 94k?
 

MatthewWBailey

Well-known member
Steel Soldiers Supporter
907
1,671
93
Location
Mesa Colorado
24, almost 25,000–
I'm at 13k, keeping an eye on the troubles that may be coming. I'm doing the full gambit of Amsoil bypass filter, IFS high psi filter and HEUI pre filter. I'll be taking the fuel lines to my hydraulic shop to just have new ones made to order as General suggested. PM wars
 

hike

—realizing each day
Steel Soldiers Supporter
540
854
93
Location
Texas Hill Country
I'm at 13k, keeping an eye on the troubles that may be coming. I'm doing the full gambit of Amsoil bypass filter, IFS high psi filter and HEUI pre filter. I'll be taking the fuel lines to my hydraulic shop to just have new ones made to order as General suggested. PM wars
I understand.

We posted this here because at first we weren't sure if we had missed a circuit in the IAH system. Maintaining the fuel and oil systems with frequent filter changes and fluid replacement is critical to staying ahead of potential issues.

When we owned a number of big yellow Caterpillars years ago we did fluid sampling and it helped us avoid significant down times. Still thinking through our plan for our new adventure—
 
Last edited:

hike

—realizing each day
Steel Soldiers Supporter
540
854
93
Location
Texas Hill Country
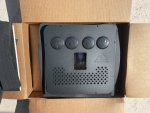
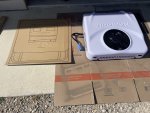
We added the second in series battery bank controlled by the Victron Cyrix-ct 230a combiner a couple of weeks ago. Getting ready for the AC installation. Opened up the AC from Nomadic, their 24v X3 rooftop unit.

IMG_4391.jpeg

IMG_4390.jpeg

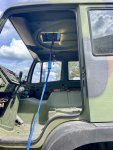
Right in the beginning the installation manual says to bench test before installing. I don't have a big enough bench available right now so we went ahead to cutting the hole and set it in place to bench test her right there. I am planning to add a new cross member from side to side right behind the AC to stiffen the roof disk and carry the ceiling panel. I am impressed how stout the roof disk is though. It still carries mine and the AC's weight solidly as is, still will be adding cross member.

IMG_4392.jpeg

She fired right up, Nomadic ships the X3 with 600g+/- R134a, and blows cold. I was expecting we would be passing power out the back wall and up the outside though everything is within the return air plenum. That will go right to the back wall where we are adding a 2nd Victron 24/12v 70a coverter, 24v/12v fuse block, 60a bus bar and fuse dedicated to the AC, and a 1000w pure sine wave DC/AC converter,

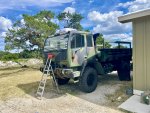
Really looking forward to seeing how well she works on the road. We are planning to paint the cab from the bottom of the windows up bright white, what should we paint the lower half? I have been suggesting that old US Forestry pale green the Forest Service used to use back in the 60's, though Jule is not convinced.

IMG_4393.jpeg

We need to insulate and finish up the panels before finishing the AC install, but the bench test has us looking forward to buttoning everything up—

@MatthewWBailey
 

MatthewWBailey

Well-known member
Steel Soldiers Supporter
907
1,671
93
Location
Mesa Colorado
re adding a 2nd Victron 24/12v 70a coverter, 24v/12v fuse block, 60a bus bar and fuse dedicated to the AC, and a 1000w pure sine wave DC/AC converter,
You need a proper DC wiring schematic for all that! Send me the sketch and I'll draw it up in CAD, add it to the back of your TM's.

I wondered how strong that turret blank is. A couple stiffeners should keep it from flexing. Doesn't the roof itself have to hold ~300lbs for the turret ring and machine gun?

Are you painting the interior white? I assume.
 

GeneralDisorder

Well-known member
Steel Soldiers Supporter
2,124
5,407
113
Location
Portland, OR
Nice! I'm curious to see how that performs.

I'm considering painting the roof of my cab in desert tan but stopping about 2" from the edges all the way around so I can keep my 383 OD green plans for the rest of the truck. Won't be able to see it from the ground anyway. Could do white but I can't bring myself to do white - gets dirty much too easy. Desert tan is fairly close in terms of thermals.

The sides are mostly glass - the ceramic tint does a fantastic job.
 

hike

—realizing each day
Steel Soldiers Supporter
540
854
93
Location
Texas Hill Country
You need a proper DC wiring schematic for all that! Send me the sketch and I'll draw it up in CAD, add it to the back of your TM's.

I wondered how strong that turret blank is. A couple stiffeners should keep it from flexing. Doesn't the roof itself have to hold ~300lbs for the turret ring and machine gun?

Are you painting the interior white? I assume.
Started the sketch in post 19. Time to update and I like your version editing the schematic version to be truck specific.

Painting the main interior what Rusto-Oleum calls Dark Taupe with .

IMG_3821.jpeg

My interior designer is still looking for carpet.

The exterior upper will be Bright White (old Land Cruiser scheme); still working on lower half. Frame and chassis plan is Black.
 

hike

—realizing each day
Steel Soldiers Supporter
540
854
93
Location
Texas Hill Country
Nice! I'm curious to see how that performs.

I'm considering painting the roof of my cab in desert tan but stopping about 2" from the edges all the way around so I can keep my 383 OD green plans for the rest of the truck. Won't be able to see it from the ground anyway. Could do white but I can't bring myself to do white - gets dirty much too easy. Desert tan is fairly close in terms of thermals.

The sides are mostly glass - the ceramic tint does a fantastic job.
We are hoping with all the insulation and carpeted panels the rooftop unit will keep us comfortable

We like the Bright White and old Land Cruiser paint scheme from the 80's—
 

MatthewWBailey

Well-known member
Steel Soldiers Supporter
907
1,671
93
Location
Mesa Colorado
REVISED Schematic concept 1.3

Corrected (hopefully) wiring for
1– existing manual disconnect next to battery box;
2– deleted LBCD controlled remote disconnect next to battery box.

Still working on best connections for
a– wire 1471 (TL507) wire from 24vbattery side of LBCD to IAH solenoid;
b– wire 1853 from LBCD "B" voltage sensor for dash warning light;
c– wire 1005 from LBCD controlled disconnect "D" to remote disconnect and start (left knee switch and engine bay switches);
d– add a manual disconnect switch between second battery bank and battery protect.

View attachment 916175

Thank you to @Ronmar @GeneralDisorder @Keith Knight @aw113sgte I am learning so much from you all here and in other threads–
I remember. I'll take this and draw it up in standard electrical fashion. You'll have to review/edit prior to permit submission 😂.
 
Top
AdBlock Detected

We get it, advertisements are annoying!

Sure, ad-blocking software does a great job at blocking ads, but it also blocks useful features of our website like our supporting vendors. Their ads help keep Steel Soldiers going. Please consider disabling your ad blockers for the site. Thanks!

I've Disabled AdBlock
No Thanks