• Steel Soldiers now has a few new forums, read more about it at: New Munitions Forums!

  • Microsoft MSN, Live, Hotmail, Outlook email users may not be receiving emails. We are working to resolve this issue. Please add support@steelsoldiers.com to your trusted contacts.

M135 S and M Build

gentrysgarage

Active member
553
118
43
Location
Lost Angels, CA
Actually I was trying to be Neil Armstrong and launch my lunar module (cab) off the deck of mobile Apollo launch pad (M135 frame) but if misfired and just fell over backwards! LOL!
 

m1010plowboy

Well-known member
Steel Soldiers Supporter
3,912
2,724
83
Location
Edmonton, Canada
What's that big rectangle thing sitting on top of the 302. Looks like she's Cummin along!

I just moved the M211 into Duramax project with a man that also has some mad fabrication skills. We're looking forward to those engine mount recipes and photos so we can see how it's done. Nice progress.
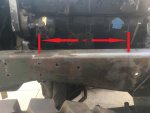
 

gentrysgarage

Active member
553
118
43
Location
Lost Angels, CA
What's that big rectangle thing sitting on top of the 302. Looks like she's Cummin along!
I just moved the M211 into Duramax project with a man that also has some mad fabrication skills. We're looking forward to those engine mount recipes and photos so we can see how it's done. Nice progress.
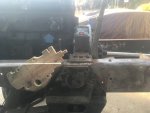
If I had to do it again, I WOULD source a 6.5 turbocharged with mechanical injection...having to change alot for the Cummins and the LARGE SAE2 flywheel housing adapter...I fully understand why Uncle Stude and Aunt Reo went with that weird SAE 2 1/2'ish flywheel housing!

There is a guy that runs the Facebook M135/211 group that has already Duramax'ed out his G749 I think his last name is Barrow, I'd pick his brain.

As far as my rear mounts go all that has been finalized is the bolt spacing of the flywheel housing and that the crank centerline has to drop further in the rear.
 

gentrysgarage

Active member
553
118
43
Location
Lost Angels, CA
Shot another video today Layout and planning strategies and using what you have on hand...pictures at 11 er tomorrow er the end of the week...OK, OK its when ever I find the dang camera's battery charger and edit the video! LOL!

Planning the rear motor mount is a bear!

Here are 2 teaser shots with pedals (not gonna be easy to keep the floor pedals) and a SUPER RARE world's lightest weight Ross HF54 power steering head.


1582519594244.jpeg1582519594861.jpeg
 

gentrysgarage

Active member
553
118
43
Location
Lost Angels, CA
Hey, I'm just a landscaper and certainly don't know a lot about mechanical. .......but if you're going to use wood for a power steering box, go with a hard wood like Oak.
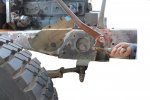
HiYa Plowboy,
It's lightweight lightweight I am trying to put the deuce on the summer bikini bod diet.....LOL!

What ever happened to the reply title lines...are they hidden somewhere? It would be nice if they were still around.

I had M35 front springs shackles and perches lined up from a (turns out a shady) person off of facebook marketplace. He said he would contact me when they were off, I checked back with him every couple of weeks till he pretty much said yer bothering me kid I will let you know. So weeks go by no word. Ad resufaces in my feed and has the springs listed T. W. I message him and ask him what T.W means. he says that's the guy I sold them to's initials...but if you want to offer me more I'll think about it. So if T.W. is reading this get the springs, perches and shackles from this guy before he sells them out from under you! Buuuttttt there is a silver lining to this story. I was pissed needless to say, so I hit the internet with a fury, searchtempest, eBay Facebook and emailed everyone parting or had parts for a M35. Only got a few responces...but one of them was the GOLD! Big Mike came through for me and will be cutting them off a deuce that had sunk so far into the mud before he got it that the split rims were completely toast and there was rust BETWEEN the springs! He said "I got this truck just for you it seems!" Thanks Big Mike!

So I am gonna concentrate on getting that video out. Planning engine mounting design (won't finalize till I get the perches though). Trying to find the front motor mount yoke that Jeepsinker used...I really didn't pay attention to the mount i have but it has slots which given the Fords used those round pin mounts in the rear isn't that big of a deal but I see many mangled radiators if I continue down that path. Anybody got one? And finally work on priming and painting the frame till Big Mike's care package arrives and then it's back to pounding the Exceedren bottle...er brainstorming rear mount design.

So if you've read this far I will reward you (LOL!) with a few pics!

IMG_0909 trimed.1plus meas.jpgIMG_0903.JPG

IMG_0898.JPG
This is the mount I am looking for Cummins 3918995
1582760775438.jpeg
 
Last edited:

gentrysgarage

Active member
553
118
43
Location
Lost Angels, CA
My Big Mike care package arrived.!!.....and just for you guys that know how powerful/Great?BIG and convienient a USPS flat rate box....when was the last time you saw a deuce suspension in a box?

IMG_2818.JPG

I built something yesterday and if I knew were the Team G749 t shirts were I' WOULD have offered a medium (only size left) t shirt to whoever would guess what I have rigged up...so just a virtual Cupi doll to the winner!

IMG_2817.JPG

Good Luck Guyz!
 
Last edited:

gentrysgarage

Active member
553
118
43
Location
Lost Angels, CA
Well the Big Mike's shackles came out after spending 2 days in the vinegar bath. Man so easy! And I am amazed at how light they are makes the M105 trailer perches seem like overkill!
Before and after (the light brown is flash rust from washing/scrubbing the vinegar off)


IMG_2820.JPGIMG_2824.JPG


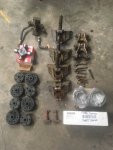
Dealt with ALOT of good people on the internet and ebay this past couple of weeks and 2 jerks, but these are the parts that have rolled in this week...a great haul and a few more are in transit!


IMG_2827.JPG
 

m1010plowboy

Well-known member
Steel Soldiers Supporter
3,912
2,724
83
Location
Edmonton, Canada
I built something yesterday and if I knew were the Team G749 t shirts were I' WOULD have offered a medium (only size left) t shirt to whoever would guess what I have rigged up...so just a virtual Cupi doll to the winner!
I know exactly what that is but already have a shirt so can I just tag along? It's cool seeing the jigs and parts coming together. One bite at a time, take it apart, paint it, reassemble and drive.

The vinegar bath results are awesome. Keep paddling brother!
 

gentrysgarage

Active member
553
118
43
Location
Lost Angels, CA
I know exactly what that is but already have a shirt so can I just tag along? It's cool seeing the jigs and parts coming together. One bite at a time, take it apart, paint it, reassemble and drive.
The vinegar bath results are awesome. Keep paddling brother!
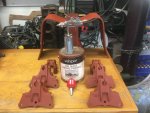
This time the prize is a virtual Cupi doll as I can't find the dang t-shirts.

I am becoming an expert at the doggie paddle!! One day I will graduate to the leaky canoe!
 

gentrysgarage

Active member
553
118
43
Location
Lost Angels, CA
Alright everybody, weekend report..Got alot done and even made it to church!

Got the 5 ton dual tank selector disassembled, I read in the other thread that they take a number __ and 24 orings, I am assuming these are generic numbers, but what rubber is best for diesel and what rubber should I specify if I want to a a FUTURE date try biofuel..or one that does both well? Thanks in Advance. Looks like it was brazed at one time I hope it is just discoloration...had ALOT of teflon tape

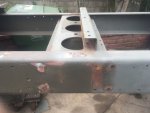
Ever since I dropped my Binks Model 7 (my FAV-OR-RITE gun of ALL Time!) and broke the spray adjustment (anybody have one?) I have been in need of a down and dirty easy to clean tractor of a spray gun for shooting stuff that is thicker than the water that they pass as paint these days. I tried all the Harbor Fright guns both cheapos and their top of the line stuff...even the pressure pot one ,that had been returned by someone painting yellow school buses and it was resealed and sold as new! All were REAL sensitive with the o-ring sealing and I hated them. Returned them all. Well except one and I have used this with every thing from House of Kolor Kandy (won't again but for a quick touchup it was ok) to red oxide primer. I used the Valspar Red Oxide oil based primer diluted a little less than 1/3 with acetone...and it sprayed like a champ. The KEWL thing is that I will not be buying spray can primer no more. I used about 1 1/2 paint cups to paint all this. The bumperets are from the rear frame I had bought from Red (that sadly did not work for repairing the G7123 Chevy COE frame) but most of the parts are being used! Thanks Red!


1583730915142.jpeg
 

gentrysgarage

Active member
553
118
43
Location
Lost Angels, CA
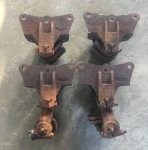
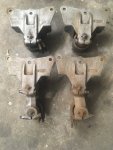
Lots happened, most of the story is going be in the video shot yesterday, hopefully it will edit easy like the last one. Special mention to the Master Sarge at a top secret High Desert Maintenance Sub Depot for the transfercase, mounts and a good bit of knowledge! 40 rivets later I have 3 Deuce crossmembers to choose from!
 

Attachments

gentrysgarage

Active member
553
118
43
Location
Lost Angels, CA
I can't believe I just spent 30 minutes typing a post added a picture and POOF everything I typed disappeared !:mad::mad::mad::mad::mad::mad:

Let's try this again..ding-ding round 2.

I need to figure out how I can, Tom Sawyer like, to convince the kids that removing rivets is like playing an ancient form of PacMan and keep my elbow aches from flaring up. 12 more rivets have bit the dust. Just need to be tapped out.

I am also changing the order of operations to make my life easier. I will be doing the front suspension first so as to not have the extra weight and obstructions of the transmission and transfercase hanging down in the way of the cribbing when I do the front suspension. Plus I only need to move the trans and transfer case once.

I pestered Jeepsinker on his mounting angle and crank centerline height, not realizing like I do now, that the crank and trans/transfercase shaft centerline is higher on the M35 than the M135/211. I hope he forgives me.

With the change to the Rockwell 136-27 my life got a TON easier! once I get placement fore and aft of the transfercase. By using the M35 crossmembers and mounts (might have to angle it up slightly if the axle pinion is to different between the Rocks and HO110's). I have the refernce point I need for the crankshaft centerline and angle! SO MUCH EASIER!

I am Saving and editing this so I don't loose it...there was an icon on the top of the reply block that used to save draft and it is missing noww sooooo many edits for this post!IMG_2887.JPG
 
Last edited:

gentrysgarage

Active member
553
118
43
Location
Lost Angels, CA
I just replied to a thread on the other forum, I want to save what I wrote there, to help others contemplating hot-rodding their Deuces and G506s...plus it puts insight and reflection on this project:

What's the saying Been there Doing That...or Still living the Nightmare? Just kidding somewhat....LOL

You should subscribe to my thread M135 S & M build and my YouTube channel for someone wading in deep for highway speed and safety hot rodding. This was orignally meant to replace the chassis on my G-7123 COE, but the kids liked it toooo much so it got the green light for build up and the COE is left sulking in the garage till I have another frame for it (40+ years of hauling grapes and blow torch mechanics) will seriously pretzel a frame and the space in the driveway for said frame.

Here is a quick lesson on WWII mentality on these vehicles. In a nutshell they were disposable. They were never meant to come back nor last 70 years. They put the emphasis of metallurgy on the airplanes not these trucks. Heck I bet Foote still lists the replacement axle shafts for these to this day.

Thus since I needed another frame I sourced the younger brother the M135/211 for the frame and axles. They didn't have the wartime rationing of materials or the tempering ovens. Just stronger all round.

There are measurements in one of my videos comparing the GMC 302 (the upgraded 270 that was in the CCKW) to the Cummins 6BTA, but the stock radiator is thicker by far than the war-rationed G506...but it will give you a bassis.

Transfer case I feel there are two options;

1, Change out for the M135/211 again metalurgy and materials...heck even stock 235s can split those cases how much more a torquey 5.9?

2. Flop the front hogshead and shorten one of the axleshafts (I think the shorter one was stipulated in my research...haven't gotten that far to verify which one) and run a divorced NP 205. I have upgraded the 205 to a T-136-27 as I plan to work this old man of mine...but a fun occasionally used truck the 205 should be plenty strong.

Axle:

I have come to the conclusion that the next one I do I will go with a Brownie overdrive box as it took 2 years and over 1,000.00 with shipping for the discontinued and virtually unobtanium 5:43 ratios. Also the M135/211 has 27 spline axles and again better metalurgy READ STRONGER.

For safety and stopping power, I am doing a disc brake conversion on the front.

For the wife I am doing the power steering conversion.

Worth all this ...only time will tell. But once you start "upgrading" it is a snowball rolling downhill...getting bigger and bigger! But hey who doen't like a little challenge in life?
 

m1010plowboy

Well-known member
Steel Soldiers Supporter
3,912
2,724
83
Location
Edmonton, Canada
We built these for a while. Not necessarily the play structure but the site works. Drainage, base, concrete, trees, landscape, benches,.....and finally rubber.

DSCF1242.JPG

We always had deadlines but we also had a blueprint. What amazes me about guys like you who tackle a project with a foreseeable result is the missing blueprint. You may have a vision of how all the components operate once they're done, what color things will be, all the details for a finished project. The path to get there isn't always clear so seeing how someone else clears the way.....very beneficial. Thank you.

Get er' done!
 

gentrysgarage

Active member
553
118
43
Location
Lost Angels, CA
HiYa Plowboy,
That's a KEWL playground! I would love to test out the different apparatus...but I think my body would be the one to fail the stress test!
As for how I am able to muddle my way through these projects is I approach and PLAN a project from 3 sides and the execution there of, as follows:


  1. Anyone you meet can teach you something if you listen long enough...even if it is just patience! I know I don't have all the answers and just like you will miss every basket you don't shoot for, you will not get an answer for any question you don't ask or pursue...as my Grandpa said a closed mouth isn't fed (we were talking about buying and selling but it fits here also.I have been wrenching on other peoples vehicles (who had some money) since I was 14 (except for one 10 year or so span I walked away from the wrenches). So it has given me ALOT of experience and knowledge. So all these things have helped me learn and grow.
  2. Budget, its not much so I research the heck out of all the alternative paths I can take, evaluate how important the area in question is in the scheme of things...but generally the ranking system is as follows from most important to least: 1. Safety Brakes and Stability is number one and will not spare the expenses on this section and is usually the first thing planned out. 2. Maintenance and durability, build it once and don't touch it again except for changing consumables and wear items (oil, u joints, brake pads etc), but if something needs to be changed out don't put it together in such a way as to need a blow torch to cut it out. Thus was the reason the decision was made to upgrade the transfercase, Its a matter of weighing options its better to pay now than later and spend time doing it again...measure twice (or thrice) cut once and if you don't do it right the first time, you will spend the time doing it again. Time is more precious than gold. A sub statement here is that I try to incorporate anything I have lying aroung,,,I pratice the teachings of Big Daddy Roth's gospel when he said (and I paraphrase here) "I build a pile o' parts yeah high, build the car and when the parts get to about here(ankle/lower shin area) I build the pile again...wash rinse repeat!" 3. LOOKS...while I have to care about the looks here in Cali to avoid even more attention from the powers to be (as if driving a military vehicle doesn't garner enough..LOL!) this is were I value engineer and aside from keeping it from rusting more I swipe my hands a couple of times and declare dishes are done!
  3. WING IT! In the past my HADD and OCD nearly deadlocked me on my own vehicles. While the customers/bosses/friends cars made an orderly and steady path from junk heap to shiny cars, mine never got past fast and then safe (younger days fast was first, only by the grace of God that I lived through it and changed my Hell bent ways). If I see I am getting hung up with one thing, I will leave it and work on another part of the truck (or another project) and once the the mental anguish/gridlock has subsided I return to finish the part or area.
 
Last edited:

gentrysgarage

Active member
553
118
43
Location
Lost Angels, CA
Part 2 (Cause I couldn't figure out how to get out of the ordered list format LOL!)

Well that turned out to be alot of idiums/quotes. but this is where I came from and how I do things. It might not be best way or the fastest. But this is how I build things now. I hope it helps the readers following this build so they can apply it to their deuce or even Vega (hopefully a V8 or Cosworth Vega LOL!) PS I draw the line at Chevettes and Yugos...you guys are too far gone! LOL!

Oh and I dropped a short YouTube update and coming attractions video for your viewing pleasure! Enjoy the Wuhan Quarenteen Edition of gentrysgarage!
https://youtu.be/jqll707du5k
 
Top