• Steel Soldiers now has a few new forums, read more about it at: New Munitions Forums!

  • Microsoft MSN, Live, Hotmail, Outlook email users may not be receiving emails. We are working to resolve this issue. Please add support@steelsoldiers.com to your trusted contacts.

M35A3 Rim Restoration and Tire Swap Project (Picture-Heavy)

HDN

Well-known member
2,127
5,128
113
Location
Finger Lakes Region, NY
I used a 4000 psi pressure washer with a very small orifice nozzle on my wheels, followed by a brillo pad and sandpaper, prior to painting.
I just got a 1700 psi peak pressure washer from Harbor Freight. It came with a detergent sprayer too, so I sprayed a Dawn mix on everything to degrease then turned the pressure all the way up. It got the GAA right off the inside of the rim, so that was easier than using a rag and drill brush! However, the hardest thing to get off were the stupid Gypsy Moth caterpillar nests!

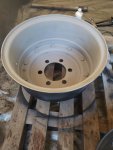
For painting the rim this time, I set it upside down instead of on its side, which made spray paint coverage a lot more uniform than before. My only concern is resting it on the studs, but they're supposed to hold the clamp ring on at ridiculously high torque, so they shouldn't pop out of the ~60 lb rim easily, right?
20210811_194943.jpg
 

Mullaney

Well-known member
Steel Soldiers Supporter
Supporting Vendor
7,774
19,893
113
Location
Charlotte NC
I just got a 1700 psi peak pressure washer from Harbor Freight. It came with a detergent sprayer too, so I sprayed a Dawn mix on everything to degrease then turned the pressure all the way up. It got the GAA right off the inside of the rim, so that was easier than using a rag and drill brush! However, the hardest thing to get off were the stupid Gypsy Moth caterpillar nests!

For painting the rim this time, I set it upside down instead of on its side, which made spray paint coverage a lot more uniform than before. My only concern is resting it on the studs, but they're supposed to hold the clamp ring on at ridiculously high torque, so they shouldn't pop out of the ~60 lb rim easily, right?

View attachment 842182
.
The only one I have taken apart had one broken stud.
Had to hit it pretty hard to knock it out to replace...

Looks nice! The detergent sprayer is nice. I don't have one of those, so I end with another weed sprayer that is marked for degreaser / dawn. More than likely you used a lot less. Couple of times, I end up with bubbles everywhere. But hey - If dawn will clean a duck - it shouldn't hurt anything else. Right?
 

HDN

Well-known member
2,127
5,128
113
Location
Finger Lakes Region, NY
When I'm done with this wheel I'm going to pause the project. It's been a huge time suck and has earned a place on the infamous "Honey don't!" list. Also, a couple tires I received have sidewall or bead damage, so I'm waiting for a reply from CSM to resolve that.

I'm not planning on doing anything that's going to require six wheel drive, so I should be okay with this wheel configuration for now. Come next spring and I'll probably pay someone to do the rest, with myself doing the de-rusting and painting as I get the time to do that.
 

Mullaney

Well-known member
Steel Soldiers Supporter
Supporting Vendor
7,774
19,893
113
Location
Charlotte NC
When I'm done with this wheel I'm going to pause the project. It's been a huge time suck and has earned a place on the infamous "Honey don't!" list. Also, a couple tires I received have sidewall or bead damage, so I'm waiting for a reply from CSM to resolve that.

I'm not planning on doing anything that's going to require six wheel drive, so I should be okay with this wheel configuration for now. Come next spring and I'll probably pay someone to do the rest, with myself doing the de-rusting and painting as I get the time to do that.
.
There is value to not dying on the job! It has been too hot an miserable around here to walk out across the parking lot. Hustling tires and rims in this heat is almost crazy. Maybe your "Honey Don't" is looking out for your best interest.

Hopefully the place you got the tires from will make them right.
 

HDN

Well-known member
2,127
5,128
113
Location
Finger Lakes Region, NY
Oh, my health isn't the issue. This is good exercise for me, even though I have no weight loss to show for it :rolleyes: So far it's taken all my free time to work on the wheels, free time that others feel should be spent elsewhere :p (They do have a point though sometimes!)

So it seems that I haven't been tightening the clamp rings down enough. One problem with this was found to be the torque multiplier. The 450 ft-lbs I calculated was not actually 450 ft-lbs, but more like 425 ft-lbs, which is at the low end of the torque range for these nuts and apparently not enough in my case. I tested the torque multiplier by assuming zero losses and by tightening a nut up to 150 ft-lbs. I then used my big Armstrong torque meter and measured the breakaway torque to loosen the nut and found it to be 120 ft-lbs. That means 20% of the torque is lost in the torque multiplier. Snap-on 60:1 torque multipliers, in comparison, have a 15% loss. Not bad for Chinese cast iron IMO. No loss value was published for this torque multiplier, so I had to do this to figure it out.

I took @glcaines advice and tightened the nuts down as far as they'd go with the 1/2" DeWalt impact I borrowed, then finished tightening with the torque multiplier. I didn't have to do much turning with the torque wrench on the multiplier to get to 450 ft-lbs, so the impact wrench was pretty spot-on. The distance between the top of the lock nuts and the end of the clamp ring studs is around 1-3/8", which is where they are on glcaine's non-leaking wheels as well as the ones on my truck I haven't touched yet.

I hope to air up this wheel tonight and see what happens! But I know that I won't know if it leaks for sure until I get truck weight on it!
 

Mullaney

Well-known member
Steel Soldiers Supporter
Supporting Vendor
7,774
19,893
113
Location
Charlotte NC
Oh, my health isn't the issue. This is good exercise for me, even though I have no weight loss to show for it :rolleyes: So far it's taken all my free time to work on the wheels, free time that others feel should be spent elsewhere :p (They do have a point though sometimes!)

So it seems that I haven't been tightening the clamp rings down enough. One problem with this was found to be the torque multiplier. The 450 ft-lbs I calculated was not actually 450 ft-lbs, but more like 425 ft-lbs, which is at the low end of the torque range for these nuts and apparently not enough in my case. I tested the torque multiplier by assuming zero losses and by tightening a nut up to 150 ft-lbs. I then used my big Armstrong torque meter and measured the breakaway torque to loosen the nut and found it to be 120 ft-lbs. That means 20% of the torque is lost in the torque multiplier. Snap-on 60:1 torque multipliers, in comparison, have a 15% loss. Not bad for Chinese cast iron IMO. No loss value was published for this torque multiplier, so I had to do this to figure it out.

I took @glcaines advice and tightened the nuts down as far as they'd go with the 1/2" DeWalt impact I borrowed, then finished tightening with the torque multiplier. I didn't have to do much turning with the torque wrench on the multiplier to get to 450 ft-lbs, so the impact wrench was pretty spot-on. The distance between the top of the lock nuts and the end of the clamp ring studs is around 1-3/8", which is where they are on glcaine's non-leaking wheels as well as the ones on my truck I haven't touched yet.

I hope to air up this wheel tonight and see what happens! But I know that I won't know if it leaks for sure until I get truck weight on it!
.
HDN , It really is odd how things work.

The book doesn't have that "how much thread is showing" value in the there anywhere.
A lot of how we all do things and the things we do are based on past experience.

Sometimes that experience can sure make you tired.
Sometimes more in the head than the back!

I am really happy to hear that you learned something that a bunch of us will eventually need to know!
 

HDN

Well-known member
2,127
5,128
113
Location
Finger Lakes Region, NY
The book doesn't have that "how much thread is showing" value in the there anywhere.
A lot of how we all do things and the things we do are based on past experience.
So I discovered a shortcoming with this - make sure your fasteners are the same height as the reference ones otherwise you might break stuff! The new ones I got from Big Mike's are about 1/4" taller than the ones that came with the truck, and I didn't realize it until I was far into the tightening process. I think I got lucky this time, though, as it doesn't look or feel like the clamp ring studs were deformed permanently.

Anyway, I think my air leak was the result of a hairline crack in a CTIS line compression fitting, specifically the collar. After I overtightened the clamp ring, I went to work piping in the CTIS wheel valve only to discover the compression fitting collar splitting wide open on one of the flats while tightening it. I have a feeling a very slow air leak was happening at this collar with the tire aired up, losing about 2.5 PSI a week.

This is the second failed brass fitting I've experienced with the CTIS hardware on this truck in three days. The other front wheel had a crack in one of the flats of the reducer fitting between the in-line filter and the line going to the CTIS valve. I get the feeling that AM General used the "cheap bin" brass on my truck's CTIS wheel components.

I think moving forward with this project, I am going to leave the CTIS components off the wheels. I didn't budget any parts to replace air fittings and lines for the CTIS wheel components, and don't want to mess with more leak-chasing than I have to right now. I'll take the Schrader valves off the CTIS valves and screw them into the wheel air pipe elbows through reducers, and put protective caps on the hollow wheel hub studs. That said, I will keep the CTIS parts for re-installation in the future as I want this truck to be mostly a restoration, just with bigger, easier-to-get tires :p But for now, I want to get this on the road for a car show or two before the end of the year!

I will keep the wheel covers on the wheels, though, as I like the look - it's one of the things that set the M35A3 apart from the other trucks! I learned that the wheel covers can be positioned on the rims such that the opening in them for the CTIS Schrader valve allows for accessibility for one installed at the wheel air pipe :)
 
Last edited:

HDN

Well-known member
2,127
5,128
113
Location
Finger Lakes Region, NY
Edited for stupid panic :p And some helpful information!

So I panicked over the Oatey 30219 90% Silicone Grease I used. The Lowe's website says it's petroleum-based, but I confirmed over the phone with an Oatey tech that this stuff is safe to use on rubber o-rings. The equivalent product on Oatey's website is Harvey 050090 Silicone Grease. If you try searching for Oatey 30219 on their website you won't find it - it's a Lowe's thing I guess!

That said, I did use this stuff on a rubber o-ring for a whole-house water filter and it didn't leak for the five years I lived there. I wasn't sure if I was just lucky, but it seems like this stuff is actually safe for rubber!

So crisis averted!
 
Last edited:

HDN

Well-known member
2,127
5,128
113
Location
Finger Lakes Region, NY
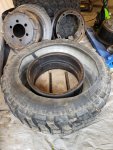
I'm on the tandem axle now, and things are moving a lot faster now that I'm using a good blade on my Ryobi Sawzall. To separate the bead from the clamp ring, I've found the flat end of a pick axe to be very useful, more so than the curved end of my big pry bar. I guess it's like a duckbill hammer?

With the mid driverside tire I cut a square in the sidewall and freed the air pipe nut and air pipe. I then flipped the wheel over onto two takeoff tires, applied tire soap to the gap between the rim and bead lock insert, and jumped on it until it popped out.

With the second wheel, I used the saw to cut out the side wall and pull the rim out. The bead lock insert was also super easy to remove with the sidewall gone. The tire bead was still on the rim snug, but it took about a minute to work off by hand.

Everything is pressure washed and ready to wire brush. Before painting this time I'm not using the Permatex rust converter because it's not durable enough for this application. When I removed the clamp ring from one of the finished wheels, I noticed that it and the paint were flaking off the contact surfaces between the rim and clamp ring. So it's just primer and paint moving forward.

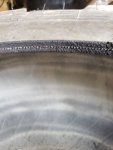
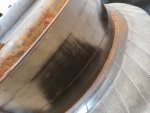
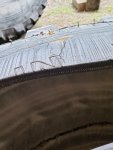
I have some pics of the tire I cut. If you look carefully you can see dry rot cracks going through to half the thickness of the 1/2" sidewall. No wonder the one tire that got a penetrating sidewall cut was so easily damaged! I have a pic showing how snug the bead fits against the rim. I guess this is the difference between MPT and NPT beads?
 

Attachments

HDN

Well-known member
2,127
5,128
113
Location
Finger Lakes Region, NY
Interesting..... I know what MPT stands for, but never heard of "NPT", related to tire bead styles...:?
Did you find that in a catalog for tires? ... Or wheels?
Maybe I'm getting myself confused with the bead types - NPT I've seen as "non-pneumatic tire", or what Google throws at me the most which is plumbing-related :p I guess it's just MPT or non-MPT? I'm not familiar with different types of tire beads. All I know is that Simp makes changing 5-ton super singles look easy with the tire practically falling out of the rim, but he mentioned it was because of a different bead design, which makes me jealous of course :)

What does MPT stand for?
 

Mullaney

Well-known member
Steel Soldiers Supporter
Supporting Vendor
7,774
19,893
113
Location
Charlotte NC
Maybe I'm getting myself confused with the bead types - NPT I've seen as "non-pneumatic tire", or what Google throws at me the most which is plumbing-related :p I guess it's just MPT or non-MPT? I'm not familiar with different types of tire beads. All I know is that Simp makes changing 5-ton super singles look easy with the tire practically falling out of the rim, but he mentioned it was because of a different bead design, which makes me jealous of course :)

What does MPT stand for?
.
It really IS amazing to watch somebody with a tire hammer (duckbill as you mentioned) and a bottle of soapy water.
Back in the days of old, our tire guy could hit a tire maybe three times to break it off the bead. Then flip it over and do it again...

Experience can't be bought.
It has to be earned.
 

Mullaney

Well-known member
Steel Soldiers Supporter
Supporting Vendor
7,774
19,893
113
Location
Charlotte NC
Well said! Although if I wanted to buy the experience I'd pay a tire shop to do the wheels :p

I was going to do that but I'm beyond that point now, mostly because I don't trust the old 14.5s at all on the road. At least I'll be able to say that I did it!
.
Agreed! And now you have that experience.
Makes it worth more when you carry a rim to the tire shop too!
 
  • Like
Reactions: HDN

HDN

Well-known member
2,127
5,128
113
Location
Finger Lakes Region, NY

HDN

Well-known member
2,127
5,128
113
Location
Finger Lakes Region, NY
I learned something when mounting a tire on the rim yesterday. I thought it might be a good idea to use a couple take-off tires to help force the rim up through the new 395 high enough to put the clamp ring on. I laid these two tires on the ground next to each other and flopped my new tire with the rim onto them where their tread was touching. Boy was I wrong! I found that I still had to use a few pieces of wood to further push the rim up through the tire and center it to mount the clamp ring.

Verdict? Do what I've been doing this whole time - flop the tire onto a stack of wood on a pallet and go from there. Make sure the back of the rim, whether it's the center or the edge, is sitting on the wood to force it up through the tire, otherwise you won't be able to center and mount the clamp ring (the studs aren't long enough!).
 

Mullaney

Well-known member
Steel Soldiers Supporter
Supporting Vendor
7,774
19,893
113
Location
Charlotte NC
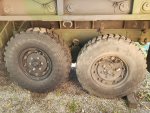
I'm half-way done! It's amazing how much difference 3" of diameter makes between these tires! 50 psi 395 next to 45 psi 14.5 (365).
.
Wow. That is a big difference - that you wouldn't normally see - without both tires side by side.
50% more work to be done.
 
Top
AdBlock Detected

We get it, advertisements are annoying!

Sure, ad-blocking software does a great job at blocking ads, but it also blocks useful features of our website like our supporting vendors. Their ads help keep Steel Soldiers going. Please consider disabling your ad blockers for the site. Thanks!

I've Disabled AdBlock
No Thanks