• Steel Soldiers now has a few new forums, read more about it at: New Munitions Forums!

  • Microsoft MSN, Live, Hotmail, Outlook email users may not be receiving emails. We are working to resolve this issue. Please add support@steelsoldiers.com to your trusted contacts.

M809 Series- Front axle work and what to expect

silverstate55

Unemployable
2,075
872
113
Location
UT
Great thread, just when I need it, but NOT ENOUGH PICTURES..
Driver side is the first I will tackle to check the breaks, no evidence of leaking seals. Will also replace the socks with zipped ones.

A few questions, because I am in the Czech Republic, and no US truck part suppliers near me. So I would like to reuse or leave the seals as is unless they leak.

- Can I remove the axle without draining the oil or will it run out?

- Are seals very specific M39 - M809 or is there a chance that any specialist in hydraulics or automotive supplier will have fitting seals in EUROPE?

- what is the best grease to pack the bearings with or will any old grease do?

- would it help save the seal if I only pulled the axle far enough to get the hub away from the brakes (balanced on a solid construction) but leave the axle in? Or is that a very bad idea?
Have you run the part numbers (available in the -34P Special Tools & Parts List) through your interwebs search engine? Sometimes when researching part numbers I come across a few European sites that specialize in US MVs, and show parts in stock. Unfortunately I can’t remember what they were as I didn’t order anything from them.

But then again if I mention the word “search” it tends to create a bigger argument than grease as AjaxMD mentioned above...:mrgreen:
 

Robo McDuff

In memorial Ron - 73M819
Steel Soldiers Supporter
2,892
1,519
113
Location
Czech Republic
Thanks for the suggestion. That is the 34P for the 809 series? I tried the M39 series, 34P does not seem to have a section for the axles at all
 

Ajax MD

Well-known member
1,569
1,414
113
Location
Mayo, MD
How much grease would you need for the bearings and replacing the axle boot?
For the bearings, it would take about a 1 lb. can.
For the axles, it depends. If you have the universal joint style axles, you can just grease the axle U-joints by hand without pumping a ton of grease into the steering knuckle (or at least that's what I've been told and read in the archives.) That would only be small amount of grease.

If you strictly adhere to the Army manual, it's something like 4 POUNDS of grease per side, into the steering knuckle. If I understand correctly, the grease fittings on the knuckle lubricate the king pins as well as the CV joint. Like I said, I have the older Bendix style CV joint which uses large, exposed ball bearings so I'm going to use a lot of grease. Filling the knuckle also displaces any water that might try to find it's way in.

If you look closely, you'll find 2 Allen-head screws at the end of the axle tube. (Scrub the end clean, so you can find them.) You're supposed to unscrew these and pump fresh grease into the knuckle until you see new grease ooze out of these holes. These screw holes act as vents so you don't blow the rubber boot off with too much grease.
 

Ajax MD

Well-known member
1,569
1,414
113
Location
Mayo, MD
I did some looking around and it does seem that the M39 series 5 tons and M809 series share a lot of parts. For example, the inner hub seal that keeps the inner wheel bearing in the brake drum is shared by both trucks:
NSN #:

5330-00-740-9550


Part #:

7979349, 7409550


but really, your parts manual is in the tech manuals section of the forum here: https://www.steelsoldiers.com/upload/809/TM9-2320-211-20P.pdf
Front axle is Group 10.
 

Robo McDuff

In memorial Ron - 73M819
Steel Soldiers Supporter
2,892
1,519
113
Location
Czech Republic
I checked the .. 20P for the M39 and the 809 series. The 809 TM is better and more detailed than the M39 one, no problem finding the stuff you mentioned there.
 

Ajax MD

Well-known member
1,569
1,414
113
Location
Mayo, MD
Quick greasing tip which I learned yesterday (and read about in the forum somewhere):

If you do decide to follow the tech manual and fill the knuckle with grease, It will take FOREVER to pump it in via the grease fittings on the top and bottom of the knuckle.
I shot one cartridge in at the top fitting, one cartridge in at the bottom fitting and then I pumped one cartridge into the vent hole on the "front" of the axle (allen screws I mentioned earlier) and the final cartridge I pumped into the vent hole on the rear side of the axle. Pumping the grease into the vent holes is MUCH faster.

A pound is 16 ounces. My cartridges were 14.5 ounces so I was just shy of 4 pounds of grease on just one side of the axle and it took all of it.

(Note to self: Buy pneumatic grease gun.)
 

Ajax MD

Well-known member
1,569
1,414
113
Location
Mayo, MD
Going through my old threads, found these references to the same job.

Just to help others looking at this, two earlier threads on this for the deuce and the five ton. The write-ups are great.

Deuce front axle

5-ton rear axle
Robo- THANKS for posting those links, especially the 5-ton rear axle link.
The 5-ton rear axle thread just answered nagging questions I had about whether the rear axles were "wet" or "grease" lubricated. The photos of the process highlighted the differences between the rear and steering axles. I knew about the cork keyway but there were other details that I was fuzzy on.

I do cringe a bit when I see folks hammer on those wheel bearing lock nuts with a hammer and chisel. :whistle:
 

Robo McDuff

In memorial Ron - 73M819
Steel Soldiers Supporter
2,892
1,519
113
Location
Czech Republic
If I see those threads I have to go lay down with a serious depression of working here alone, far away from help and cheap parts and ...
and ..

:cry: :oops::shrugs:

and then I seriously have to kick myself and

:grd:
 

Ajax MD

Well-known member
1,569
1,414
113
Location
Mayo, MD
If I see those threads I have to go lay down with a serious depression of working here alone, far away from help and cheap parts and ...
and ..

:cry: :oops::shrugs:

and then I seriously have to kick myself and

:grd:
I hear you on the "working alone" part. At least I have access to parts and materials.
I will say this- Buying the proper TOOLS greatly reduced the struggle and kept my morale high while doing the work.
 

Robo McDuff

In memorial Ron - 73M819
Steel Soldiers Supporter
2,892
1,519
113
Location
Czech Republic
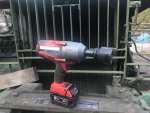
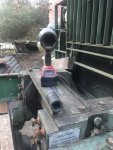
Thanks to advice of Kenny, I now have a brutal 1500 NM Milwaukee Power M18 Fuel cordless impact wrench, and thanks to Mike and Swamp Donkey, I also have the full set of power sockets including both wheel nut sockets: 6-edge and square.

Man, its just pure fun to remove bolts and nuts just for the heck of it.

IMG_7320_resize.JPGIMG_7322_resize.jpg
 

Ajax MD

Well-known member
1,569
1,414
113
Location
Mayo, MD
Wow, that thing is a beast. I (mostly) quit battery operated tools because the battery design and shape changes every year, making buying replacements a hassle.
I understand why people love cordless tools, though.

I use the military geared lug wrench and air-impact gun. I also carry a hose and gladhand to run tools from the truck air supply.
 

Robo McDuff

In memorial Ron - 73M819
Steel Soldiers Supporter
2,892
1,519
113
Location
Czech Republic
I saw Kenny busy with it at the 2014 GA Rally. After having to wait for a second person and then using 4 foot pipes as extra, and breaking tools, still without getting bolts free, I decided I needed one. But ... too expensive here: $ 870. Then I went to a tool day from one shop and the had several event sales. Could have spent an easy 2-month salary (Czech level) there on the sales. The M18 was going for $ 520 including case, two batteries and loader and some other things thrown in.

The bumper bolts left had taken me about 90 minutes to get free, after which I quit and went to the sale. With the M18, it took about 3 minutes. This one is stronger than most heavy air wrenches especially with the breakout power. My blacksmith son declared I was crazy, then borrowed the thing to bolt the new roof into his 60x24 feet workshop.
 

Ajax MD

Well-known member
1,569
1,414
113
Location
Mayo, MD
Ok, I'm in a bind and seek the wisdom of the Big Truck People.

I'm prepping to do the driver's side of the steering axle. I figured I'd start by breaking the lug nuts loose and remove the tire tomorrow, after tonight's rain.

I have ONE lug nut that absolutely will not let go. I've tried:

- 40" breaker bar and standard chrome socket. I weigh 240 and it just laughed at me.
- 5 foot breaker bar with the military geared lug wrench (of course, the geared part doesn't apply when using it on the front) I actually bent the solid bar that the tool comes with
- heat with a oxygen/mapp gas torch
- vibration with hammer

I did something potentially dangerous. I put the 40" breaker bar and socket on the nut and then put my 20 ton jack under it and cranked it up.
I stopped because I had visions of the apocalypse in my head... socket shattering, fragments blowing the tire, the breaker bar snapping, blowing up the tire, the lock ring blowing off the rim.

At present, I do NOT have a 1 1/2" impact socket but I also don't have an impact gun strong enough to get this nut free even if I did have the impact socket. No store has one in stock, I'd have to order it.

Give me some fresh, safe ideas, please.
 

Robo McDuff

In memorial Ron - 73M819
Steel Soldiers Supporter
2,892
1,519
113
Location
Czech Republic
When getting the bolts from the bumper free, we had two people, hardened power sockets and connectors, and a 6 foot and thick steel tube on it, one person making sure the wrench stayed in place and hammering on it, while the other was hanging on the tube. Still was a problem, and caused some minor injuries. That's when I decided I really needed that M18 impact wrench.

The first time the wheel nuts were released I had a truck tire repair company do it with very big and high power air hammers.

Some bolts even the M18 Impact Wrench has problems, and I already split two of the hardened special sockets, but in the end the bolts came free.

Maybe stupid remark, but did you check which direction the nuts move? I think the driver side nuts are counter normal direction.

Also, put lots of WD40 on it and let it sit 24 hours. Maybe even go back a few times, hit the nut, heat it (not too hard, just to shake the WD 40 in) and put next WD 40 on it.

Also try to tighten it and free it and etc etc; with the impact wrench it works. Even a weaker air gun might do the trick that way.

Standard chrome sockets: if you really put enough power on it they will split, which can cause you injury. Either use power sockets which can stand high pressure AND high vibration, or use the official wheel nut stick wrench or whatever they called that thing. Better wait for the power sockets than splitting a chrome one and losing your balance and ending up in hospital.

Whatever you do, be very careful.
 

Scrounger

Active member
496
66
28
Location
Southern, Maryland
Maybe stupid remark, but did you check which direction the nuts move? I think the driver side nuts are counter normal direction.

Do check the direction of the threads.
We had a truck that we could not get one of the lug nuts loose. I won’t go into the details other that to say thankfully there weren’t cameras around. Then the Chief Warrant Officer came and gave it another look. Well, don’t you know? Five of the studs were left hand and one was right. Sometime in the past someone hand installed the wrong part.

And a PM sent.
 

MyothersanM1

19K M1 Armor Crewman
Steel Soldiers Supporter
1,958
427
68
Location
Culver City, CA
Maybe stupid remark, but did you check which direction the nuts move? I think the driver side nuts are counter normal direction.

Do check the direction of the threads.
We had a truck that we could not get one of the lug nuts loose. I won’t go into the details other that to say thankfully there weren’t cameras around. Then the Chief Warrant Officer came and gave it another look. Well, don’t you know? Five of the studs were left hand and one was right. Sometime in the past someone hand installed the wrong part.

And a PM sent.
I had the same problem on my old juice brakes drums (before I switch over to M939-series front drums). The right front drum had one left-hand stud infiltrator.
 

Robo McDuff

In memorial Ron - 73M819
Steel Soldiers Supporter
2,892
1,519
113
Location
Czech Republic
Other thing, if its the last nut with the wheel on, the wheel will be at an angle also frustrating your efforts. Put a few nuts back, at least one opposite of the bad nut and two on each side of it, tighten them good and try again, both directions
 
Last edited:

Ajax MD

Well-known member
1,569
1,414
113
Location
Mayo, MD
Hey gents,

Thanks for all the wise responses.

First- I have not removed any lug nuts, only slightly loosened them. This will keep the wheel at the proper attitude while I work on the final nut.

Second- Are you @#$! kidding me??? "Infiltrator" huh? I will check that first thing when I get home this afternoon! The "L" or "R" is clearly visible on the end of these studs, so I should know right away. I did not think to look at all of them.

Lastly- Last night I ordered one of those new, geared lug wrenches. It generates about 3,300 ft.lbs. of torque, safely. I was fortunate enough to score free shipping to arrive TODAY. I thought it was made in the U.S. but maybe not. It does include a 1-1/2" impact socket.

https://www.amazon.com/Multiplier-A...cles+by+lUKSY+US-Direct&qid=1573217381&sr=8-1

Wes demo'd one of these (of a different manufacturer) in a Youtube video and declared it to be acceptable.
 
Top
AdBlock Detected

We get it, advertisements are annoying!

Sure, ad-blocking software does a great job at blocking ads, but it also blocks useful features of our website like our supporting vendors. Their ads help keep Steel Soldiers going. Please consider disabling your ad blockers for the site. Thanks!

I've Disabled AdBlock
No Thanks