• Steel Soldiers now has a few new forums, read more about it at: New Munitions Forums!

  • Microsoft MSN, Live, Hotmail, Outlook email users may not be receiving emails. We are working to resolve this issue. Please add support@steelsoldiers.com to your trusted contacts.

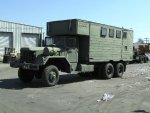
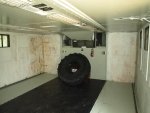
M820, What's the story?

980
24
18
Location
Dover, New Hampshire
Hey fellas, hope you are enjoying the summer.
I had a few quick questions about the M820 Expansible Van Truck.
I took a tour of a salvage yard in PA a while back and while I was there I became very curious about the M820.
I was told that the M820 is 'an aquired taste' and only a select few seem interested in them as they are. This yard had a few for sale but I was also told that most people request to have the bodys removed before they purchase it, why? I understand that the longer wheel base could be used for a wide variety of applications but in my opinion the M820 is just so darn cool it seems like a sin to butcher it.
Is the body problematic i.e. does it leak or have insulation issues? I see so many threads about camper conversions and this seems like the perfect platform. I would like to hear from M820 owners or just guys who have knowledge about them as to why they are not widely represented in the MV community. I was also wondering what one of these (in surplus condition)typically cost. My family and I have been kicking around the idea of starting a food truck and I thought an M820 would make an excellent mobile Diner.

Any thoughts, experiences or pics would be very helpful.
Thank you and god bless!

-GM
 

Attachments

maddawg308

Well-known member
Steel Soldiers Supporter
10,865
762
113
Location
Appomattox, VA
Most MV buyers of the bigger truck, believe it or not, are people who are going to use the trucks for work. It is much easier to use a 5-ton for work with a buyer-installed flatbed than a van body with a small door in back.
 
Last edited:
980
24
18
Location
Dover, New Hampshire
only real downside I could see for making it into a camper is everything would have to be bolted to the middle when open, unless you put the items on rollers.
I had considered that, I was thinking that if it was to be built into a camper / motorhome then it should be made 'non expansible' (remove the floor, roof, and wall plates so you have access to the side doors and windows). There is enough space in there already before the sides are extended to be a good sized camper.
 

Sirblissfull

New member
470
7
0
Location
New Mexico
Insulation is the old pink fiberglass and is normally destroyed.

The ply wood interior will almost certainly need to be ripped out and replaced.

The wiring is going to be 1960 or 1970 era. So its a good idea to replace that while your tearing the box apart.

The process to expand the box is really a 4 person job to get it done quickly and while your doing that the interior is open to the elements.

The box weighs 6 thousand pounds according to the TMs. A modern box that size will weigh maybe half that.

Even if you peer into every corner while the box is compact when you unfold it your going to get surprises.

The box is made from aluminum side panels riveted to a steel frame. With wooden window frames. Salt water causes a chemical reaction with the old style rivets that melts them. I have not seen a single M4 van body without half or more of the rivets replaced with screws and the window frames rotted or swollen from humidity so they bust the outer screens.

The cab over space had AC in it that was not plumbed very well and so the front corners of the box are going to be rusted through.

When the walls are not expanded the side doors and windows are not useable and as such there is only one way to get out of the box and that is the back door. So no one can travel in the back of the box until there is a second method of egress preferably three. As well as a form of communication that can be heard over the NHC 250.

Those are some of the issues I have seen that could cause someone to not like the M4 van body.

Of course I own 2 of them and really like the M809 series vehicles. So I also see a lot of pros to this list of cons. The frame for this box in configuration to travel is extremely strong compared to the fiberglass and laminate they make modern RV boxes out of and from a safety standpoint for an off road RV that is vital. With the floor and ceiling panels reinforcing the strength of the side walls you cant buy tougher any more. The floor is reinforced with the slide out supports that are very sturdy as well.

Its early for me and I am going to prepare for a thousand mile trip starting tomorrow in my M820A2 today.
2cents
 

michigandon

Well-known member
1,442
82
63
Location
Wake Forest, NC
Many (all?) newer RVs are now equipped with slide outs.

Would it be possible to hang kitchen cabinets, bunks, etc to the outer walls on these units, or do you guys think that the expansion mechanisms would have a tendency to bind if too much weight was placed on them?
 

Sirblissfull

New member
470
7
0
Location
New Mexico
I can assure you from personal experience with the jack stands in place you can put a thousand pounds or more on the fold out sections and it will be stable.

The floor section has cut outs along the diamond plate that work as tie down points for lighter equipment and 8 heavy load tie downs in the deck of the main floor. When compact the cut outs are right at 3 foot from floor level. Perfect for strapping small cargo or cabinets to. Leaving you access to the heavy tie downs for an ATV, or ohh say a big cam 3 NTC 350 with turbo and jakes. In case you wanted to haul something a little larger.

My box is full right now or I would snap some pics for you. Let me check the computer and see if I have close ups of the cargo tie downs.
 

Attachments

Last edited:

ZiggyO

Well-known member
Steel Soldiers Supporter
634
444
63
Location
Nebraska
Hello all,


The other issue that not many people take notice of is the asbestos lining the ducts for the shelter heating system....... Alot of the trucks have had a mod done to disable the heaters and seal the ducts in the expando shelter-- some shelters (like one of mine) never had the mod done----- Removing the asbestos can be done but its a time consuming process---- and, I would strongly suggest that proper protective gear be used when doing so. As a good alternative, tight knit fiberglass cloth can be put in place of the asbestos where duct lining is needed (when I refer to ducting, I mean the heat duct that exits under the heaters and comes down behind the forward panel to the four registers in the nose and the radiant heat channels in the floor-- it seems the mwo was to replace the four registers with blank plates and fill the ends of the radiant heat chanels at the base of the forward wall with an expanding foam sealant)........


Ziggy
 

Sirblissfull

New member
470
7
0
Location
New Mexico
Once the rivets pop they can leak.

I had a seam burst on the front top edge of the box. That was annoying but we do not get much rain here in New Mexico. The time I spend in Houston will tell me just how good a job was done on the repairs.
 

jmccaulley

New member
4
0
0
Location
Flinton, PA
Hey fellas, hope you are enjoying the summer.
I had a few quick questions about the M820 Expansible Van Truck.
I took a tour of a salvage yard in PA a while back and while I was there I became very curious about the M820.
I was told that the M820 is 'an aquired taste' and only a select few seem interested in them as they are. This yard had a few for sale but I was also told that most people request to have the bodys removed before they purchase it, why? I understand that the longer wheel base could be used for a wide variety of applications but in my opinion the M820 is just so darn cool it seems like a sin to butcher it.
Is the body problematic i.e. does it leak or have insulation issues? I see so many threads about camper conversions and this seems like the perfect platform. I would like to hear from M820 owners or just guys who have knowledge about them as to why they are not widely represented in the MV community. I was also wondering what one of these (in surplus condition)typically cost. My family and I have been kicking around the idea of starting a food truck and I thought an M820 would make an excellent mobile Diner.

Any thoughts, experiences or pics would be very helpful.
Thank you and god bless!

-GM

was wondering what salvage yard you went to and about what were they asking for them?
 

Kalbrman

New member
26
0
0
Location
Tacoma, WA
Expanding the M820 Expansible Van.

I'm doing this mostly from memory. I used M820 vans about 30 years ago.

1. Unhook the safety chains that are attached to the sides of the liftgate.

2. Lower the tailgate to the ground and remove ladders. The liftgate is controlled by two levers. One with a red plastic coated handle and controls the tilt of the liftgate. The liftgate is raised and lowered by attaching a handle to the bent levers under the back corners of the box. To lower the liftgate to the ground, engage the PTO. Tilt the liftgate to its horizontal position by pushing the straight lever with the coated handle towards the rear. The tailgate is lowered by attaching a handle to one of the bent levers and lifting up first to disengage the safety locks. Then lower the tailgate by shoving the lever down.

3. The M820 has four leveling jacks. The leveling jacks go under the corners of the box when expanded. The leveling jacks are not required, but they make the box much more stable. Because of what we used them for, our vans required them to be leveled before we could start working. Remove the 4 leveling jacks and base plates from their storage location behind the cover under the center of the back doorway.

4. You have to open the two back doors to access the cranks to extend the sides.

5. First unlatch the safety latches at the lower corners of the box. I believe that there are cotter pins holding them. At each corner of the box, there is a hinged rod (about 4 or 5 feet long) that is used to secure the box sides when expanded. Keep the rods safely out of the way until the box sides have been extended and cranked tight again.

6. The crank for the doors is supposed to be stored in a bracket fastened to the door (if missing, you can use a large wrench with socket and extender). Put the handle on the hex shaft and flip the lever to disengage the pawl so that the sides can be cranked out. Crank the sides completely out. Flip the hinged end panels out from inside at each corner. These need to be out of the way so that the floor and ceiling panels can be opened.

7. Duck under the opened side and reach up to the center of the box and unlatch the Floor/roof panels.

8. Pull the floor out and down until it rests on the rails that are supporting the extended sides (you might need to get inside the box and push the floor/ceiling panels out.) The roof panel is linked to the floor panel by cables and will flip up at the same time as the floor panel lowers.

9. Now flip the end panels hinged at the corners back in to enclose the box corners. Climb into the box. There is a metal guide that can be extended to help keep the corner panels aligned when closing the box sides.

10. There are 3 hooks (attached at the upper edge of the sidewalls) that should be extended (pointing toward the center of the box). Push up on the ceiling to extend the hooks. These will help guide the ceiling panels when the sides are cranked in.

11. Flip the ratchet pawl. Slowly crank the sides all the way in, paying careful attention to the corner panels.

12. Climb inside the box and fasten the roof latches to the hooks at the upper edge of the sidewalls. There are 3 of them on each side.

13. When the sides have been cranked in and the roof latches fastened, you should lower the hinged rods on the outside corners of the box and use them to tighten the corners down with the safety latches that you first unfastened in the beginning.

14. Install the leveling jacks (if desired) by attaching the baseplate and attaching the top of the jack to a mating flange under the box corners and twisting it to lock it in place.

15. As these vans are prone to leaking, it is best to have a tarp that covers the entire top of the van to keep out the rain. Tie down the tarp to keep it from blowing away in the wind.

When closing up the van for moving, reverse these steps. To stow the liftgate, raise it and tilt it up vertical. Try to lower it again to ensure that the safety locks have engaged. Disengage the PTO. Attach the safety chains to the edges. Stow the lift handles. Attach the ladders to the liftgate and secure (if not stored inside the box). Ensure they are kept from moving around by using ropes and/or bungees. I think they have some screws and washers that help to fasten them down.

The liftgate can be used as a raised platform if some kind of bracing is used under it and a safety chain put around the sides. There should be some holes around the sides of the liftgate for posts linked together by chains. The ladders can then be attached to the sides of the liftgate. Alternately, the ladders can be attached to the side doors.
 
Last edited:

Kalbrman

New member
26
0
0
Location
Tacoma, WA
M820 Liftgate and equipment

I was a calibrator in the Army and drove M820A2s. If I remember correctly, the liftgate has a safety latch to prevent it from lowering while driving down the road. You need power to be able to lift the gate up several inches to disengage the safety mechanism and then you can lower the liftgate down to ground level.

The back doors have an overlapping lip on them. You just need to lock one of the doors with a padlock to secure both back doors.

I have some pics of what the vans look like when they have the equipment racks in them. I'll figure out how to post them later. There are two rows of benches/racks that are mounted in the middle of the floor. The racks are mounted back to back and there is only a small gap between them to be able to reach up from the bottom and attach cabling. The benchtops have extensions that are mounted on short support bars. They mount between each leg opening, and over the lower drawers. The benchtops are mounted on pedestals that contain drawers. The pedestals are spaced apart to make room for sitting down, and there is space between the two sides large enough for a person to crawl from the back to the front of the vehicle. We called it the tunnel and would use it as storage space unless we needed to get under there to make cable changes. The pedestals were mounted to the floor using L-brackets and rivets. The racks were mounted to the benchtops using shock mounts. At the front of the vehicle box, between the racks and the front wall of the box, there was a desk on one side that was used for doing paperwork, and records storage. I think the other side had a filing cabinet or two.

On a calibration team, we would sometimes have as many as four of these expansible vans parked side by side with the side doors removed. We had long strips of plywood covering the gaps between the vehicles to keep out the weather. Tarps would be placed across the tops of the vehicles to make it waterproof. Some vans would have racks mounted in them and some would be used for 'production control' where we would accept and store equipment waiting to be worked on, or waiting repair parts.

We got the newer style equipment racks in the early '80s. Before that, we had an 'A'-frame in the van that was used for supporting stacked 'tubs' that had covers. The tubs were square and could usually hold a few pieces of equipment. The old tubs stacked three high and were closed on the back, so all cables had to come out though the front from around the sides of the internal racks. When closed up with their covers, the tubs resembled large rounded cubes with handles and latched covers. They were either a light green or gray color.

The driver's seat was spring mounted and 'floated'. It was quite a ride when going over uneven ground or railroad tracks. I think you could actually hit your head on the cab roof if you got a good bounce. Having a seat belt attached to the floor would not be a good idea.

Check here for pictures: http://www.steelsoldiers.com/showth...eck-her-out!&p=1144264&viewfull=1#post1144264
 
Last edited:

Kalbrman

New member
26
0
0
Location
Tacoma, WA
These M820 Expansible Vans are quite a bit heavier than a civilian version, but that is because they were meant as a tactical vehicle to be driven in very extreme conditions.

I'm not sure I would attempt a conversion to make one or both sides slide out. It would take extensive modification to make that work, but it might end up being easier to open in the field.

I would recommend exercising the mechanical components a few times a year by expanding and closing it back up. Keep the cables, hinges and cantilever mechanism well lubricated.

Trying to mount anything on the moveable floor or ceiling panels is not a good idea if you intend to open that side. The mechanicals are not designed to take any additional load, and would very likely result in damage to the cabling.

These trucks have a lot of torque and can go just about anywhere. Try to park it on a level are before expanding.

With the many years that the van has been in use, it's a good idea to remove and replace the insulation with something newer, lighter and more efficient.

We drove them around with several tons of racks and electronic/mechanical equipment inside of them. It's unlikely that you would have that much weight in yours.

It's possible for one person to open and close the van, but it goes much faster if you have 4 people. When regularly exercised, the side walls can often be pushed closed or pulled open by hand without having to use the crank mechanism. Because they were prone to leaking around the roof seals, we always put a large tarp over our vans to keep out any water.
 
Last edited:

cotton

New member
6
2
3
Location
TN
Can anyone tell me what size 3 phase generator is required to run the hvac and other systems for the m820 expansible van? I have an m820, and now just need a generator.
 
Top
AdBlock Detected

We get it, advertisements are annoying!

Sure, ad-blocking software does a great job at blocking ads, but it also blocks useful features of our website like our supporting vendors. Their ads help keep Steel Soldiers going. Please consider disabling your ad blockers for the site. Thanks!

I've Disabled AdBlock
No Thanks