• Steel Soldiers now has a few new forums, read more about it at: New Munitions Forums!

  • Microsoft MSN, Live, Hotmail, Outlook email users may not be receiving emails. We are working to resolve this issue. Please add support@steelsoldiers.com to your trusted contacts.

M932A2 and Mk-48 Cab conversion

silverstate55

Unemployable
2,075
872
113
Location
UT
WOW your truck is really coming together nicely! Good job! [thumbzup]

I'm also interested in your experiences with that manual winch...I'm looking to add one to my M920 spare tire mount, dragging around a chain hoist is a bit of a pain.
 

agazza2

Active member
483
31
28
Location
Ahwatukee, AZ
WOW your truck is really coming together nicely! Good job! [thumbzup]

I'm also interested in your experiences with that manual winch...I'm looking to add one to my M920 spare tire mount, dragging around a chain hoist is a bit of a pain.
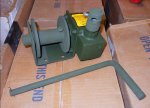
I should be welding up the bracket for the hand crank winch this week, and then I will let you know how it does. It tales 15 turns of the handle for one crank on the spool. So it should be fairly easy to lift and lower the tire.
 

agazza2

Active member
483
31
28
Location
Ahwatukee, AZ
Work complete 11/14/2015

For things done over the last dew weeks. Steps are mounted between the fender and the storage box. But I only have the photos prior to the finished product after this weekends work. Also dropped off the front brush guard to have the top aluminum piece bent and the grill stamped out.

I received the steering shafts back for the drive line place. I had them weld the M1070 Jack shaft to the tube once I shortened it to the correct length. Also had the original shaft lengthened by 8.5". The original shaft connects from front of the cab back to the M1070 jack shaft. Also had to order another end yoke Spicer/Dana part #10-4-183 to connect to the parallel shaft box. I will take a photo of this once I mount the cable brackets to get a clear photo of the new steering setup. Made some small brackets at the end of the fenders to blend in with the steps, and also cap off the end of the open tube on the fenders. Here are a few photos, will get updated photos later this week.
 

Attachments

agazza2

Active member
483
31
28
Location
Ahwatukee, AZ
11/21/2015 progress

Some progress today finishing the steps behind the fenders today, and mounting the hand crank winch on the tire davit. Still need to buy some cable for the winch. The truck will also have slave ports on both sides. I also added D- rings to the top of the dog house today. The d-rings will be used for lifting off the dog-house if the engine ever needs to be removed.

Also received the end yoke in the mail for the steering. So now I have everything i need to connect the steering. Need to just tighten bolt everything in place now. Next weekend my plans are to get the steering completed, top doghouse welded down, build bracket for the air throttle on the engine, and mount up the front brush guard again if it is finished by the fabrication shop. Also I will have the accessory boxes that I am picking up from Nellis this week to start mounting behind the doghouse. Picking up a pallet of thick metal to make the front tow brackets. A few photos are attached this week. I want to be able to finish all the metal work by the end of December, and January dedicate 3 weekend to paint, add stencils, and get it ready for the Arizona Military vehicle show.
 

Attachments

agazza2

Active member
483
31
28
Location
Ahwatukee, AZ
Received my upper section back from the metal fabricator. They bent the top section to the front brush guard. Maybe this week they will complete the grill. Bolted this the brush guard together after cutting out the headlight holes and painting the backside of it. Also set one of the new accessory storage boxes I bought last week on to the back where it will be placed. I still need to make the lower brackets for this box. Welded up the top of the doghouse, and applied seam sealer so I will not have any leaks. Still a few things I need to figure out/build.

Need a bracket for the air throttle on the motor, and I am thinking about using one of the Thompson Electric Linear actuators I am selling to use for engaging the transfer case. It appears that this would work excellent, but need to figure out what I need to stop it once the transfer case rod is in the full engaged/dis-engaged position. May need to visit a local rep. I also need to find someone that installed cable on to the same type of hand winch I have. It has one small bolt on the spool, and not sure how this should connect to the cable. Most cable winches have three holes the cable goes through to lock down the cable. Any ideas? A few updated photos. I will need to re-take the front photo when the sun is not so bright and directly facing me.
 

Attachments

Last edited:

Swamp Donkey

The Engineer
Steel Soldiers Supporter
1,450
119
63
Location
Gray, GA
The cable for the winch probably had a crimped eye on the end that the bolt would pass through. I had noticed the same thing in the pictures from that seller, along with some from another seller. That's one of the reasons I wanted to see how it worked out for you, so i could see how you did the cable. Lowe's or HD should have some of those crimped eyes.
 

agazza2

Active member
483
31
28
Location
Ahwatukee, AZ
The cable for the winch probably had a crimped eye on the end that the bolt would pass through. I had noticed the same thing in the pictures from that seller, along with some from another seller. That's one of the reasons I wanted to see how it worked out for you, so i could see how you did the cable. Lowe's or HD should have some of those crimped eyes.
I just located the same winch on Thern's website, model 462. It shows installing the cable beneath the bolt and next to the side of the spool. When the bolt is tightened it compresses it down and to the side of the spool. It also shows it should have 1000 lbs with one layer of cable, and 500 lbs with a full drum. The winch can be filled with 90 weight lubricant or grease. There is a user manual online. Hope this helps. I will buy a cable tomorrow and try it out this week.
 

agazza2

Active member
483
31
28
Location
Ahwatukee, AZ
Hand crank winch- cable installed and tire lowered

Installed the cable on the hand winch today. Bought the 50' cable and 3' axle strap from Amazon. Lowers the tire to the ground with 90 turns of the winch handle. Worked excellent. Also worked on the support for the rim to rest on. Still need to make a bracket to secure the tire. A few photos of lowering the spare tire with this winch.
 

Attachments

agazza2

Active member
483
31
28
Location
Ahwatukee, AZ
12-20 work completed

Even though I worked on it most of the weekend, it seems like there was not as much progress as I thought I would get done. Made brackets for the accessory tool box in the back, and bolted the one up the one on the side. Worked on many miscellaneous items. Only 5 weeks left till the 25 annual Arizona Military Vehicle show and I would like to have the truck painted and ready to drive.
 

Attachments

marchplumber

Well-known member
Steel Soldiers Supporter
3,785
2,791
113
Location
Peoria, Illinois
Even though I worked on it most of the weekend, it seems like there was not as much progress as I thought I would get done. Made brackets for the accessory tool box in the back, and bolted the one up the one on the side. Worked on many miscellaneous items. Only 5 weeks left till the 25 annual Arizona Military Vehicle show and I would like to have the truck painted and ready to drive.
It's amazing how much time and effort "little things" eat up!! I notice that at work and on projects at home. I guess if one didn't care how it looked or functioned, that'd be different. Obviously, you care, soooo.............................. Good luck gettin the girl ready for the "Ball"....
are the little wheels in the first pic steerage?!??!? ROFLMAO!!
 

agazza2

Active member
483
31
28
Location
Ahwatukee, AZ
Very well put Marchplumber (Tony). The little wheels are my training wheels for the new girl :) Actually those are for my small trailer that I use as a workbench, and storage of extra metal while I work on the project. I keep making a "To Do list" and always end up adding more little things to do. For example, many of the little things include capping off all open square tube, adding the rubber fender extensions around the fenders, build tool boxes in front of the front wheels so the fender well opening is the same distance on all sides of the tire.......and the list only gets bigger the longer I think.

I have been thinking about what to do with the area behind the engine doghouse where the old cab came off, and think I will build a platform deck the same as the M983 for now. In time I do have other plans and modules planned for this space. Thanks to Soni and Patracy and their use of Modules :) It would be nice to build this as multi-purpose truck.
 

agazza2

Active member
483
31
28
Location
Ahwatukee, AZ
the MSFETT starts, moves and steers :)

Made a little progress over the weekend. The biggest thing was being able to start it up, move it forward and back and steer it. After two minutes of running the trans cooler line had a pin hole leak. I was able to make it before closing to the hydraulic hose store and have a new one made. Air throttle works perfectly once the air pressure builds up. At least the list of to-do is getting shorter. Will post photos in a few days of the air throttle setup, and the radiator shroud modifications.

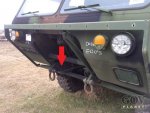
Still need to either make, or buy the front tow hooks. See attached photo from a HEMMT.
 

Attachments

patracy

Administrator
Staff member
Administrator
14,635
4,793
113
Location
Buchanan, GA
Just being able to move it forwards and backwards and it steer in the right direction was a great relief during my build. :mrgreen:
 

agazza2

Active member
483
31
28
Location
Ahwatukee, AZ
Was able to get some paint work done this weekend, as the next week it is supposed to rain all week. It was a very enjoyable 73 degrees outside which made it nice painting weather. Still need to work on the back part of the vehicle to get it ready for paint. Starting to prioritize my list of what needs to be done to get it road worthy, and items that can be done after the car show. Sure starts to look like a complete truck with the matching paint.

Also one photo of the air throttle that was installed a couple weeks ago. Need to order a few more gallons of Rapco green so I will have enough paint to finish the back, and the floor boards of the passenger compartment. The Rubber Fenderette fender extensions should be arriving this week. I think I may have to order a Nut riveter to make installing and removing the extensions easy. (good thing for Amazon and their same day shipping) :)
 

Attachments

Top