nf6x
Feral Engineer
- 1,630
- 50
- 48
- Location
- Riverside, CA, USA
Please forgive me, but I feel the need to rant for a moment.
I'm installing a keyed battery disconnect switch in my M923, and I think that an ideal place for it is in the left wall of the battery box (which is also the passenger seat). It'll be reachable form the driver's seat, out of easy sight, and by putting a new hole in the floor under the switch and re-routing the existing ground cables through that hole, I should be able to leave the original cables intact and just add a short cable from the switch to the battery negative terminals. I'd probably leave the negative slave cable in place. I have all of the parts on hand now... heavy duty switch, three new MS35489-110 grommets, a hole plug to stuff in the one that I remove the ground cables from, lugs, terminal boots, and a brief surge of gumption. The batteries are disconnected, I have my safety goggles on, and I'm ready to go!
So, next step is to remove the battery box lid so I can get access to the area where the switch is going, which is right under the lid's hinge. That big lid/seat is in the way and needs to come out.

So, why the ******* **** didn't they use captive nuts for the half dozen small screws holding it on the ******* battery box? I already unbolted the driver's seat and slid it out of the way to get more hand room around that area, but taking the cover off is still a job for two midgets with tentacles for arms! **** ****** ******* **** ******!

Thanks for listening! I feel a little bit better now. Maybe I should just cut the dang screws off, then build a captive nut plate to affix in the battery box when I reinstall the cover.
Is there something silly and easy that I'm missing?
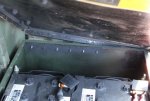
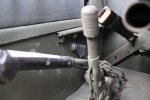
I'm attaching a picture showing the nuts holding the cover hinge on. The screws are phillips head machine screws.
I don't think that I want to install a battery relocation kit.
I'm installing a keyed battery disconnect switch in my M923, and I think that an ideal place for it is in the left wall of the battery box (which is also the passenger seat). It'll be reachable form the driver's seat, out of easy sight, and by putting a new hole in the floor under the switch and re-routing the existing ground cables through that hole, I should be able to leave the original cables intact and just add a short cable from the switch to the battery negative terminals. I'd probably leave the negative slave cable in place. I have all of the parts on hand now... heavy duty switch, three new MS35489-110 grommets, a hole plug to stuff in the one that I remove the ground cables from, lugs, terminal boots, and a brief surge of gumption. The batteries are disconnected, I have my safety goggles on, and I'm ready to go!
So, next step is to remove the battery box lid so I can get access to the area where the switch is going, which is right under the lid's hinge. That big lid/seat is in the way and needs to come out.

So, why the ******* **** didn't they use captive nuts for the half dozen small screws holding it on the ******* battery box? I already unbolted the driver's seat and slid it out of the way to get more hand room around that area, but taking the cover off is still a job for two midgets with tentacles for arms! **** ****** ******* **** ******!
Thanks for listening! I feel a little bit better now. Maybe I should just cut the dang screws off, then build a captive nut plate to affix in the battery box when I reinstall the cover.
Is there something silly and easy that I'm missing?
I'm attaching a picture showing the nuts holding the cover hinge on. The screws are phillips head machine screws.
I don't think that I want to install a battery relocation kit.
Attachments
-
55.6 KB Views: 123


