• Steel Soldiers now has a few new forums, read more about it at: New Munitions Forums!

  • Microsoft MSN, Live, Hotmail, Outlook email users may not be receiving emails. We are working to resolve this issue. Please add support@steelsoldiers.com to your trusted contacts.

My 1952 M135 Build

LMRmopar

Active member
Steel Soldiers Supporter
26
118
28
Location
Alberta, Canada
locker.JPG
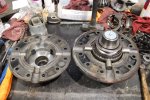
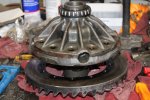
Now begins the fun process of it all, I have taken lots of photos for those curious as there isn't exactly a whole lot of information on the H110..

The Eaton/GM H110 was a 12.25" Axle used from the 1940s-1980s, from deuces to one tons. (Last known use was 1986 Chevrolet C30). They're all open diffs as far as I know.

Parts are getting harder to track down but thankfully the bearings are still being produced in limited numbers, they are expensive however...
Pinion Seal: 25970 (SKF Number)
Outer Pinion Bearing P/N: 5310WA (SKF Number)
Inner Pinion Bearing P/N: MU-1306-TDM (BCA Bearings)
Differential Side Bearings P/N: KA11820-Z (SKF number)
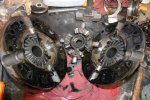
Locker Assembly: 250S27 (Detroit No-Spin)

As for gaskets I am sure I could have tracked down them all however I much prefer to use High performance Engine Sealant as we have an abundance of it at the shop LoL.

The service procedure can be found in the technical manuals and does go in depth with a lot of it, however it should be noted that this differential shares nothing with todays differential configurations.

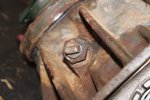
The pinion has no shims and no crush sleeve, seeming as both pinion bearings are ball/cylindrical roller bearings, the need for a crush sleeve is moot. The pinion nut is torqued between 160-280 Ft-Lbs.

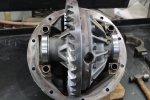
This Diff has what is called a Thrust Block and keeps the ring gear from flexing too much when under severe load (This must be removed before attempting to remove the ring gear/diff carrier from the axle)

differential.JPGdiff removal.JPGdiff removal 1.JPGthrust pad.JPGdiff removal 2.JPG
 

LMRmopar

Active member
Steel Soldiers Supporter
26
118
28
Location
Alberta, Canada
After removing the differential, make sure you mark everything before you take it apart. (if you do not mark the differential case there is manufactured mark engraved on the case so it cannot be missed) there is no mark on the ring gear however.

During the removal of my differential it is clear that the truck sitting up north for 7 years has let some condensation rust spots on the diff, no cause for concern on anything so far though. Differential is not cracked, no gears were chipped, all the bearings are worn out, business as usual rofl

Removal of all the bearings are to be done with a press supposedly, however if you have a bench vise and a hammer with a bearing separator clamp then you'll be fine, or cut them off which also works.

Replaced the Pinion bearings, installed the pinion seal and re installed the pinion assembly back into the axle. re installed pinion seal housing and hand torqued the pinion nut to 200 ft lbs, aligned the cotter pin hole with the castle nut and away she went.

Pinion Flange Removal.JPGPinion Housing.JPGPinion Removal.JPGPinion Removal 2.JPGPinion Removal 3.JPGPinion Removal 4.JPGPinion Seal Install.JPGPinion Nut Torque.JPG
 

LMRmopar

Active member
Steel Soldiers Supporter
26
118
28
Location
Alberta, Canada
In the final stretch, split the differential case after removed the ring gear bolts, removed the spider gears and thrust washers and stored them away in a box incase of breakage, always good to keep spare parts on hand for these trucks.

Removed the Differential side bearings and installed new ones. Put the Differential case and ring gear back together with the new locker installed and hand torqued the Ring gear bolts. Re installed the differential into the carrier housing and set the side bearing adjustment so the backlash is set to 0.006" after measuring with a dial indicator, (Spec is 0.005"-0.008"). Hand Torqued bearing cap bolts and verified backlash again to make sure.

After installing the side bearing adjuster locks it was time to install the thrust pad. Installation of the thrust pad is easy, screw in the thrust pad all the way until it makes contact and then back it off 1/12th a turn from the ring gear, then, tighten the jam nut. Spun the ring gear and verified the Thrust pad does not drag.

After reinstalling the Differential assembly into the axle housing, I re installed the driveshaft and the axle shafts, filled the diff with 80w90 and took it for a quick drive to check engagement of the locker and make sure everything was correct.

It wasn't hard to verify the locker was working as the truck sits on 395s that are still aired to 55 psi, and it's also the dead of winter with the ambient temperature being -19C (-2 Fahrenheit) and quite a lot of snow on the ground currently. Taking off from icy/snow intersections was much better even just having only one locker installed, I cannot wait to install another locker on the center axle.

I will be uploading a video this weekend of the M135 playing in the snow and possibly drifting so stay tuned for that :driver:
 

Attachments

DUUANE

Active member
Steel Soldiers Supporter
467
230
43
Location
Qualicum Beach BC
The next few posts will detail my repair on the Eaton/GM H110 Axle rebuild and the installation of a Detroit No-Spin Locker
Great thread.
Back in the concrete days, I would get jammed up woking 6 or 7 days a week so i wasnt able to get out to the bush. Eventually frustration would take over and after work I'd jump in the M37 and go crash through the roughage in the back yard/neighbours yard lol. Eventually i was looking for some new short term joy.
Well..At the time in south surrey there was a whole bunch of industrial new construction happening around where the shop was so i got to eyeing up the 4 storey high mountains of pre load. I saw the kids on their dirt bikes and quads ..and ...well.. I'm a big kid, so here i go in the 37.. 2nd gear low range and up i go. You should've seen the looks on their faces as i crested the top. Best entrance ever. Then i went down over the opposite edge. 4:1 grade in sand. Good thing i was able to keep it going straight 😬🤣
 

rustystud

Well-known member
9,336
3,179
113
Location
Woodinville, Washington
In the final stretch, split the differential case after removed the ring gear bolts, removed the spider gears and thrust washers and stored them away in a box incase of breakage, always good to keep spare parts on hand for these trucks.

Removed the Differential side bearings and installed new ones. Put the Differential case and ring gear back together with the new locker installed and hand torqued the Ring gear bolts. Re installed the differential into the carrier housing and set the side bearing adjustment so the backlash is set to 0.006" after measuring with a dial indicator, (Spec is 0.005"-0.008"). Hand Torqued bearing cap bolts and verified backlash again to make sure.

After installing the side bearing adjuster locks it was time to install the thrust pad. Installation of the thrust pad is easy, screw in the thrust pad all the way until it makes contact and then back it off 1/12th a turn from the ring gear, then, tighten the jam nut. Spun the ring gear and verified the Thrust pad does not drag.

After reinstalling the Differential assembly into the axle housing, I re installed the driveshaft and the axle shafts, filled the diff with 80w90 and took it for a quick drive to check engagement of the locker and make sure everything was correct.

It wasn't hard to verify the locker was working as the truck sits on 395s that are still aired to 55 psi, and it's also the dead of winter with the ambient temperature being -19C (-2 Fahrenheit) and quite a lot of snow on the ground currently. Taking off from icy/snow intersections was much better even just having only one locker installed, I cannot wait to install another locker on the center axle.

I will be uploading a video this weekend of the M135 playing in the snow and possibly drifting so stay tuned for that :driver:
Your giving me nightmares !
At "Ben's Truck Parts" in downtown Seattle, I was required to rebuild four of these smaller differentials a day.
It got to the point I couldn't stand looking at them. Thankfully there were other transmissions and differentials to rebuild.
Did you happen to find anyone who has the "double lip seals" used in these units ? They were becoming rare even back in the 1980's
 

LMRmopar

Active member
Steel Soldiers Supporter
26
118
28
Location
Alberta, Canada
Great thread.
Back in the concrete days, I would get jammed up woking 6 or 7 days a week so i wasnt able to get out to the bush. Eventually frustration would take over and after work I'd jump in the M37 and go crash through the roughage in the back yard/neighbours yard lol. Eventually i was looking for some new short term joy.
Well..At the time in south surrey there was a whole bunch of industrial new construction happening around where the shop was so i got to eyeing up the 4 storey high mountains of pre load. I saw the kids on their dirt bikes and quads ..and ...well.. I'm a big kid, so here i go in the 37.. 2nd gear low range and up i go. You should've seen the looks on their faces as i crested the top. Best entrance ever. Then i went down over the opposite edge. 4:1 grade in sand. Good thing i was able to keep it going straight 😬🤣
Definitely love seeing the public reaction to scenarios like that and as you would imagine they love to see these trucks actually get used as well lol
 

LMRmopar

Active member
Steel Soldiers Supporter
26
118
28
Location
Alberta, Canada
Your giving me nightmares !
At "Ben's Truck Parts" in downtown Seattle, I was required to rebuild four of these smaller differentials a day.
It got to the point I couldn't stand looking at them. Thankfully there were other transmissions and differentials to rebuild.
Did you happen to find anyone who has the "double lip seals" used in these units ? They were becoming rare even back in the 1980's
I completely understand that, i'm a GM tech at a dealer and I can't stand certain repairs under warranty anymore :ROFLMAO:

For the double lip seals are you referencing the pinion seal by chance? Because if that's the case i've been putting two seals in the housing and none of them have been leaking, the one hasn't leaked since I put them in 3 years ago now.
 

rustystud

Well-known member
9,336
3,179
113
Location
Woodinville, Washington
I completely understand that, i'm a GM tech at a dealer and I can't stand certain repairs under warranty anymore :ROFLMAO:

For the double lip seals are you referencing the pinion seal by chance? Because if that's the case i've been putting two seals in the housing and none of them have been leaking, the one hasn't leaked since I put them in 3 years ago now.
Yep the Pinion gear seal. The original military one was a special low profile double lip seal. They were really a cool design. Sadly I haven't seen any since the late 1980's. I know you can "flip" a seal, but it isn't the same as having that factory double lip seal. It really kept the crud and water out of the differential.
 

LMRmopar

Active member
Steel Soldiers Supporter
26
118
28
Location
Alberta, Canada
Yep the Pinion gear seal. The original military one was a special low profile double lip seal. They were really a cool design. Sadly I haven't seen any since the late 1980's. I know you can "flip" a seal, but it isn't the same as having that factory double lip seal. It really kept the crud and water out of the differential.
Every seal I have removed so far for the pinion seals have been a modern'ish replacement already, I have yet to see one of those but I have not done the front differential yet, if any of them would have original seals it'd be that one because even the inner axle seals were original. Would be cool to track down the original seal.
 

DUUANE

Active member
Steel Soldiers Supporter
467
230
43
Location
Qualicum Beach BC
Every seal I have removed so far for the pinion seals have been a modern'ish replacement already, I have yet to see one of those but I have not done the front differential yet, if any of them would have original seals it'd be that one because even the inner axle seals were original. Would be cool to track down the original seal.
We will be spending just under 100k buying new SKF intensifiers. If we can get the origonal design number and specs i can get our rep to put me in touch with someone higher up in the seal dept. Maybe get our own number and a custom seal. Its worth a try.
 

rustystud

Well-known member
9,336
3,179
113
Location
Woodinville, Washington
Looks like 2279461 and SKF 25970 are alternates for the quoted 7413229. Both include the aux dirt lip. Rock Auto has the SKF for $16.09 CAD.
That's great news !
Also I found an air diagram for a 40ft bus I'll post for you. I was cleaning out an old cabinet that had a few of my old manuals. One had an air diagram for the 40ft Gillig bus. That should show you what a normal medium size vehicle air system looks like.
img038.jpgimg037.jpg
Sorry about the pictures. I had to split the diagram as it was a 11" X 17" size.
 

DUUANE

Active member
Steel Soldiers Supporter
467
230
43
Location
Qualicum Beach BC
I had a look at the diagrams. Thanks for posting those up. Most of the extras are involved with making the abs system work. I wont be adding that as there is no way to conrol each wheel individually. I want to keep things as simple as possible with the best redundancy thats reasonable.
 

rustystud

Well-known member
9,336
3,179
113
Location
Woodinville, Washington
I had a look at the diagrams. Thanks for posting those up. Most of the extras are involved with making the abs system work. I wont be adding that as there is no way to conrol each wheel individually. I want to keep things as simple as possible with the best redundancy thats reasonable.
This diagram was from the 1980's, so nothing really new here. I threw out the modern diagrams from "New Flyer" sorry. Maybe I might find another cache somewhere else.
 
Top
AdBlock Detected

We get it, advertisements are annoying!

Sure, ad-blocking software does a great job at blocking ads, but it also blocks useful features of our website like our supporting vendors. Their ads help keep Steel Soldiers going. Please consider disabling your ad blockers for the site. Thanks!

I've Disabled AdBlock
No Thanks